Making coat hooks

I don't like commercial coat hooks so much. It always seems like they are about to break.
They are often so spiny that it feels like they might poke through whatever gets
hung from them. So for these coat hooks by my back door,
I went for a very rounded shape with no points.

 Making the round pegs for the coat hooks is best done on the lathe.
Before using the lathe, I had to prepare the stock.
I used some red oak that I cut to about 3.5 x 3.5 cm.
I drilled some holes in either end for the centers of the lathe and cut a slight V-slot
in one end so that the prongs of the driving end would better grip the wood.
Making the round pegs for the coat hooks is best done on the lathe.
Before using the lathe, I had to prepare the stock.
I used some red oak that I cut to about 3.5 x 3.5 cm.
I drilled some holes in either end for the centers of the lathe and cut a slight V-slot
in one end so that the prongs of the driving end would better grip the wood.
I beveled off the corners on my jointer so that I wouldn't have to remove as
much material to get it round.
On modern lathes, the tail stock (that is, the spindle not driven by the motor) has a live center
that is passively turned by the wood. On ancient
lathes like mine, the wood itself has to
turn on a fixed tailstock cone.
 It helps to put a drop of oil on the wood to cut down on friction. The part nearest the
tailstock gets cut away later anyway, so I don't worry about the oil soaking into the wood.
It helps to put a drop of oil on the wood to cut down on friction. The part nearest the
tailstock gets cut away later anyway, so I don't worry about the oil soaking into the wood.
 Next I marked where the knobs and stems would start and end on the wood. I actually
turned a prototype knob in spruce first to get a sense of the shape (you can see it
lying behind the tool rest in the photo). I used that pattern to mark my work piece.
First I marked some dark pencil lines on the work piece. Next I cut deep notches
where the lines were with the parting tool. The pencil marks were still faintly visible
when the stock was spinning so knowing where to cut was easy.
Next I marked where the knobs and stems would start and end on the wood. I actually
turned a prototype knob in spruce first to get a sense of the shape (you can see it
lying behind the tool rest in the photo). I used that pattern to mark my work piece.
First I marked some dark pencil lines on the work piece. Next I cut deep notches
where the lines were with the parting tool. The pencil marks were still faintly visible
when the stock was spinning so knowing where to cut was easy.
 The way I made the pegs was to turn two of them on a piece of stock back to back.
The tricky part is that is that I ended up with a longer work piece. The longer
and thinner the workpiece, the more it flexes while turning.
So I avoided cutting too deep until most of the shape was roughed out.
The way I made the pegs was to turn two of them on a piece of stock back to back.
The tricky part is that is that I ended up with a longer work piece. The longer
and thinner the workpiece, the more it flexes while turning.
So I avoided cutting too deep until most of the shape was roughed out.
 I brought the dowel stem part to its final thickness of 5/8" (20 mm) only after I was
happy with the shape of my knobs and stems.
I brought the dowel stem part to its final thickness of 5/8" (20 mm) only after I was
happy with the shape of my knobs and stems.
I took all these photos with the stock spinning. This makes the wood look smooth.
But in reality, the surface is quite rough from turning. Red oak is probably one of the worst
woods in terms of producing a nice surface from turning.
With the lathe stopped I was thinking "this will never get smooth".
Fortunately, sanding on the lathe is easy, it's just a matter of holding a
piece of sandpaper to the spinning stock. I should have taken a photo of that, but
forgot. The thing to do is to move the tool rest away from the stock. Then you can just press
the sandpaper against the spinning stock with your hands. Keep moving it back and forth
or the paper will get totally clogged up with dust. It also helps to switch the direction of rotation
of the lathe from time to time while sanding, especially when switching to a finer grit.
I took the connections for reversing the motor direction out to a 4-way switch next to the motor.
You can see that switch in this photo.
 Turning, and especially sanding, makes for a lot of dust. If I used my lathe
often enough, I'd probably rig up some sort of funnel behind my work piece to hook
up to the dust collector.
As it is, I just used a spring clamp to attach the hose near
where I was turning. My big dust extractor pulls in enough air that I could
see the stream of fine dust heading straight for the hose while sanding. The heavier
chips from turning just fell down on the lathe bed though.
Turning, and especially sanding, makes for a lot of dust. If I used my lathe
often enough, I'd probably rig up some sort of funnel behind my work piece to hook
up to the dust collector.
As it is, I just used a spring clamp to attach the hose near
where I was turning. My big dust extractor pulls in enough air that I could
see the stream of fine dust heading straight for the hose while sanding. The heavier
chips from turning just fell down on the lathe bed though.
 Before taking the stock off the lathe, I turned the ends of the knobs to be
quite narrow (less than 1 cm in diameter). I then cut off the waste on my
table saw. Last I cut the stem between the two pegs down the middle.
Before taking the stock off the lathe, I turned the ends of the knobs to be
quite narrow (less than 1 cm in diameter). I then cut off the waste on my
table saw. Last I cut the stem between the two pegs down the middle.
 Here is one of the knobs after turning. It still had a slight flat spot on the end from
where it was cut off, though with this camera angle it's not visible.
Here is one of the knobs after turning. It still had a slight flat spot on the end from
where it was cut off, though with this camera angle it's not visible.
 A logical thing to do would be to put the stem side of the knob in a lathe
chuck of sorts. But my lathe doesn't have a suitable chuck.
Fortunately my drill press opens up to 5/8" (20 mm), and so I could just spin the
peg in my drill press while sanding the end smooth.
A logical thing to do would be to put the stem side of the knob in a lathe
chuck of sorts. But my lathe doesn't have a suitable chuck.
Fortunately my drill press opens up to 5/8" (20 mm), and so I could just spin the
peg in my drill press while sanding the end smooth.
The amount of sanding that the end needed was so minimal that just sanding
it by hand without spinning would have worked almost just as well.
 Next I cut out a suitable board for the base of my coat hooks. I wanted
to round the corners. A can of WD-40 was just the right size
to mark the radius that I wanted to cut away.
Next I cut out a suitable board for the base of my coat hooks. I wanted
to round the corners. A can of WD-40 was just the right size
to mark the radius that I wanted to cut away.
 After cutting away the corners on my band saw, I smoothed the cuts on my belt
sander by slowly turning the board through 90 degrees while sanding the edge.
After cutting away the corners on my band saw, I smoothed the cuts on my belt
sander by slowly turning the board through 90 degrees while sanding the edge.
 I then rounded the front edges of the board with a 1/2" radius router bit on my router
table.
I then rounded the front edges of the board with a 1/2" radius router bit on my router
table.
 To work out where to put the pegs, I held a peg near the end of the board and moved
it back and forth until I found the spot that I found most aesthetically pleasing.
I then marked that spot, and another the same distance from the other end.
To space the four pegs evenly I need three equal intervals between them.
This is something that is easier to do with a metric tape measure (with its decimal scale)
and a calculator. Except I noticed that the
distance between the outside pegs just happened to be exactly 24 inches
on the inches side of my tape measure.
That divides neatly into 3 x 8, so I used the inch scale.
To work out where to put the pegs, I held a peg near the end of the board and moved
it back and forth until I found the spot that I found most aesthetically pleasing.
I then marked that spot, and another the same distance from the other end.
To space the four pegs evenly I need three equal intervals between them.
This is something that is easier to do with a metric tape measure (with its decimal scale)
and a calculator. Except I noticed that the
distance between the outside pegs just happened to be exactly 24 inches
on the inches side of my tape measure.
That divides neatly into 3 x 8, so I used the inch scale.

 I drilled 5/8" holes for the pegs. The fit of three of my four pegs was not as tight
as I would have liked it to be. So I cut some slits into the dowel part of the
pegs, and made a wedged joint instead. The wedges expand the pin slightly and make
it fit tight.
I drilled 5/8" holes for the pegs. The fit of three of my four pegs was not as tight
as I would have liked it to be. So I cut some slits into the dowel part of the
pegs, and made a wedged joint instead. The wedges expand the pin slightly and make
it fit tight.
I could have just used more glue to fill the gap, but then I would have had to wait
longer for the thick layer of glue to dry. Waiting just isn't my thing.
 I still used lots of glue though, and I had some squeeze out at the top. I rubbed some
bandsaw sawdust into the squeezed-out glue and then scraped it off with a chisel. If you
scrape the glue straight off, it tends to smear as you scrape it.
Sawdust prevents that.
I still used lots of glue though, and I had some squeeze out at the top. I rubbed some
bandsaw sawdust into the squeezed-out glue and then scraped it off with a chisel. If you
scrape the glue straight off, it tends to smear as you scrape it.
Sawdust prevents that.
 Finally, I cut the back ends of the pegs flush on the bandsaw. It's neat how flush you
can trim on a bandsaw with minimal marking up of the wood. Of course,
there are all kinds of neat ways to get it flush with very sharp and shiny hand tools,
but the bandsaw is faster. This side of the rack is going to be against the wall
anyway, so it wouldn't even matter if the wood got marked up.
Finally, I cut the back ends of the pegs flush on the bandsaw. It's neat how flush you
can trim on a bandsaw with minimal marking up of the wood. Of course,
there are all kinds of neat ways to get it flush with very sharp and shiny hand tools,
but the bandsaw is faster. This side of the rack is going to be against the wall
anyway, so it wouldn't even matter if the wood got marked up.
 To finish it off, I put three coats of water based Varathane on it.
And here are the coat hooks, all done. The peg on the left is a tiny bit thinner than
the other three, but it's the sort of thing people only notice if I point it out to them.
I couldn't think of a good and strong way of mounting it without exposed screw heads.
I really don't like covering screw heads with plugs.
So I just held it up to the wall, marked where the studs
would be on the board and then drilled countersink holes there. You can just
barely see one of the mounting screws in the first picture on this page, so they
don't mess up the look of it too much.
Back to my Woodworking website
 Wooden jewellery rack
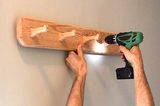 Coat hooks (again)
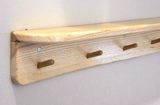 Coat hooks and shelf
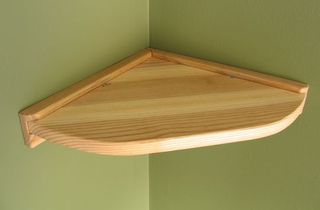
 Ball on the lathe
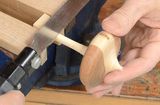 Spinning to pon the lathe
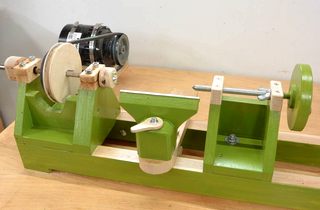 Homemade lathe