Building a dresser
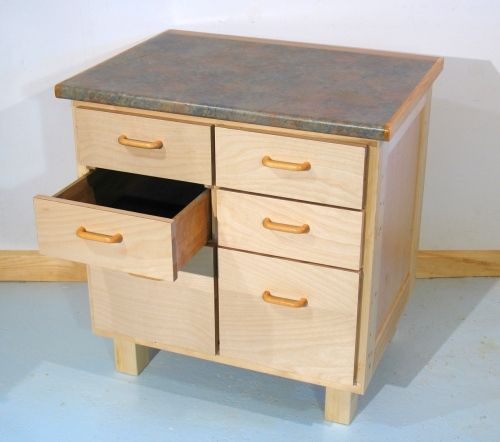
I wanted to build a piece of furniture with drawers for storing stuff in, using some drawers that came from some old desks. Though the intended use of this piece of furniture was to be a base for my radial arm saw, I figured it would be good to try to make it nice looking so that at some point, it could be used as a bedroom dresser.
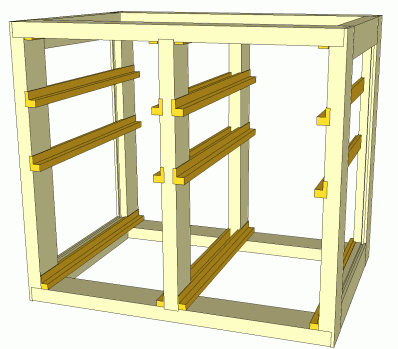 The core of the dresser design is the frame, made from 2x4 construction lumber, with some
hardwood rails to allow the drawers to slide. In this regard, the frame is quite similar
to my workbench drawers, though the design is slightly
refined in that the drawer guides are actually 'L' shaped, so that I don't need to glue
in separate side guide rails to the drawer guides. I also changed the frame a bit to allow
for side panels, which would form the sides of the dresser.
The core of the dresser design is the frame, made from 2x4 construction lumber, with some
hardwood rails to allow the drawers to slide. In this regard, the frame is quite similar
to my workbench drawers, though the design is slightly
refined in that the drawer guides are actually 'L' shaped, so that I don't need to glue
in separate side guide rails to the drawer guides. I also changed the frame a bit to allow
for side panels, which would form the sides of the dresser.
 I started by cutting the verticals to length, and then cutting dados in them to hold the
drawer slides.
I started by cutting the verticals to length, and then cutting dados in them to hold the
drawer slides.
Because my saw is a right tilt saw, I have to put the crosscut sled on the right side whenever I put the wide dado blade in it. This because the flange is on the right, so the dado extends to the left, where the sled normally is.
I measured how far from the end of the vertical pieces the dado needs to be cut, and clamped a block of wood to the fence of the sled to allow for consistent repeat cuts of the dados. With 8 dados to cut at each height in the 6 verticals, it's worth jigging this sort of thing up.
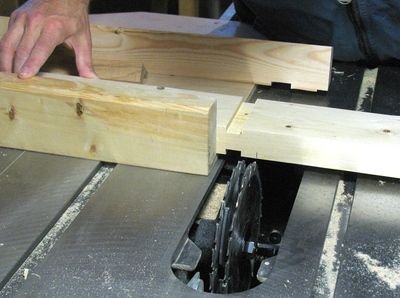
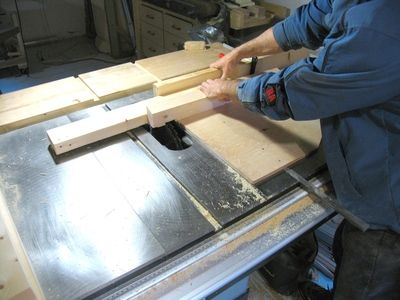 On cutting the dados, I placed another piece of wood behind the part that I am cutting as a
sacrificial fence. This cuts down on tear out on the trailing end of my cut. The long piece
in the photo is the work piece, while the short piece that I have my left hand on is
my sacrificial fence. I just hold it in place by hand.
On cutting the dados, I placed another piece of wood behind the part that I am cutting as a
sacrificial fence. This cuts down on tear out on the trailing end of my cut. The long piece
in the photo is the work piece, while the short piece that I have my left hand on is
my sacrificial fence. I just hold it in place by hand.
I actually put a slight hook on one end of my sacrificial fence, so that I could align it with the cut the same way every time, rather than cut anther chunk out of it with every dado cut. The hook was just a screw screwed into the sacrificial fence near its end.
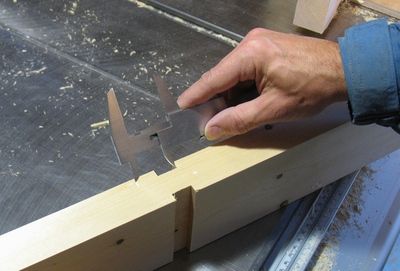 The maximum width I can cut with my dado blade and table saw is about 17 mm, but I needed a
dado twice as wide. So once I'd cut the dados, I used the inside gauge of my
calipers to scratch how wide the dado needs to go. I set the caliper to the width of my
L shaped drawer guides, which I had already cut at this point.
The maximum width I can cut with my dado blade and table saw is about 17 mm, but I needed a
dado twice as wide. So once I'd cut the dados, I used the inside gauge of my
calipers to scratch how wide the dado needs to go. I set the caliper to the width of my
L shaped drawer guides, which I had already cut at this point.
 With the mark for the width of the dado, I line it up with the blade, and then move the block
clamped to my sled up against the work piece, so that I can cut all the work pieces
again just by pushing them against the block clamped to the fence of the sled.
With the mark for the width of the dado, I line it up with the blade, and then move the block
clamped to my sled up against the work piece, so that I can cut all the work pieces
again just by pushing them against the block clamped to the fence of the sled.
 I used a similar approach to cut a dado into the top and bottom horizontal rails of the
frame. I also had to cut some rabbets into the ends of the upright for how the frame went
together. The reason I did it this way is so that the end grain of the horizontals would not
be visible from the sides of the dresser when it is assembled.
I used a similar approach to cut a dado into the top and bottom horizontal rails of the
frame. I also had to cut some rabbets into the ends of the upright for how the frame went
together. The reason I did it this way is so that the end grain of the horizontals would not
be visible from the sides of the dresser when it is assembled.
This did result in the center uprights being shorter than the side uprights. For simplicity, I made them all the same length initially for when I cut the dado, and cut 30 mm off the end of the uprights later to make it the right length for the frame.
 I assembled the front and back frames without drilling holes for the dowels.
The glue alone is strong enough to hold it all together, and it means I can drill the holes
through both parts at once.
I assembled the front and back frames without drilling holes for the dowels.
The glue alone is strong enough to hold it all together, and it means I can drill the holes
through both parts at once.
You can see one clamp at a slight angle in the photo at left. I added this clamp to pull the frame into square. That happens sometimes, that once clamped, things are just a little bit off square. But with the glue drying while it's forced square, it will stay square.
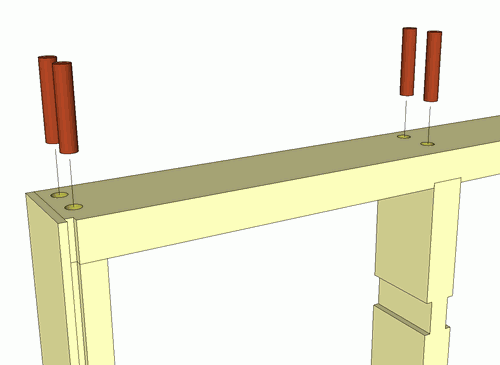
 I put two 5/8" dowels into the corners of the frame to hold the corners of the frame
more rigid. I also put four 3/8" dowels into the T joint where the center upright meets
the horizontal rails. Note that my drawing above shows 5/8" dowels in the T joints as well,
but I ran out of dowels.
I put two 5/8" dowels into the corners of the frame to hold the corners of the frame
more rigid. I also put four 3/8" dowels into the T joint where the center upright meets
the horizontal rails. Note that my drawing above shows 5/8" dowels in the T joints as well,
but I ran out of dowels.
A spline in the corners might have been stronger than the dowel joint, but the spline would be visible from the side, whereas the dowels would not be.
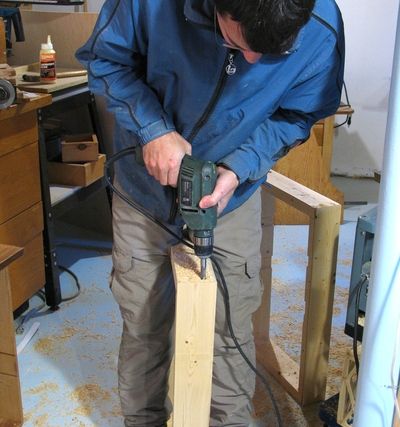
I inserted these dowels after the frame was glued together and the glue all dried. That way, I could just hand drill the holes in, without worrying about aligning the two halves, as whole frame was already assembled. So long as my hole is straight, and doesn't break out of the work piece by accident, it doesn't matter how the hole is aligned. I had to do it with a hand drill because the pieces of frame were too long to fit into my drill press.
I have since built a horizontal boring machine that the frame could be clamped onto to drill these holes accurately.
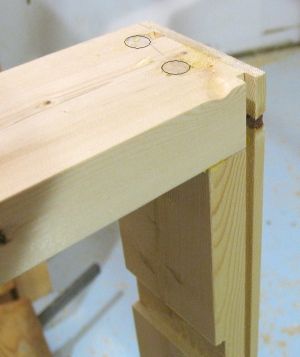 The picture at left shows the dowels in the corner. I had to highlight them on the photo
because they hardly showed up.
Also shown is the groove in the frame, for the side panel. I cut this groove separately
in the upright, and the notch in the cross piece. In retrospect, it would have been easier
to cut the groove in the assembled frame, so that I'd cut the notches in the cross piece
with the same operation. The frame is not so large that I would
not have been able to put it on my table saw.
The picture at left shows the dowels in the corner. I had to highlight them on the photo
because they hardly showed up.
Also shown is the groove in the frame, for the side panel. I cut this groove separately
in the upright, and the notch in the cross piece. In retrospect, it would have been easier
to cut the groove in the assembled frame, so that I'd cut the notches in the cross piece
with the same operation. The frame is not so large that I would
not have been able to put it on my table saw.
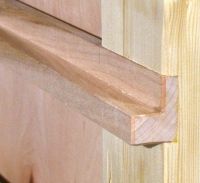
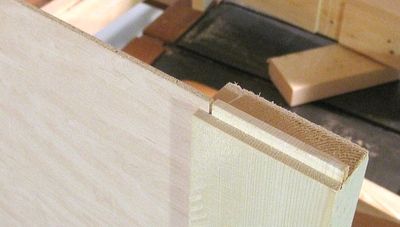 The pieces that connect the front and back frame have a stub tenon the same width as the thin
sheet of veneered particle board that I used for the dresser sides, and fits in the grooves
on the front and back frames. The shot at left is from a test fit, as I didn't actually glue
in the side panel until a bit later.
Also note that there is also a groove, of the same dimensions in the part nearest
the camera, to accept the side panel there.
The pieces that connect the front and back frame have a stub tenon the same width as the thin
sheet of veneered particle board that I used for the dresser sides, and fits in the grooves
on the front and back frames. The shot at left is from a test fit, as I didn't actually glue
in the side panel until a bit later.
Also note that there is also a groove, of the same dimensions in the part nearest
the camera, to accept the side panel there.
 The next step was to glue the parts that join the front and back rail into the
back frame of the dresser. I did this in multiple steps. First, I glued the front-to-back
rails to the back frame.
The next step was to glue the parts that join the front and back rail into the
back frame of the dresser. I did this in multiple steps. First, I glued the front-to-back
rails to the back frame.
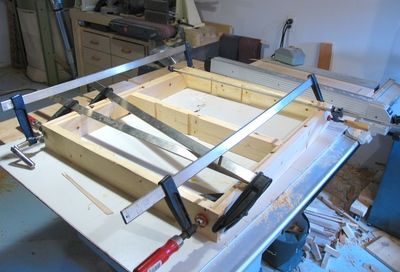
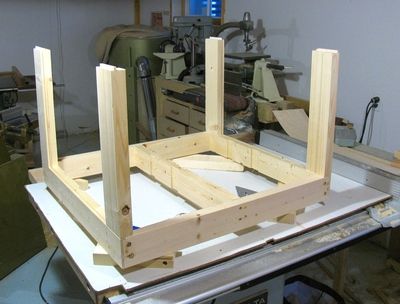
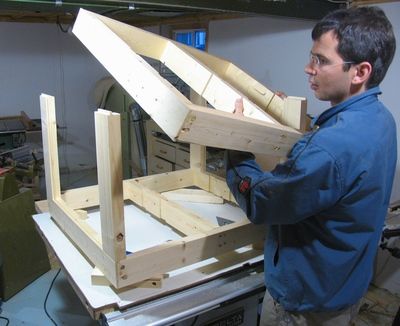 I add the front of the dresser on top. Though I didn't apply any glue to the top
side of the pieces shown vertically in this photo. I added the top piece mainly to ensure
everything was aligned while letting the glue holding the rails to the back frame dry.
I add the front of the dresser on top. Though I didn't apply any glue to the top
side of the pieces shown vertically in this photo. I added the top piece mainly to ensure
everything was aligned while letting the glue holding the rails to the back frame dry.
I could have glued it in all at once, including the side panels, but I decided that would be too much to worry about gluing right and getting square all at once.
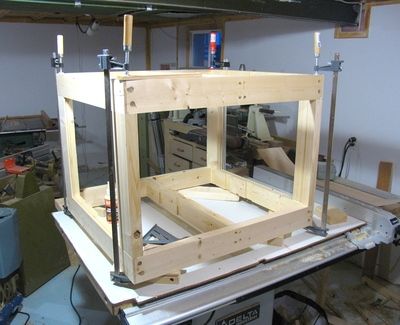 This photo shows the glue drying on the joints for the front-back connecting pieces to the
back frame.
This photo shows the glue drying on the joints for the front-back connecting pieces to the
back frame.
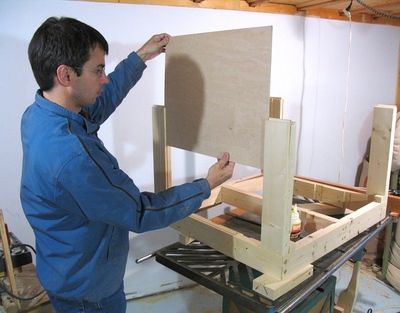 Once the glue dried, I removed the front frame again from the top, cut the side
panels to size. and slid them into the assembled parts of the frame.
Once the glue dried, I removed the front frame again from the top, cut the side
panels to size. and slid them into the assembled parts of the frame.
I added some glue all around in the groove, so that the side panel could add a bit of rigidity to the dresser. With the side panel made of veneered particle board, it's ok to do that. If it was of solid wood, that would be a big no no, as it would need room to expand and contract with changes in humidity.
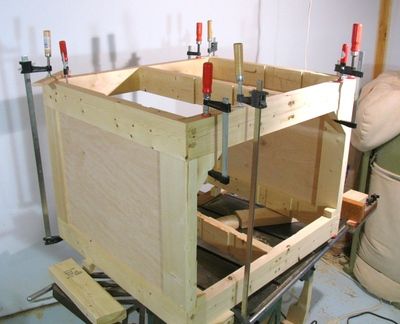 With the side panels in, and the fit checked, it was time to glue on the front frame.
I also added some diagonal braces. These are just glued to the frame, more as an afterthought.
With the side panels in, and the fit checked, it was time to glue on the front frame.
I also added some diagonal braces. These are just glued to the frame, more as an afterthought.
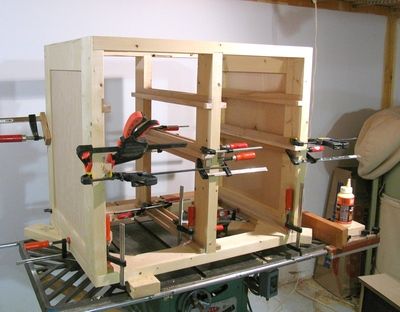 With the carcass of the frame assembled, it was time to glue in the L shaped drawer guide rails.
For this piece of furniture, I just glued them in, without screwing them in.
With the carcass of the frame assembled, it was time to glue in the L shaped drawer guide rails.
For this piece of furniture, I just glued them in, without screwing them in.
Note that the bottom most guide rails don't have a rabbet joint in the upright. This because I could just rest them against the bottom of the frame, and also because I didn't want to weaken the corner joints of the dresser by cutting dados into them, as these are what gives the dresser its rigidity.
Next:
Back to my Woodworking website