Building a Rip Fence
 I built this rip fence long before digital cameras, so unfortunately, I don't have any photos
of the construction of it. But its a very basic design, so from the description, and pictures
it should be able to build your own.
I built this rip fence long before digital cameras, so unfortunately, I don't have any photos
of the construction of it. But its a very basic design, so from the description, and pictures
it should be able to build your own.
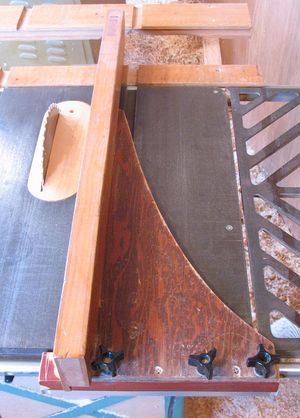
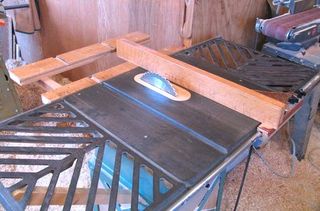
The fence only clamps to the steel rod at the front of the saw, and doesn't use the one on the back. This is deliberate, as my table extension blocks that part of the saw anyways. The fence gets its rigidity by clamping to a wide part of the rod - the clamp is 28 centimeters wide. This does present a bit of a problem if I want to make a cut with the fence parly off the rod. For those rare cases, I use a small clamp to clamp down the tail end of the fence.
Fence clamp

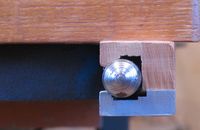
 The top part of the clamp is made of maple, and is glued and screwed to the plywood
triangle that is the bracing. The bottom part I milled out of aluminium. There's three
bolts through the piece, press fit in place. The screws have heads on the bottom of the
piece, so the press fit is only to keep things from jiggling too much.
The top part of the clamp is made of maple, and is glued and screwed to the plywood
triangle that is the bracing. The bottom part I milled out of aluminium. There's three
bolts through the piece, press fit in place. The screws have heads on the bottom of the
piece, so the press fit is only to keep things from jiggling too much.
The bottom part of the clamp could have been made out of wood also, but it would have to be a bit thicker in that case. I had easy access to a machine shop at the time, so making it out of metal was no big deal.
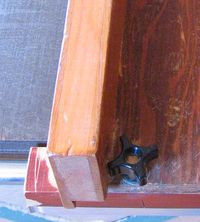
The fence clamp is tightened by tightening the three black knobs at the top of the fence. This is a bit more awkward than having just a nice lever, but it does give a very firm lock.
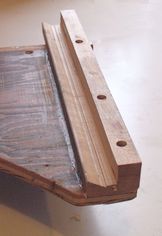
 The actual fence part of the this rip fence is a piece of pine, with a quarter inch of
white oak laminated to either side. This came from a very old hardwood door. The reason
they sandwiched layers together like that was not so much to save hardwood wood, but to prevent
warping. You really don't want your doors to warp! I just cut it straight out of the
door. In fact, near the tail end, you can see the rest of a mortise and tenon joint
from the door in the main picture of the fence.
The actual fence part of the this rip fence is a piece of pine, with a quarter inch of
white oak laminated to either side. This came from a very old hardwood door. The reason
they sandwiched layers together like that was not so much to save hardwood wood, but to prevent
warping. You really don't want your doors to warp! I just cut it straight out of the
door. In fact, near the tail end, you can see the rest of a mortise and tenon joint
from the door in the main picture of the fence.
If I had to build another rip fence, I think I would deliberately make a sandwich like that, because its worked out very well. Certainly, the saw side of the fence should be a very dense wood to prevent wear. And with a sandwich like that, there's less warping, and also less hardwood needed.
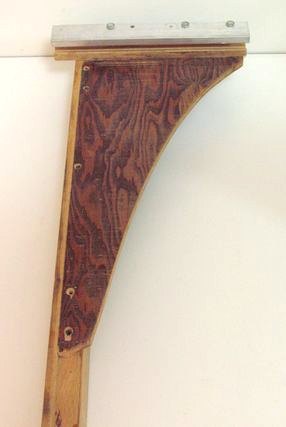 The hardwood fence itself has a rabbet cut into it, and is screwed from the bottom onto
the piece of plywood. I didn't glue this joint so I could stillmake minor adjustments to it
if I found it getting out of square. But so far, in 10 years, I have never had
a need to do that.
The hardwood fence itself has a rabbet cut into it, and is screwed from the bottom onto
the piece of plywood. I didn't glue this joint so I could stillmake minor adjustments to it
if I found it getting out of square. But so far, in 10 years, I have never had
a need to do that.
This rip fence is not perfect. The main drawback is that it takes a bit of experience to set it. With the knobs loosened, there is nothing holding it completely square, and once the knobs are tightened, the fence cannot easily be moved. So its a matter of half tightening it, and tapping it into place with the wrist for the final fine adjustment. But I'm used to that.
See also:
 More about this table saw
 Another
Homemade
Another
Homemade rip fence
 Effects of rip fence misalignment
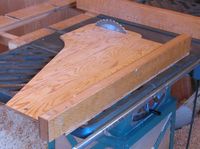 Table saw sled
(sliding table substitute)