Making a Crokinole stones
Originally, I planned on just buying a set of Crokinole playing pieces, but when
I called around, I couldn't find a place that would sell me just the pieces. It was too
late to order them online, So I had to resort to making the pieces as well.
The Crokinole stones, or discs, are 1 1/8" in diameter. Fortunately, that one can buy
1 1/8" dowels, so didn't have to resort to making my own dowels
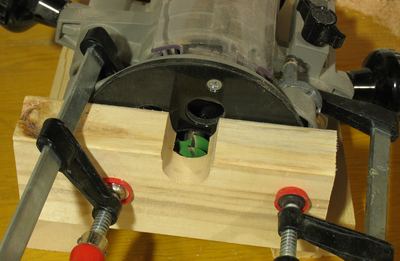 To round the edges of the pieces, I used a 3/8" half round bit, jigged up in a router
as shown at left. The block of wood has a 1 1/8" hole drilled into it, which is cut
out towards the top so that the dowel can be slid into it from the top. The back of the
block of wood has a cavity cut out for the 3/8" half round router bit. The cavity is open
towards the bottom, to allow the chips to get out.
To round the edges of the pieces, I used a 3/8" half round bit, jigged up in a router
as shown at left. The block of wood has a 1 1/8" hole drilled into it, which is cut
out towards the top so that the dowel can be slid into it from the top. The back of the
block of wood has a cavity cut out for the 3/8" half round router bit. The cavity is open
towards the bottom, to allow the chips to get out.
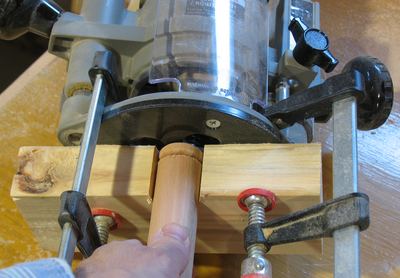 I cut the rounds for the disk on the end of the dowel, by sliding it against the router
bit from the top, and turning the dowel. Only after cutting the rounds did I cut the disk
off on the table saw.
I cut the rounds for the disk on the end of the dowel, by sliding it against the router
bit from the top, and turning the dowel. Only after cutting the rounds did I cut the disk
off on the table saw.
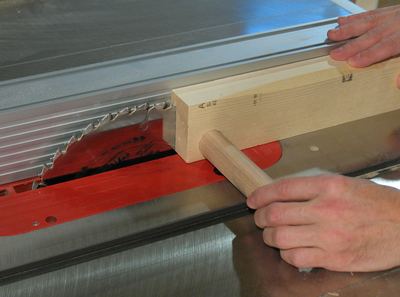 I experimented with various ways of cutting off the disks. The best way I found was to drill
a hole in a scrap piece of lumber, and insert the dowel into it and cut through the lumber
and the dowel. That way, the piece that came off was held firmly, and wouldn't get
thrown across the shop by the blade.
I experimented with various ways of cutting off the disks. The best way I found was to drill
a hole in a scrap piece of lumber, and insert the dowel into it and cut through the lumber
and the dowel. That way, the piece that came off was held firmly, and wouldn't get
thrown across the shop by the blade.
Making all the pieces meant going back and forth between the router and the table saw a
lot. I just left both tools running, and worked from both ends of the dowel to speed up
the process.
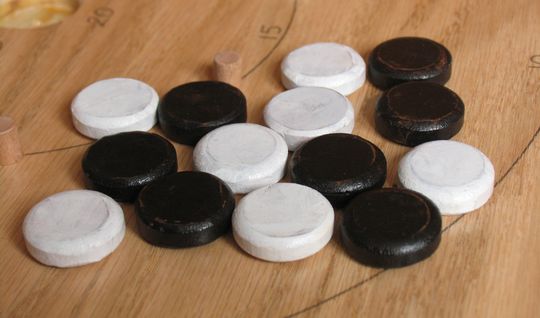
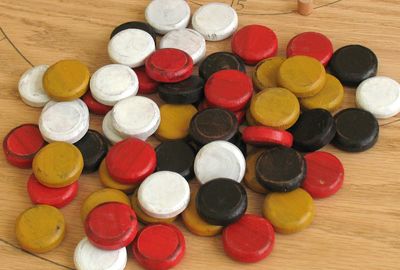 Originally searching for Crokinole stones online, I found a set that consisted of 4 colours
of 12 stones each. Not knowing the rules of the game yet, I figured each player had to get
their own colour, so made 12 of each of four colours. Turns out you only need two colours
when playing four people, but having four colours is kind of fun, as it allows various
nonsense variations of the game.
Originally searching for Crokinole stones online, I found a set that consisted of 4 colours
of 12 stones each. Not knowing the rules of the game yet, I figured each player had to get
their own colour, so made 12 of each of four colours. Turns out you only need two colours
when playing four people, but having four colours is kind of fun, as it allows various
nonsense variations of the game.
I cut a lot more disks than I needed, as not every one of them turned out nice. But making
the disks was relatively fast, so no big deal. A lot of them got chipped, and most of them
ended up getting a bit of scorching on them from the router. Perhaps a better, but tedious
way would be to just cut them off without rounding them, and then round the edges on
a belt sander.
To colour the disks, I used some of my acrylic artist paints. After painting them, I put a
coat of clear water based varnish on the disks to protect the colour a little better.
The disks don't look perfect, but they work just fine.
See also: Crokinole board plans
Making a Crokinole board
To my Woodworking website
