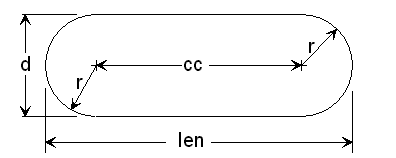
 For north American style table saws, the shape of the insert is almost always an
elongated hole. This is easy to construct if you know the radius of the semicircular ends,
and the distance between the centers.
For north American style table saws, the shape of the insert is almost always an
elongated hole. This is easy to construct if you know the radius of the semicircular ends,
and the distance between the centers.
There are many articles out there on how to make your own zero clearance table saw insert. Almost invariably, they recommend attaching your old insert to a new piece of wood with carpet tape, and using a router bit with a guide roller to follow the original insert's shape. I never quite understood why you would want to do this, when the insert's geometry is such a simple shape.
For north American style table saws, the shape of the insert is almost always an
elongated hole. This is easy to construct if you know the radius of the semicircular ends,
and the distance between the centers.
But these are easy to derive - the radius 'r' is just half the width of the slot 'd', and the distance between centers 'cc' is just the length 'len' minus twice the radius.
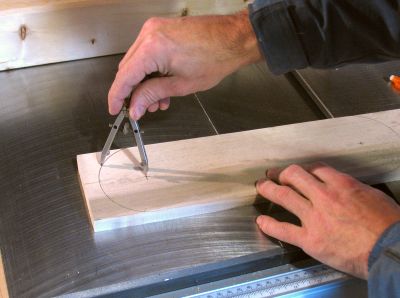 Once the values for 'cc' and 'r' are derived, constructing the shape with a compass is
a trivial exercise. Start with a piece of maple that is as wide as the slot, and
mark the two semicircles on either end.
Once the values for 'cc' and 'r' are derived, constructing the shape with a compass is
a trivial exercise. Start with a piece of maple that is as wide as the slot, and
mark the two semicircles on either end.
The piece should be a little bit thicker than the depth of the lowest support from the table top. Measure all four support points - they may not all be exactly the same distance down from the top of the table. About 15 mm, or nearly 5/8" thick should be enough to make an insert.
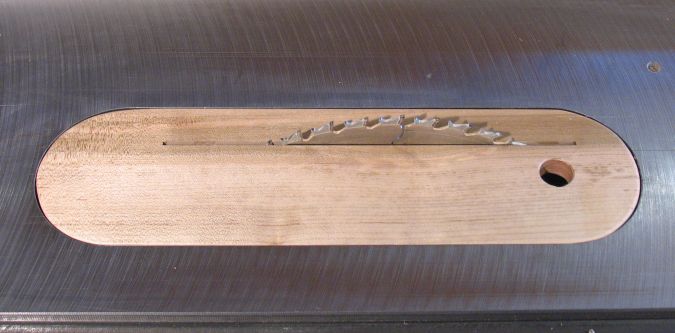
 The blade will cut a slot along most of the insert.
To prevent the possibility of the insert splitting apart on account of this,
its best to reinforce it with some splines on either end.
The blade will cut a slot along most of the insert.
To prevent the possibility of the insert splitting apart on account of this,
its best to reinforce it with some splines on either end.
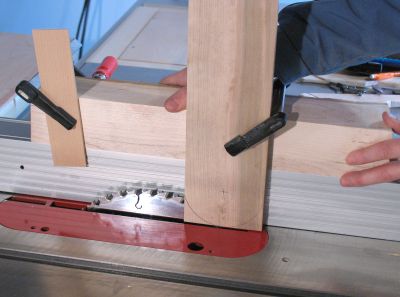
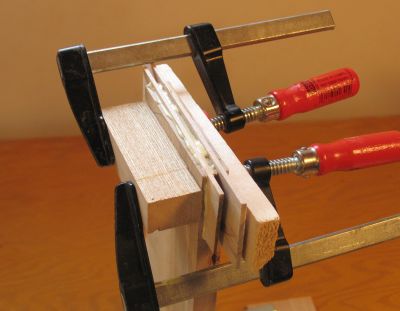
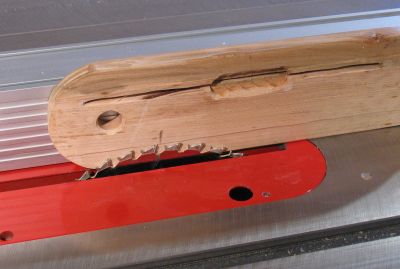
After cutting the ends of the insert square, cut two slots into each end of the piece of wood. Cut the slots about as deep as the radius of the semi circle. Use a tenon jig if you have one, otherwise clamp your work piece to a block of wood and slide it along the top of the fence, as shown. Note the second small piece of wood also clamped to the block. It helps guide my block straight.
 Cut some pieces of hardwood to be the width of the slots and glue them into the slots
just cut. With the grain of the strips running perpendicular to the insert, this prevents
any possibility of the insert splitting apart. The ends of the insert will be like
plywood this way.
Cut some pieces of hardwood to be the width of the slots and glue them into the slots
just cut. With the grain of the strips running perpendicular to the insert, this prevents
any possibility of the insert splitting apart. The ends of the insert will be like
plywood this way.
Of course, one could make the whole zero clearance insert out of plywood. If you do, you should use something like Baltic birch plywood, which is birch throughout. But making an insert this way out of maple is stronger and harder.
 After the glue is dry, cut out the radii on either end with a bandsaw, and fit it in the saw.
I tend to make it fit very tightly, so I needed a belt sander to tweak the shape a little
so that it fit easily.
After the glue is dry, cut out the radii on either end with a bandsaw, and fit it in the saw.
I tend to make it fit very tightly, so I needed a belt sander to tweak the shape a little
so that it fit easily.
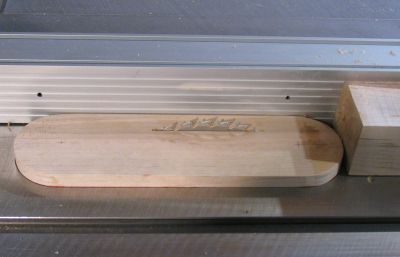
The next step after that is to cut the zero clearance slot for the blade. Because the blade doesn't go down far enough to allow for an un-slotted insert to be placed above it, it is best done by placing the new insert directly on top of the original insert. Then use the fence to restrain the insert on the right, and a heavy block of wood to restrain it in front. Clamp this block of wood to the fence, as you will need both hands next.
Hold the insert down with a push stick (not shown) while cranking up the spinning blade until it just protrudes through the insert.
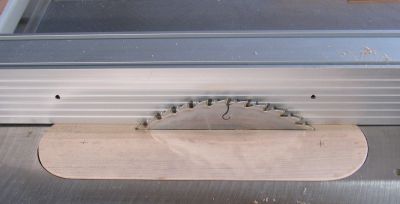 After the blade protrudes, turn off the saw, remove the original insert and insert your new
insert.
Clamp the fence down over the insert to hold it in place, and bring up the blade up a little
further. Careful with this, as the arbor flange is likely to hit bottom of the insert before
the blade is fully up.
After the blade protrudes, turn off the saw, remove the original insert and insert your new
insert.
Clamp the fence down over the insert to hold it in place, and bring up the blade up a little
further. Careful with this, as the arbor flange is likely to hit bottom of the insert before
the blade is fully up.
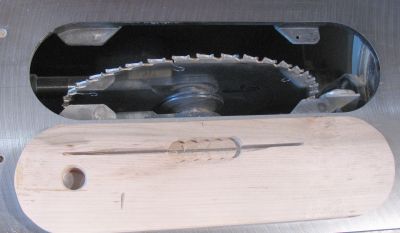 Drill out a series of holes with a forstner bit to make room for the arbor flange.
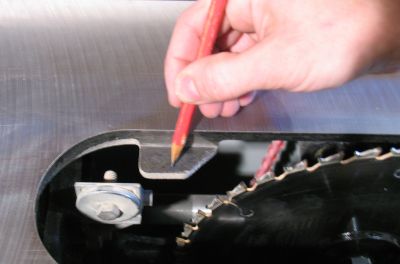
 And finally, time to adjust the height of the insert. Up until this point, if you cut it
thick enough, the insert was not flush with the table. Measure the depth of the supports
on either side, and cut away the edge, as shown at left, to bring it to the right depth.
Take separate measurements for left and right, and cut away only as much to leave
enough thickness for the deeper of the supports on either side.
And finally, time to adjust the height of the insert. Up until this point, if you cut it
thick enough, the insert was not flush with the table. Measure the depth of the supports
on either side, and cut away the edge, as shown at left, to bring it to the right depth.
Take separate measurements for left and right, and cut away only as much to leave
enough thickness for the deeper of the supports on either side.
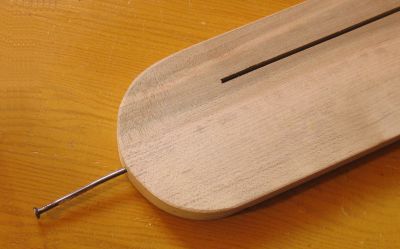 Add a pin to the back of the insert to keep it from jumping out of the hole.
Use a large nail, and pre-drill a hole for it slightly smaller than the diameter of the
nail. Pound the nail in, then cut it off leaving just 5 mm of nail sticking out.
Add a pin to the back of the insert to keep it from jumping out of the hole.
Use a large nail, and pre-drill a hole for it slightly smaller than the diameter of the
nail. Pound the nail in, then cut it off leaving just 5 mm of nail sticking out.
 To make final height fine adjustments, scribble pencil marks on the supports, then put the insert
in and tap it down hard, or press it down and wiggle it back and forth if it has any
wiggle room.
To make final height fine adjustments, scribble pencil marks on the supports, then put the insert
in and tap it down hard, or press it down and wiggle it back and forth if it has any
wiggle room.
 The pencil marks will transfer onto the insert where it touches. Use this as a guide
to chisel away from the back of the insert until it's flush.
The pencil marks will transfer onto the insert where it touches. Use this as a guide
to chisel away from the back of the insert until it's flush.
This is an iterative process, and you won't see the shape of the whole support transfer to the insert, but it will tell you where you need to remove material to bring the insert down gradually.
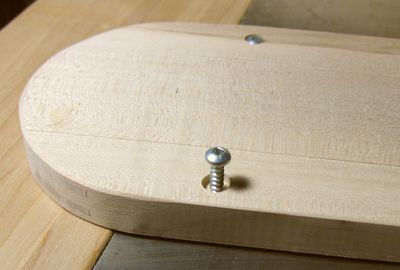 For another insert I made, I just cut the insert a little bit shallower than
what I needed, and then put some wood screws in the bottom of it.
The screws are screwed in to be
nearly flush with the surface, and serve to adjust the level of the insert.
This turned out to be much less work. An added advantages are adjustability,
and with the insert resting on the screw heads, A a bit of dust is less
likely to raise it up a little.
For another insert I made, I just cut the insert a little bit shallower than
what I needed, and then put some wood screws in the bottom of it.
The screws are screwed in to be
nearly flush with the surface, and serve to adjust the level of the insert.
This turned out to be much less work. An added advantages are adjustability,
and with the insert resting on the screw heads, A a bit of dust is less
likely to raise it up a little.
And finally, put a few coats of varnish on your zero clearance insert, top and bottom. I found that floor varnish works best because it produces a surfaces that glides really easily. After you varnish it, you might want to tweak the height some more.
More on my Delta hybrid table saw
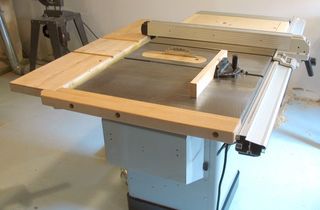
 Table saw alignment
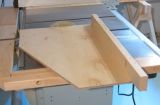 Table saw sled
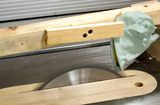 Shirt sucked into table