Forklift toy: Lifting fork
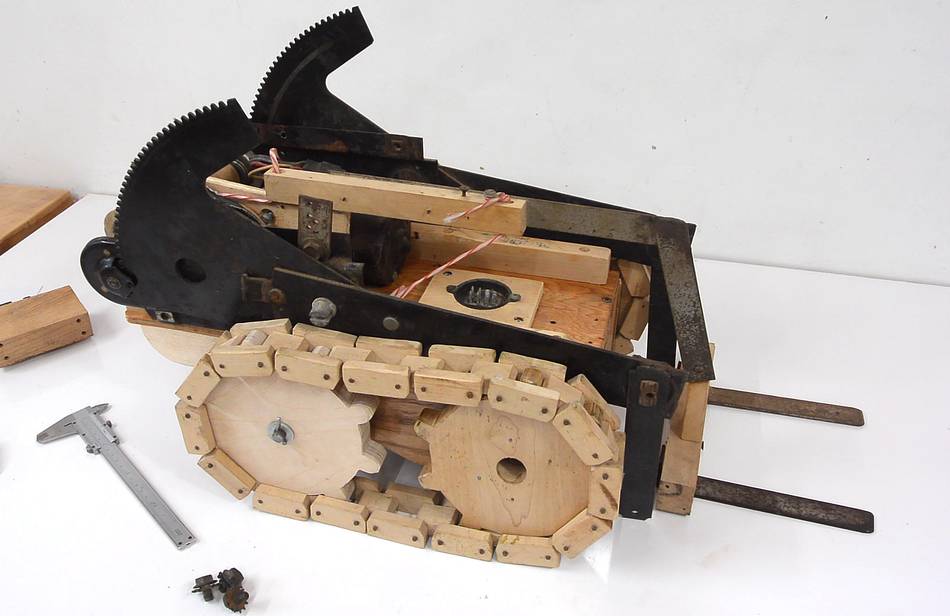 Having redone the tracks of my old forklift
toy from 1985, it was time to make the lifting mechanism work again.
Having redone the tracks of my old forklift
toy from 1985, it was time to make the lifting mechanism work again.
 The lifting mechanism consists of two hand-cranked window lifing
mechanisms from a 1970s car. I had coupled these together with a shaft with
a pulley on it. A shredded old belt connected this to a wooden pulley on a
wiper motor. That mechanism never really worked all that well
and wouldn't anymore. The window lifters were seized.
The lifting mechanism consists of two hand-cranked window lifing
mechanisms from a 1970s car. I had coupled these together with a shaft with
a pulley on it. A shredded old belt connected this to a wooden pulley on a
wiper motor. That mechanism never really worked all that well
and wouldn't anymore. The window lifters were seized.
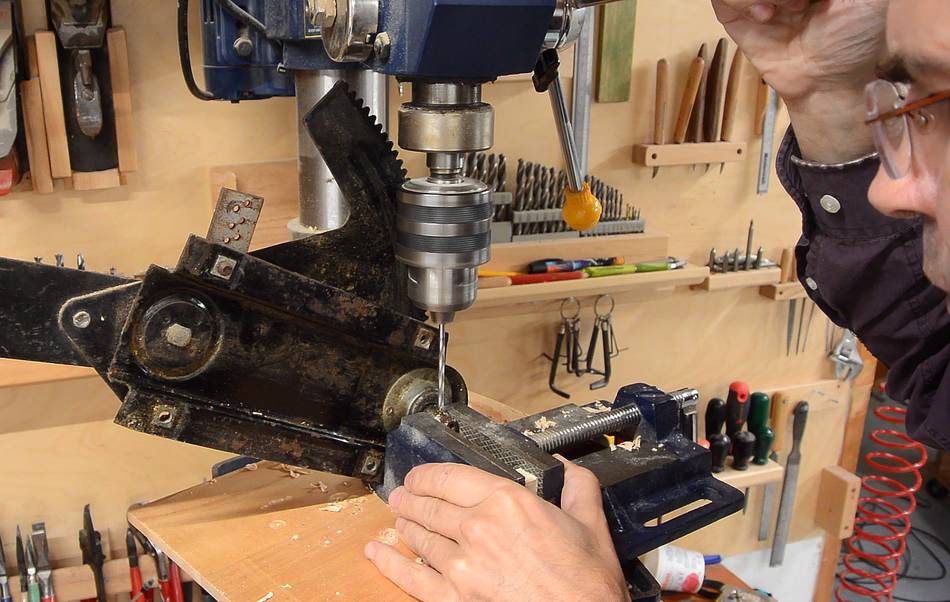
I took it apart again and managed to get the window lifters unseized by adding oil and turning the shaft with a vise-grip, then with a drill.
I figured gears would be much better than the pulley.
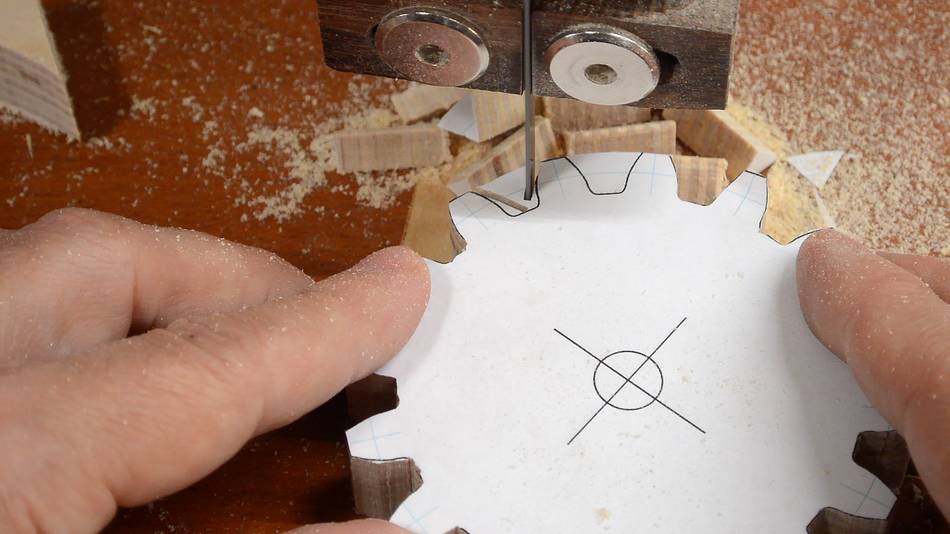
 I designed a pair of gears with my gear generator.
I had a piece of scrap Baltic birch plywood that was just barely
big enough if I put both gears on it slightly meshed. I was barely able to cut
between them with the bandsaw.
I designed a pair of gears with my gear generator.
I had a piece of scrap Baltic birch plywood that was just barely
big enough if I put both gears on it slightly meshed. I was barely able to cut
between them with the bandsaw.
Then cutting out the gears on the bandsaw.
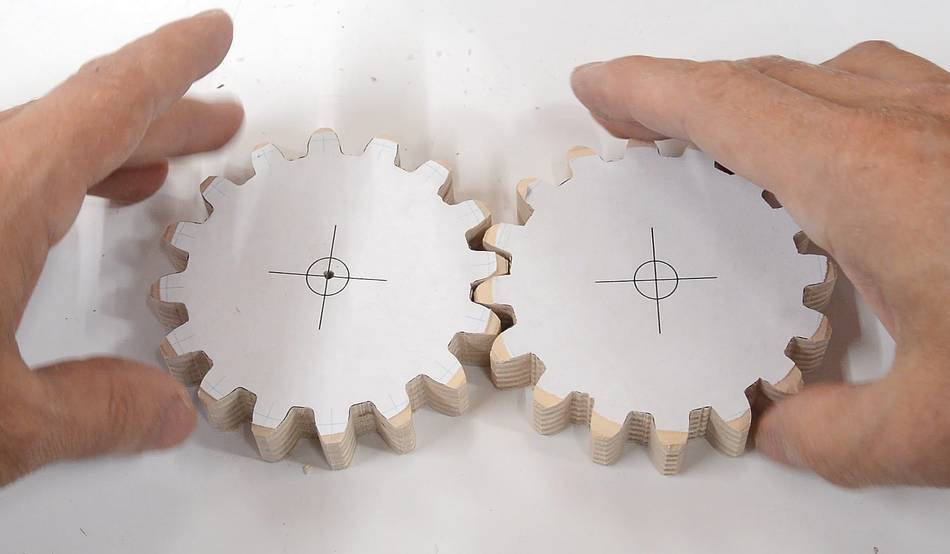
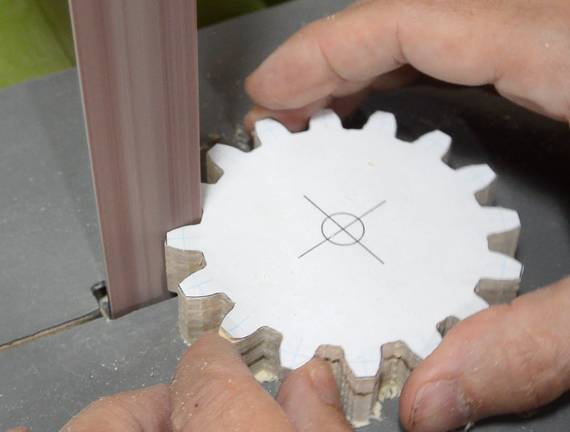 I finished shaping the teeth on my strip
sander, then checked that they meshed well.
I finished shaping the teeth on my strip
sander, then checked that they meshed well.
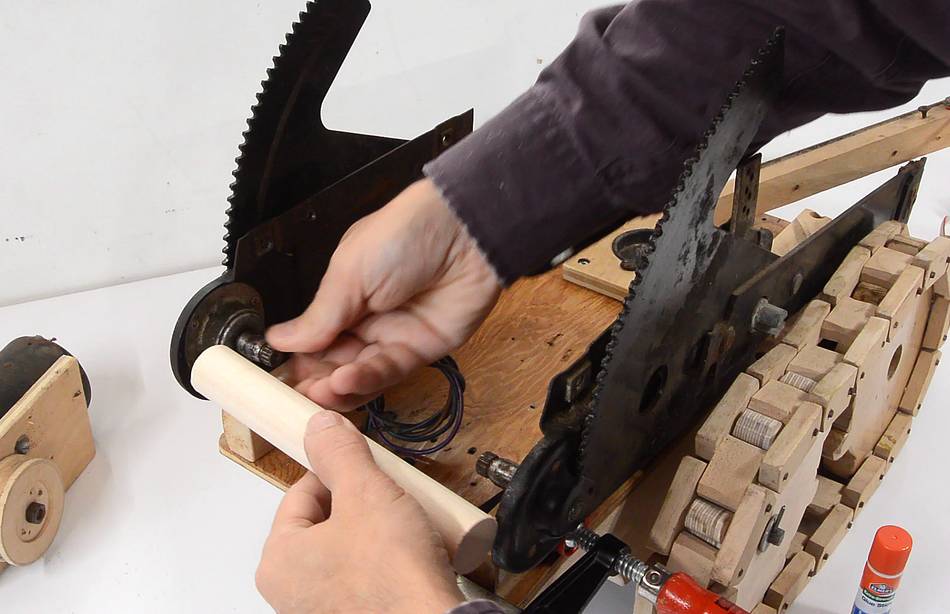
 I coupled the two shafts of the window lifters together with a piece
of 1" dowel. This was some leftover doweling I made for
this project
I coupled the two shafts of the window lifters together with a piece
of 1" dowel. This was some leftover doweling I made for
this project
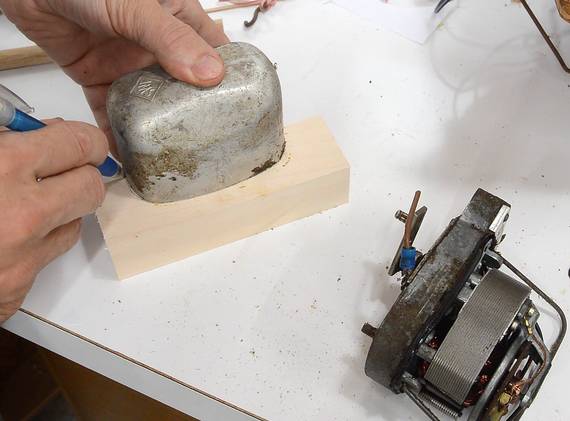
I needed to drill a hole in the center of the dowel. I marked the center by setting a compass to about half the diameter of the dowel and marking in from different sides. There are of course various gadgets for marking the center of a dowel, I just can't be bothered to acquire or make one for the few times that I'd use it.
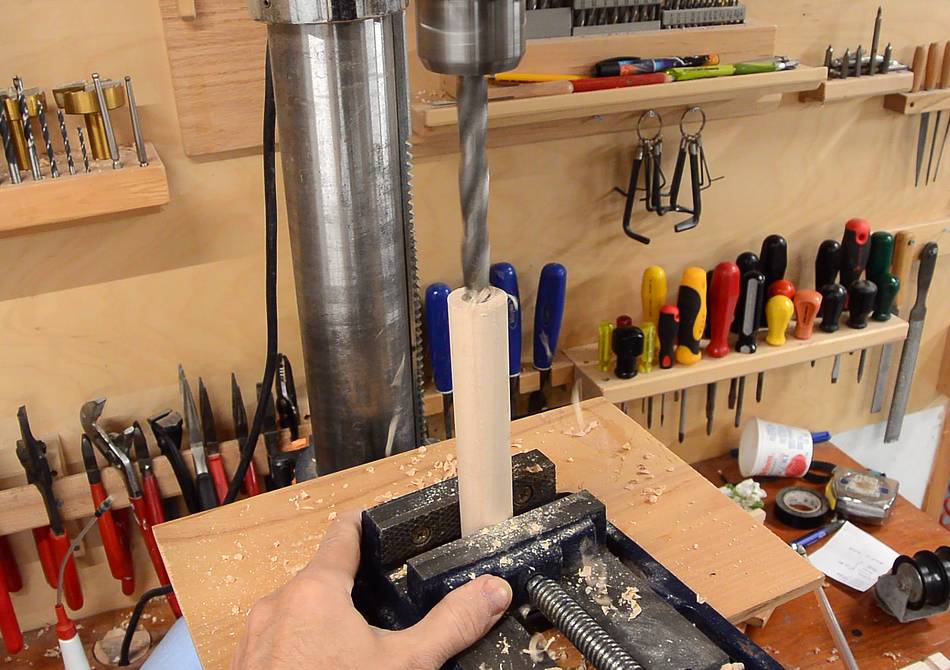
 Drilling it out. The other challenge is getting the drill to go in
the right place. I punched a divot with an awl, which guided the point
of a brad point drill bit. I got it within a fraction of a millimeter.
On the old shaft from 1985, on one end, I had drilled it way off (see at right)
Drilling it out. The other challenge is getting the drill to go in
the right place. I punched a divot with an awl, which guided the point
of a brad point drill bit. I got it within a fraction of a millimeter.
On the old shaft from 1985, on one end, I had drilled it way off (see at right)
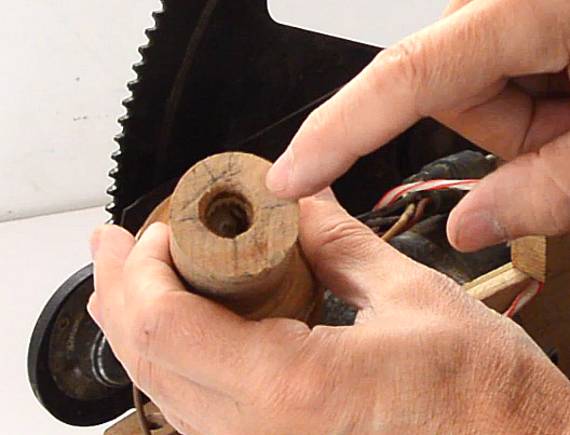
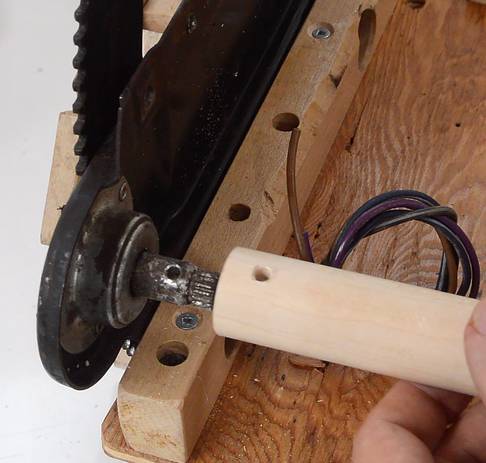 I drilled a hole through the metal shaft sticking out of the window lifter and
through the end of the dowel. A pin (a roofing nail, actually) will lock
the two together.
I drilled a hole through the metal shaft sticking out of the window lifter and
through the end of the dowel. A pin (a roofing nail, actually) will lock
the two together.
The whole thing made me reflect on how I build things differently now than at 16. I have become more methodical. But part of this is also a matter of having the right tools. My dad's workshop was not at all set up for this type of tinkering. And documenting the whole process gives me extra motivation to do it "right".
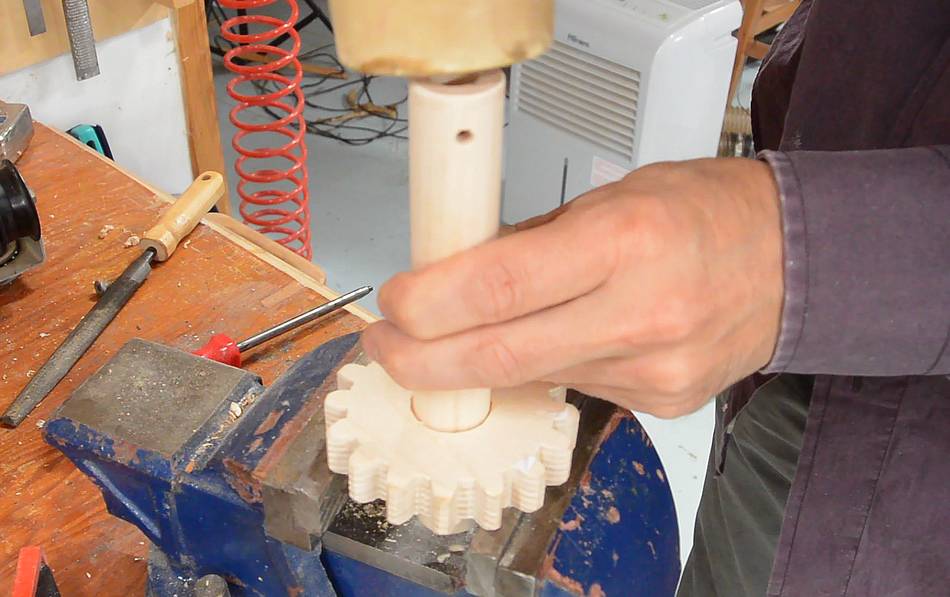
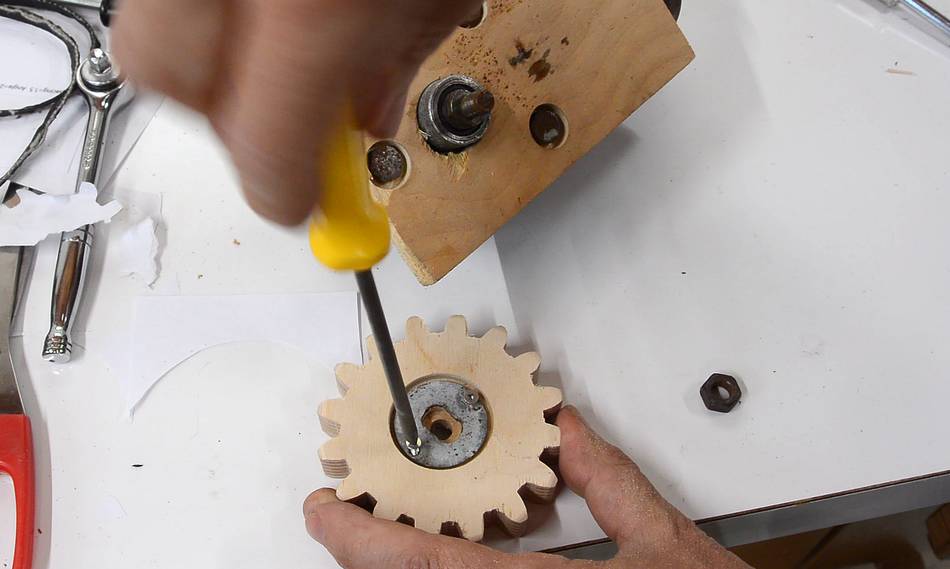
 I drilled a 1" hole in the gear. My 1" dowel was a very tight fit
in the hole, but I could drive it in with a mallet.
I drilled a 1" hole in the gear. My 1" dowel was a very tight fit
in the hole, but I could drive it in with a mallet.
I added a screw through the gear to lock it onto the dowel, but didn't take pictures of that.
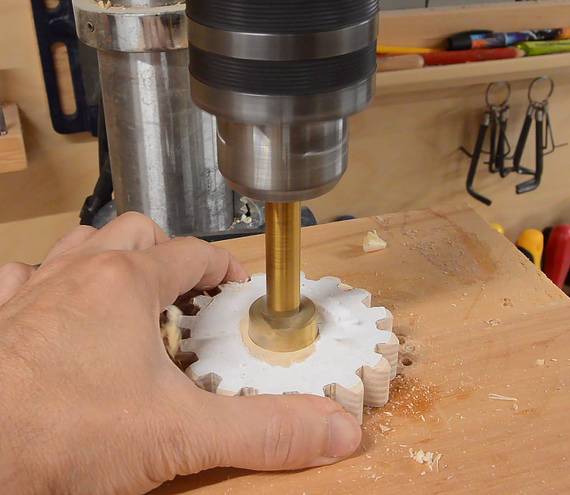
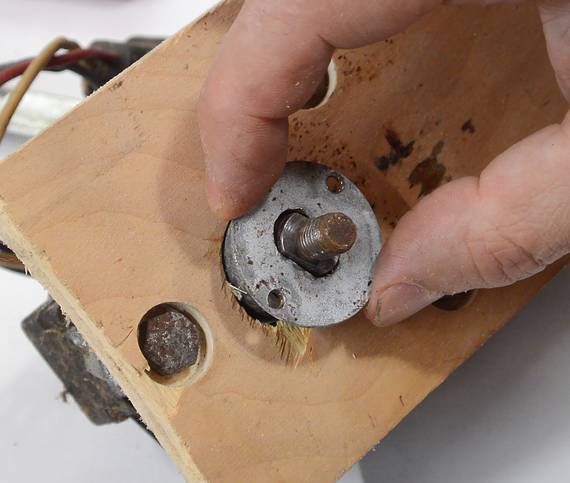 The windshield wiper motor has a shaft with two flat spots on it for locking
the arm to it. Those flat spots don't provide enough of a bearing surface
for a wooden gear (or the pulley I used earlier), so I originally made a
washer with a slot in it to go on the shaft.
The windshield wiper motor has a shaft with two flat spots on it for locking
the arm to it. Those flat spots don't provide enough of a bearing surface
for a wooden gear (or the pulley I used earlier), so I originally made a
washer with a slot in it to go on the shaft.
The washer screws into a recess in the new wooden gear.

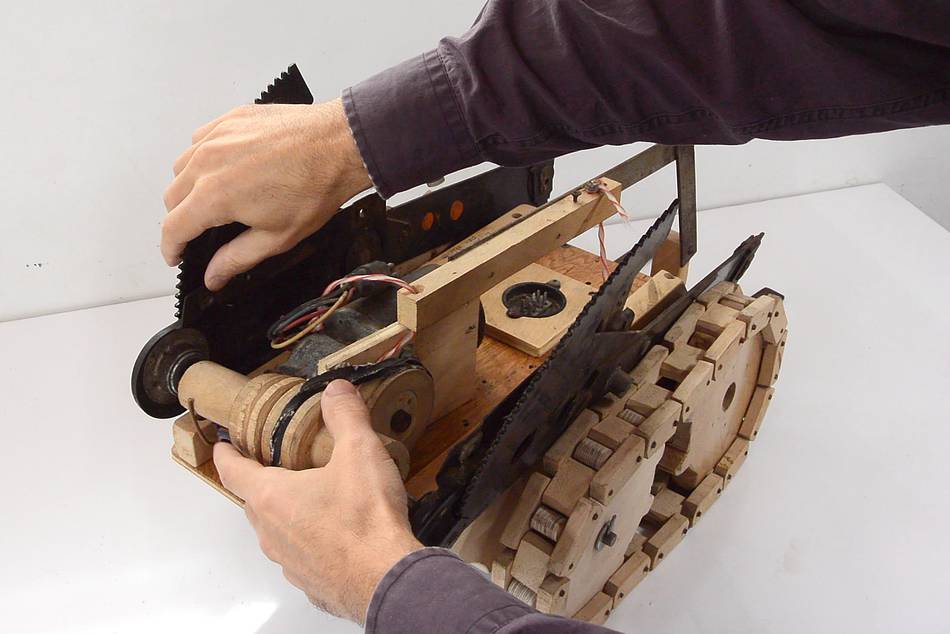
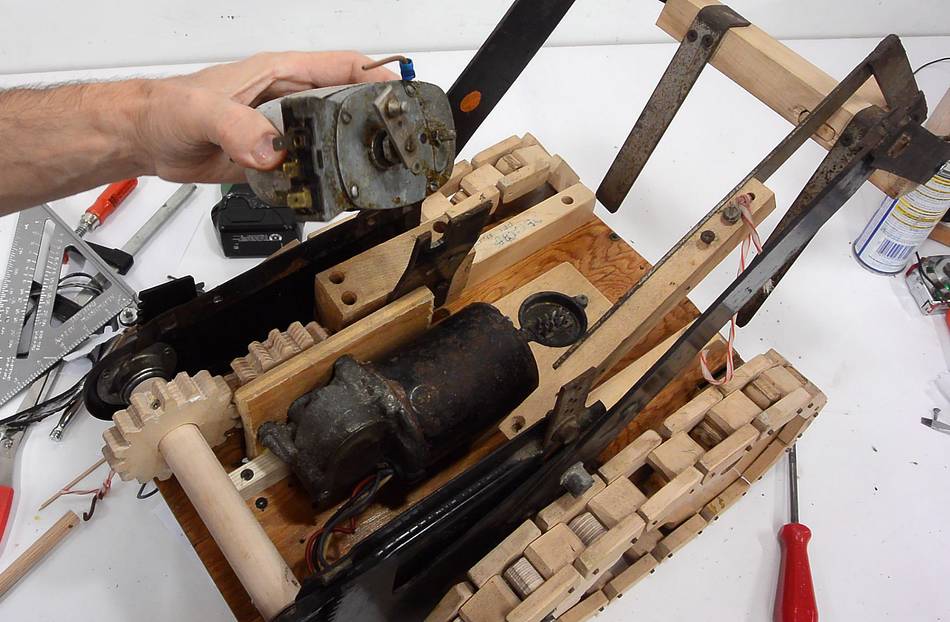
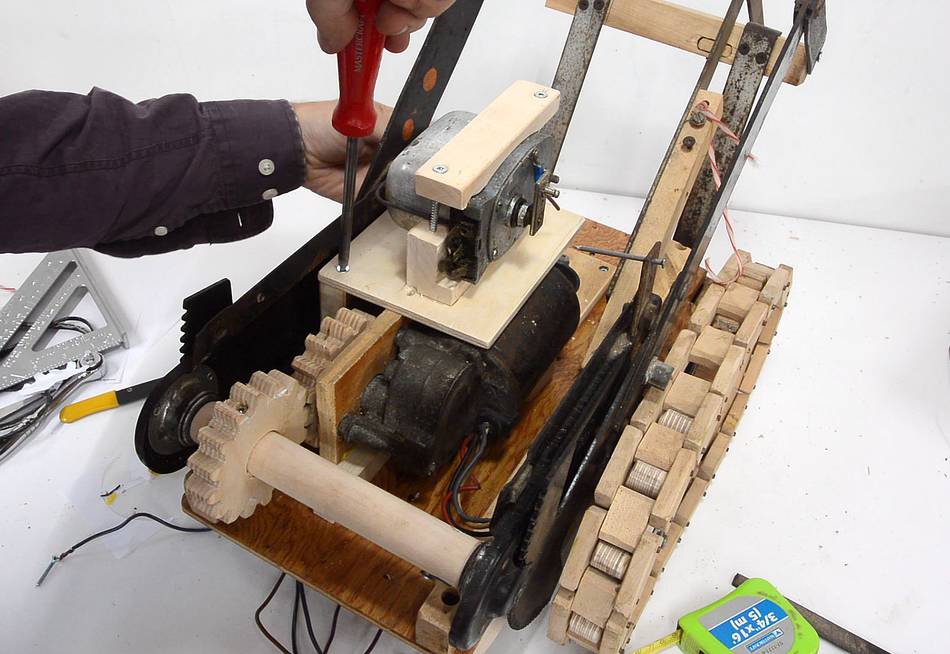
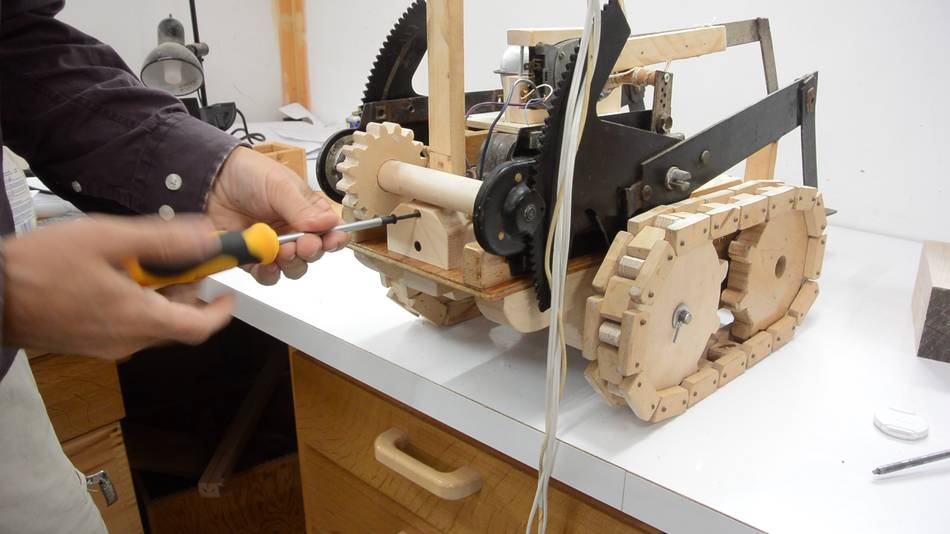
 Windshield wiper motor and gear mounted on the forklift toy. I tested
it by connecting the motor to a power supply. It worked.
Windshield wiper motor and gear mounted on the forklift toy. I tested
it by connecting the motor to a power supply. It worked.
In retrospect, the old pulley system at least provided a sort of "slip clutch" when the lift reached the end of its range. This one has no "give" to it, so I will have to be careful not to try to force it beyond its range.
 I figured I'd reuse the same string wrapped around a dowel method for
controlling the fork tilt. But with the lift motor
now in the middle of the deck, there wasn't any room for the
mounting bracket I originally made for the VW wiper motor.
I figured I'd reuse the same string wrapped around a dowel method for
controlling the fork tilt. But with the lift motor
now in the middle of the deck, there wasn't any room for the
mounting bracket I originally made for the VW wiper motor.
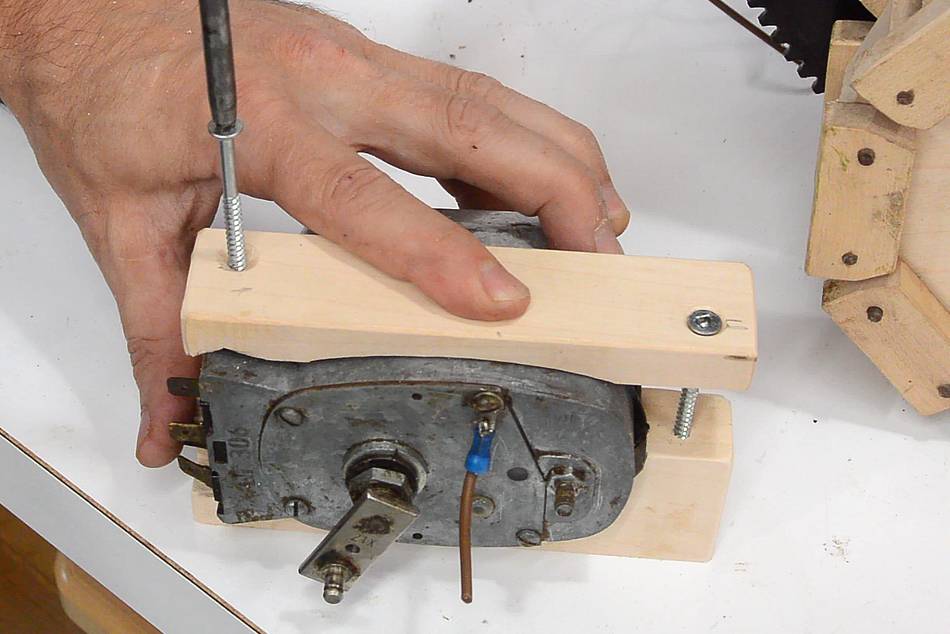
 I took the back cover off the motor and traced the shape on a piece
of wood, then cut that out on the bandsaw to make a bracket to clamp
around the motor.
I took the back cover off the motor and traced the shape on a piece
of wood, then cut that out on the bandsaw to make a bracket to clamp
around the motor.
 This bracket screws onto a piece of plywood which in turn screws onto the motor
mount and onto another block which attaches to the side rail of the chassis.
This bracket screws onto a piece of plywood which in turn screws onto the motor
mount and onto another block which attaches to the side rail of the chassis.
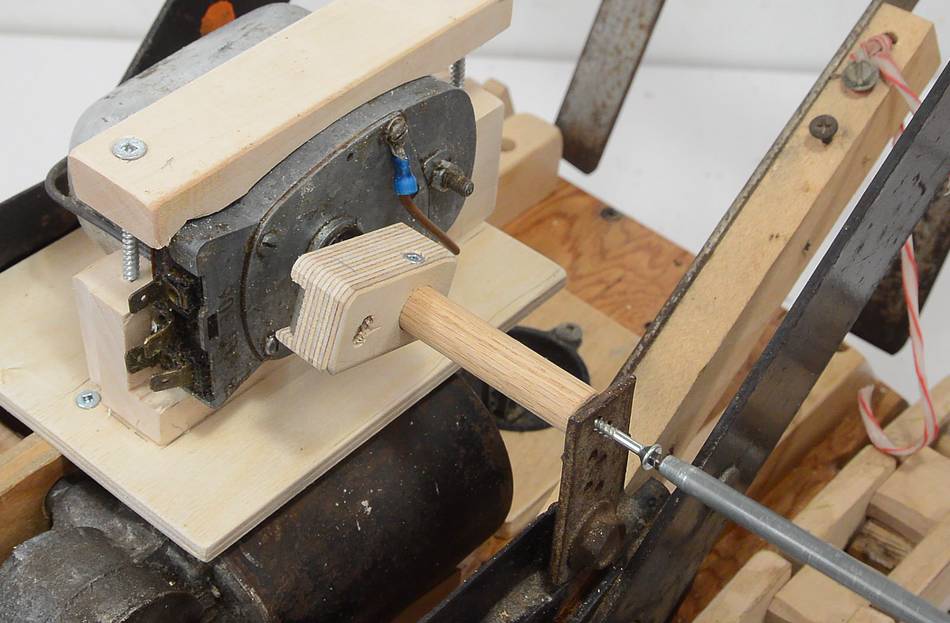 I made a new bracket for mounting a dowel to the motor's crank (having lost
the original one). A screw in the end of the dowel provides a "bearing"
on the other end of it.
I made a new bracket for mounting a dowel to the motor's crank (having lost
the original one). A screw in the end of the dowel provides a "bearing"
on the other end of it.

 A string winds around the dowel and goes towards the fork while another
string wraps around in the opposite direction and goes towards the back.
A string winds around the dowel and goes towards the fork while another
string wraps around in the opposite direction and goes towards the back.
This way, when the motor turns the dowel, the fork tilts up and down. The second string allows me to force the fork down.
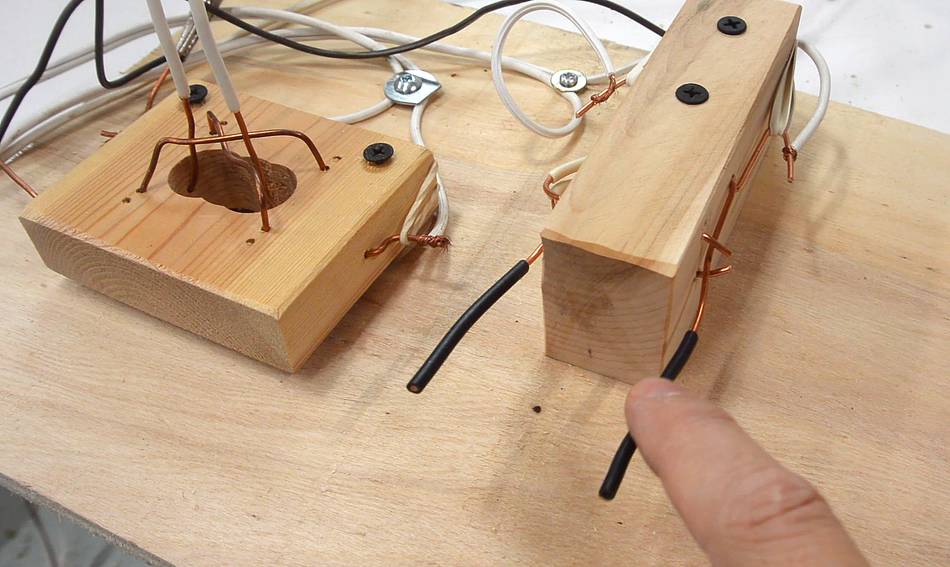 I made some crude switches out of #14 copper wire to control the fork.
These are wired to mimic the front end loader controls on my
big tractor. I find the arrangement
counterintuitive, and this will hopefully help me get used to it.
I made some crude switches out of #14 copper wire to control the fork.
These are wired to mimic the front end loader controls on my
big tractor. I find the arrangement
counterintuitive, and this will hopefully help me get used to it.
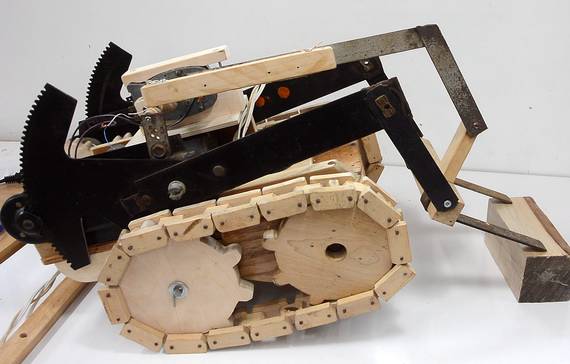
 I added a cable mast to the back. A block of wood acts as a bracket to hold it.
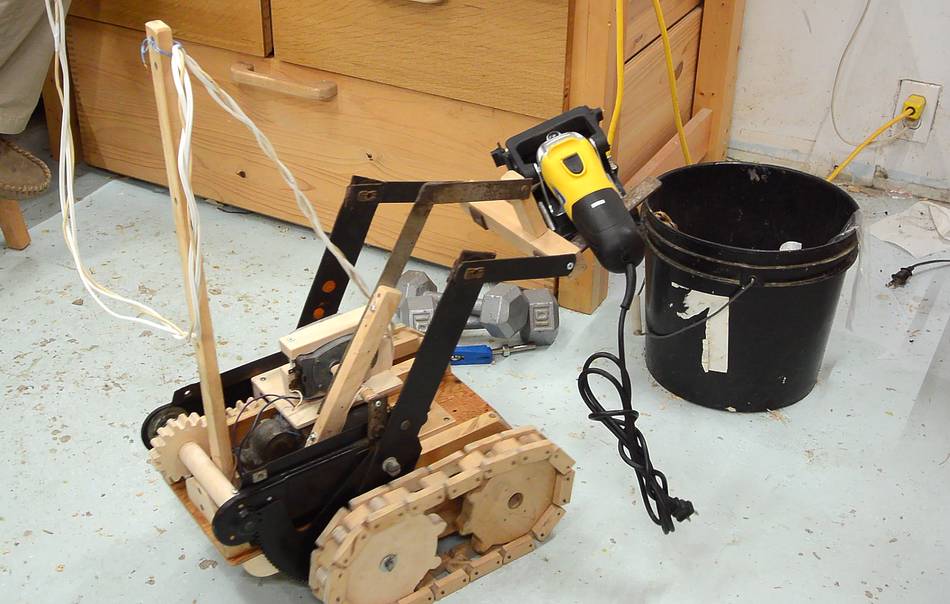 Then lots of testing, setting out to do specific challenges, like picking up
this biscuit jointer and dropping it in the garbage can.
Then lots of testing, setting out to do specific challenges, like picking up
this biscuit jointer and dropping it in the garbage can.
Also picking up some barbells. It could lift up a 10 lbs and a lbs barbell together (8 kg total), but as soon as I started driving it tipped forward.

 Or picking up my Kreg pocket hole jig and dropping it in the garbage. This
was very tricky to pick up. It kept falling off the fork, but I managed to
get it in there (The Kreg K5 pockt hole jig would be easier).
I then tipped over the garbage can with the forklift, and it
fell out, so I ran it over a few times.
Or picking up my Kreg pocket hole jig and dropping it in the garbage. This
was very tricky to pick up. It kept falling off the fork, but I managed to
get it in there (The Kreg K5 pockt hole jig would be easier).
I then tipped over the garbage can with the forklift, and it
fell out, so I ran it over a few times.
Playing with this toy is very different from using a real front end loader. Visibility and manoeuvrability are much better. And if something isn't in quite the right position, I'd just bang into it with the fork until it was where I wanted it. Very different from the careful and deliberate action when using real heavy equipment.
It was fun to play with, and I had to fix a few things. One of the links of the chain had a tendency to kink in a funny way, and eventually it broke, so I replaced that one. Fortunately, the kinking was limited to one inaccurately made link.
I also had to tweak one of the wiper motors to work better in reverse, tighten down a lot of screws, and add an extra screw to hold the dowel onto the wiper motor for the fork tilt. I'm thinking, next I should make a bucket for it so I could use it like a front end loader.
See also:
 Touring dad's shop attic
 Forklift drive chains
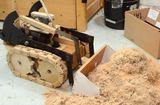 Forklift toy payloader bucket
 Homemade bench top power supply
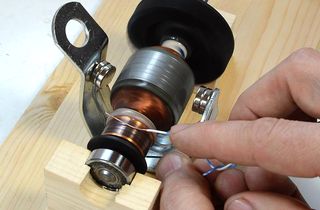 How DC and universal
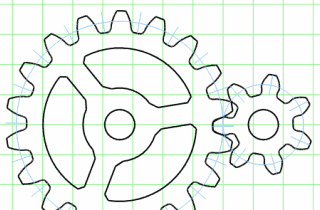 Gear generator program
Back to my woodworking website.