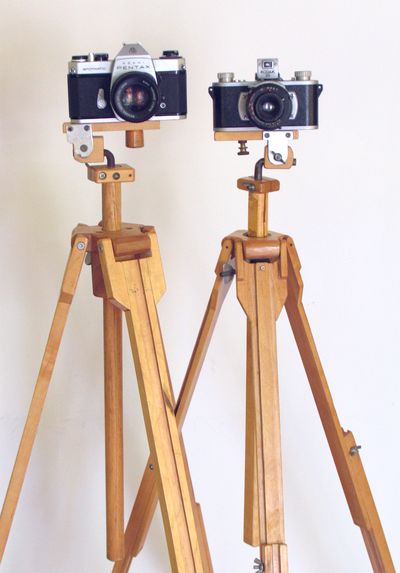
My first and second tripod
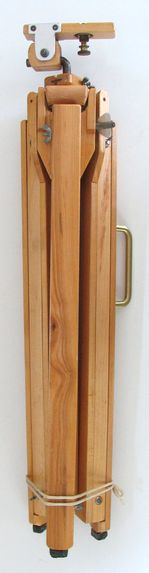
Second tripod
folded up
I didn't have a lot of money when I first got into photography back in highschool in the 1980s, but I wanted a tripod so I could experiment with longer exposures in low light. I didn't want to spend a lot of money. So I set out to build my own.
I built my first wooden tripod in 1987, and in 1988 built a more refined version of it. This page details some of the things I figured out and hints if you want to build your own.
|
My first and second tripod |
Second tripod folded up |
 One of the things that helped make the wooden tripods possible was my dad's (at the time) new
Felder table saw with a tilting spindle shaper.
There was also a thin 30-degree cutter head that was actually part of a sort of panel joining
cutter assembly. By using this cutter,
and tilting the shaper spindle, I was able to cut out most of the 30 degree dovetails in a few passes.
Using the shaper worked better than a router would have, on account of better chip removal, and
not having to worry about the cutter overheating from a full depth cut that is always necessary with a dovetail bit.
The other thing I realized much later is that 30 degree dovetail router bits are actually kind
of rare. I guess 30 degree is not ideal for most normal
dovetail joinery.
One of the things that helped make the wooden tripods possible was my dad's (at the time) new
Felder table saw with a tilting spindle shaper.
There was also a thin 30-degree cutter head that was actually part of a sort of panel joining
cutter assembly. By using this cutter,
and tilting the shaper spindle, I was able to cut out most of the 30 degree dovetails in a few passes.
Using the shaper worked better than a router would have, on account of better chip removal, and
not having to worry about the cutter overheating from a full depth cut that is always necessary with a dovetail bit.
The other thing I realized much later is that 30 degree dovetail router bits are actually kind
of rare. I guess 30 degree is not ideal for most normal
dovetail joinery.
For the first tripod I built, I made the legs out of two segments. But I figured this tripod was a little too bulky to take with me to university, so I built a second, lighter tripod with legs that consisted of three segments.
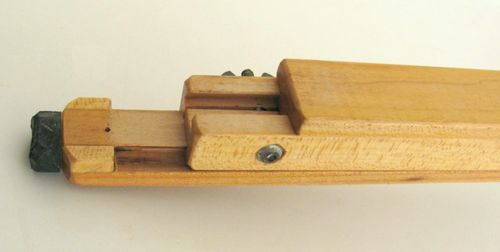 The middle segment has two female dovetails cut into it, and the outside pieces are each a male
dovetail. To lock the legs, the female dovetail is clamped together with a screw and wing nut,
one on each end of the middle segment. With this clamping action, the dovetail forms a rigid joint.
The middle segment has two female dovetails cut into it, and the outside pieces are each a male
dovetail. To lock the legs, the female dovetail is clamped together with a screw and wing nut,
one on each end of the middle segment. With this clamping action, the dovetail forms a rigid joint.
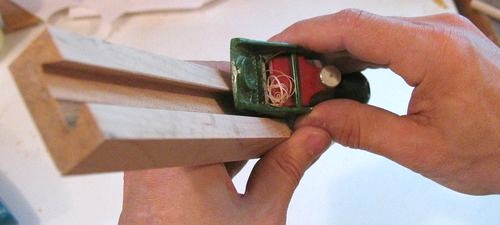
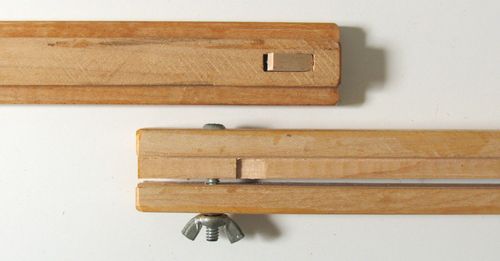 I needed some way of keeping the dovetails from sliding
all the way apart. I couldn't really figure out a good place to put a catch on it without making it ugly
or interfering with the wing nuts on the sides of the legs. So I came up with this clever little
spring loaded catch. At left, the top segment shows the spring loaded catch and the bottom
segment shows the wedge shaped notch that it catches in. The catch is normally retracted,
but a spring pushes it into the notch when the notch slides by.
I needed some way of keeping the dovetails from sliding
all the way apart. I couldn't really figure out a good place to put a catch on it without making it ugly
or interfering with the wing nuts on the sides of the legs. So I came up with this clever little
spring loaded catch. At left, the top segment shows the spring loaded catch and the bottom
segment shows the wedge shaped notch that it catches in. The catch is normally retracted,
but a spring pushes it into the notch when the notch slides by.
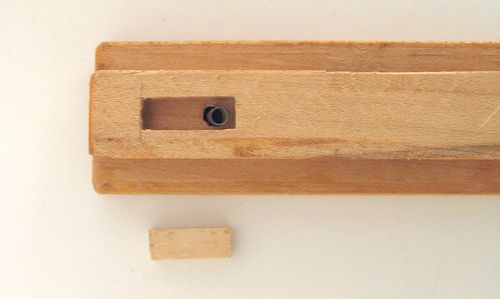 Shown at left is the catch removed from the leg. The catch is just a rectangular piece of wood in
a rectangular hole, with a spring behind one end of it to push it out. In retrospect, I should
maybe have made the catches a little bigger. I have never had them fail on me, but then again,
I don't treat the tripod overly roughly.
Shown at left is the catch removed from the leg. The catch is just a rectangular piece of wood in
a rectangular hole, with a spring behind one end of it to push it out. In retrospect, I should
maybe have made the catches a little bigger. I have never had them fail on me, but then again,
I don't treat the tripod overly roughly.
For my first tripod, with the legs of just two segments, I didn't need catches like that. To extend the
legs on that one, I'd just loosen the wing nuts, and lift the shoulders of the tripod off the ground to the right
height and tighten the wing nuts again. So the legs joints never over extended and came apart.
But for the tripod with three segment legs, raising the tripod by the shoulder would just slide
one of the dovetails all the way apart without extending the other dovetail.
So some catches were needed so that after one segment is fully extended, it won't go any further and the
other segment has to extend.
 Because 30 degree router bits are not something you can get in most stores, I decided to experiment with
making a 30 degree dovetail joint on my table saw, using a technique vaguely similar to what I had done with my
dad's shaper.
Because 30 degree router bits are not something you can get in most stores, I decided to experiment with
making a 30 degree dovetail joint on my table saw, using a technique vaguely similar to what I had done with my
dad's shaper.
Making a finely spaced series of cuts did the trick. But it took on the order of 20 passes to clear out
the dovetail to make it reasonably flat on the bottom. The bottom of the dovetail is always cut
with the corner of the sawblade teeth. Perhaps it might be a good idea to take a cheap 7 1/4" circular
saw blade with teeth at alternating angles, and break or grind off the carbides to make all the teeth
face in one direction so the saw blad would make a skewed cut.
 I cleaned out the bottom of the inside dovetail joint with a chisel to make it reasonably smooth.
 The outside dovetail could be cut with just two passes on either side.
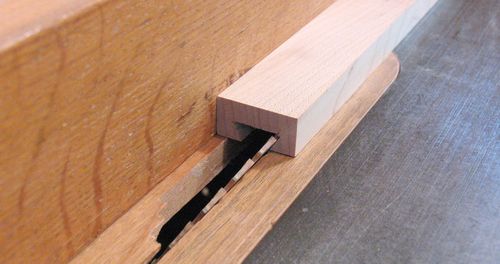
 Finally, I beveled all the sharp 60 degree corners. There's two reasons for this. The first is that
the saw blade would not reach all the way in on the inside corner, the other that these sharp
60 degree corners are very uncomfortable to touch and just generally vulnerable to damage.
Finally, I beveled all the sharp 60 degree corners. There's two reasons for this. The first is that
the saw blade would not reach all the way in on the inside corner, the other that these sharp
60 degree corners are very uncomfortable to touch and just generally vulnerable to damage.
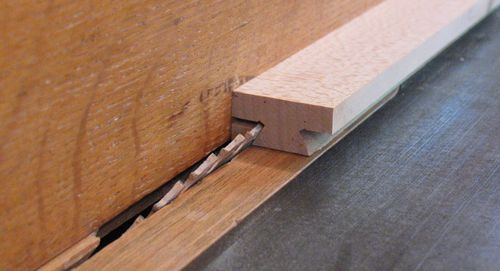
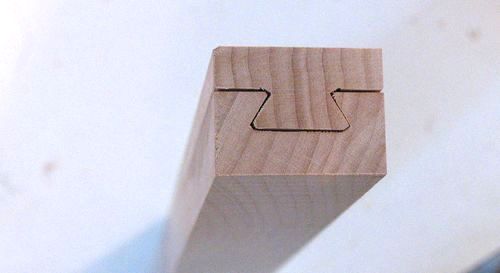 And finally, how it all fits together. Enough of a gap left for it to slide easily but not pop apart.
Next... Tripod shoulders and head