More on making box joints
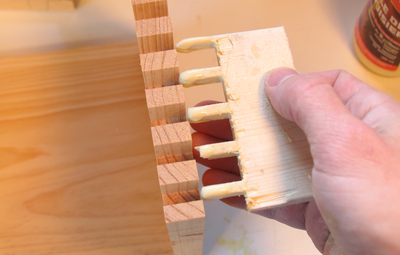
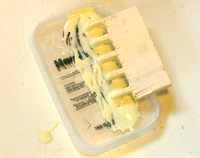 When making several boxes, it's useful to make a comb for applying the glue
to multiple fingers. I load the comb by dipping it into a tray of glue, and then
use it to smear glue between several fingers at once.
I usually use a thin piece of wood as a backing to keep the back-most piece
of wood from chipping out. To make the comb, it's simply a matter of offsetting
the backing piece a bit to the side, and making another series of cuts.
That way, its notches will be wider
and its fingers narrower, so that it's easy to get in between the fingers of the box.
When making several boxes, it's useful to make a comb for applying the glue
to multiple fingers. I load the comb by dipping it into a tray of glue, and then
use it to smear glue between several fingers at once.
I usually use a thin piece of wood as a backing to keep the back-most piece
of wood from chipping out. To make the comb, it's simply a matter of offsetting
the backing piece a bit to the side, and making another series of cuts.
That way, its notches will be wider
and its fingers narrower, so that it's easy to get in between the fingers of the box.
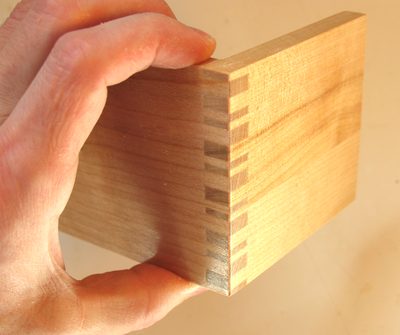
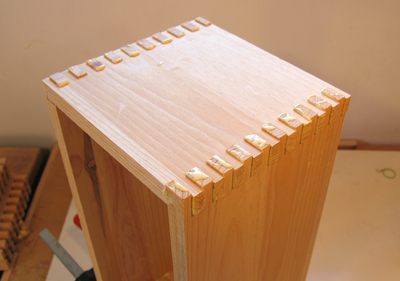 I like to make the fingers a millimeter longer than needed, as you can see at
left. That way, there's certainty of never making the fingers too short.
I like to make the fingers a millimeter longer than needed, as you can see at
left. That way, there's certainty of never making the fingers too short.
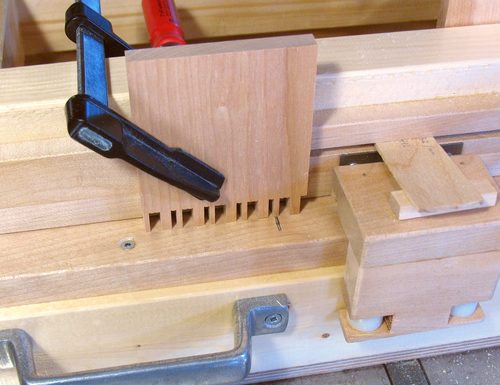
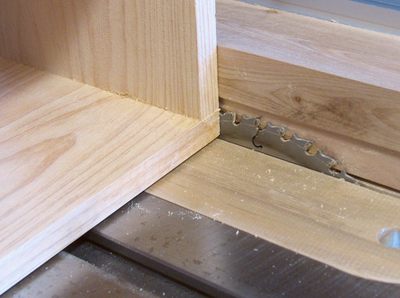 The fingers are best trimmed off with a table saw. I made a piece of wood
to attach to the fence for this purpose.
The piece is narrower at the bottom, where the blade is.
It is set so that the left most edge of the blade
lines up with the edge of the fence above it. That way, I just need to slide the box
past it to trim all the protruding fingers flush.
The fingers are best trimmed off with a table saw. I made a piece of wood
to attach to the fence for this purpose.
The piece is narrower at the bottom, where the blade is.
It is set so that the left most edge of the blade
lines up with the edge of the fence above it. That way, I just need to slide the box
past it to trim all the protruding fingers flush.
A useful little cheat is to tilt the blade by half a degree away from the box, and set the fence so that the blade will cut into the joint a tiny bit. With the blade tilted, the top of it will be out of the material, so there won't be an edge left by the blade from cutting into the box. If your saw is a left-tilt saw, you will have to use the right side of the fence if you want use this cheat.
Strength test
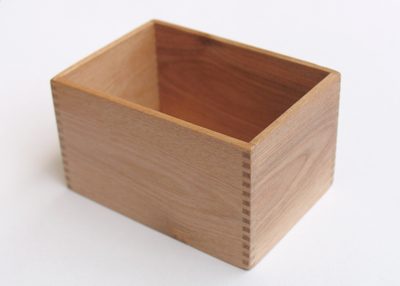
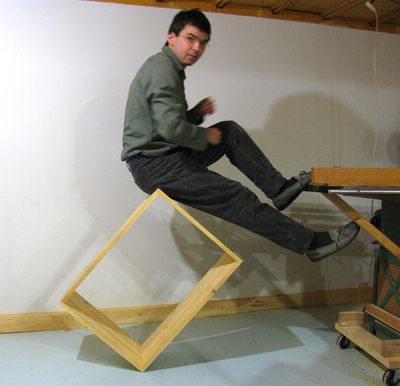 Accurately cut box joints are very strong. Even without a bottom, this box is strong
enough to support my weight on edge. The box is from 18 mm thick material, and is 50x70 cm, and 30 cm
deep. At first, I was a bit tepid about testing the box like that, but it took me
10 tries with the self timer to get even this shot, so by the end of it, I was much more
concerned about getting into a good pose before the camera's timer went off than I was
about whether the box would hold.
Accurately cut box joints are very strong. Even without a bottom, this box is strong
enough to support my weight on edge. The box is from 18 mm thick material, and is 50x70 cm, and 30 cm
deep. At first, I was a bit tepid about testing the box like that, but it took me
10 tries with the self timer to get even this shot, so by the end of it, I was much more
concerned about getting into a good pose before the camera's timer went off than I was
about whether the box would hold.
I wouldn't try that with a dovetail joined box!
Update: I have performed some strength test experiments comparing box joints against dovetail joints.
Irregular box joint
 Another experiment was to cut irregular box joints. With the
screw advance jig set up with a gear
where one turn is the width of the blade, it's just a matter of how many turns between
fingers. As long as one always does whole turns, and one piece always has a cut where
the other piece does not, a perfect fit can be achieved.
Another experiment was to cut irregular box joints. With the
screw advance jig set up with a gear
where one turn is the width of the blade, it's just a matter of how many turns between
fingers. As long as one always does whole turns, and one piece always has a cut where
the other piece does not, a perfect fit can be achieved.
 The joint above is symmetric, so I was able to cut both parts at once. But it was
a bit challenging keeping track of how many turns I needed to make when. A better method
is to cut one master template, and then clamp that to the jig. Then it's a matter
of making a mark on the jig, and when the mark lines up a gap, cut, otherwise
continue to the next increment.
To cut the opposite piece, repeat, but cut when the mark lines up with wood instead.
The joint above is symmetric, so I was able to cut both parts at once. But it was
a bit challenging keeping track of how many turns I needed to make when. A better method
is to cut one master template, and then clamp that to the jig. Then it's a matter
of making a mark on the jig, and when the mark lines up a gap, cut, otherwise
continue to the next increment.
To cut the opposite piece, repeat, but cut when the mark lines up with wood instead.
By setting it up so that the one crank turn is exactly one blade width, and always stopping the crank with the handle in the same positions, all cuts are essentially on a sort of grid, making sure it's all aligned. It's just a matter of cut or not cut for any position, with no need to keep track of how many turns to the next cut.
Tiny box joints
 I also experimented with making very tight box joints. I have a 6 1/2" blade, which is actually
meant for battery powered circular saws. This blade has a kerf of about 1.75 mm.
Using a 35 tooth primary against the 16 tooth secondary resulted in a tight joint with
this blade. The fingers and slots are each about 1.75 mm (just over 1/17") wide!
I also experimented with making very tight box joints. I have a 6 1/2" blade, which is actually
meant for battery powered circular saws. This blade has a kerf of about 1.75 mm.
Using a 35 tooth primary against the 16 tooth secondary resulted in a tight joint with
this blade. The fingers and slots are each about 1.75 mm (just over 1/17") wide!
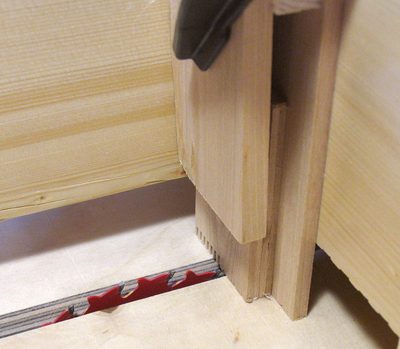 The jig is a little large for pieces that small. If I were to make a lot of boxes that
small, I'd probably make some sort of insert to clamp the work pieces onto. You can see
how the work pieces are wedged between a larger backing board, and another board
that I clamped into the box to squeeze them in place.
The jig is a little large for pieces that small. If I were to make a lot of boxes that
small, I'd probably make some sort of insert to clamp the work pieces onto. You can see
how the work pieces are wedged between a larger backing board, and another board
that I clamped into the box to squeeze them in place.
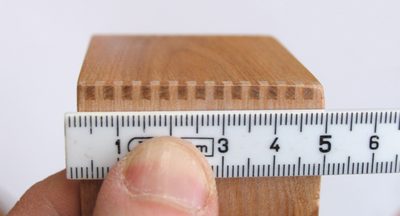 The box joint, from above, next to a metric ruler and my thumb for size comparison.
This is the smallest box joint I can make. There are smaller and thinner saw blades, but tese tend to
have arbors smaller than 5/8"
The box joint, from above, next to a metric ruler and my thumb for size comparison.
This is the smallest box joint I can make. There are smaller and thinner saw blades, but tese tend to
have arbors smaller than 5/8"
More on box joints
![]()