This fall (2009), my brother and I went to my
parents to help with making apple cider. We used the same apple grinder and
press that my parents have been using since the fall of 2004, so this was the sixth
season for the equipment.
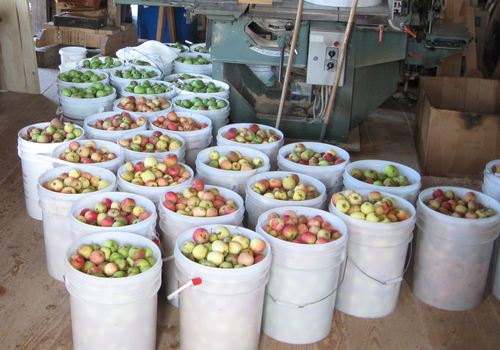
We had about fifty 20-liter buckets worth of appes gathered, this picture doesn't show
quite all of them. That was a lot of apples - over one cubic meter's worth!
The apples are not the sort of apples you'd just eat - they are all half wild, and
kind of tart, gathered from apple trees from abandoned farms and such all around.
Aside from being free, the wild-ish apples are a little tart, but make some excellent
cider.
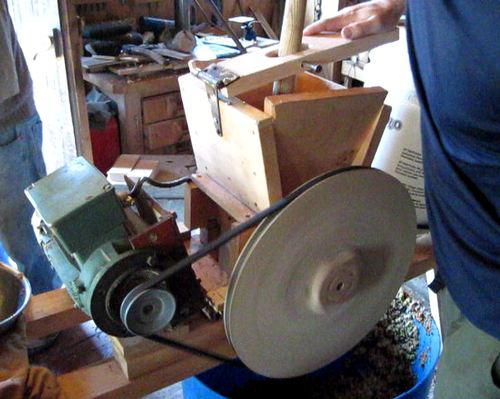
To get the apples to grind fast, it helps to push the apples down a bit. My dad had built
a plug to push them down, and, to it easier, I added this lever that Markus is using in this
the photo to push down the apples.
With the lever mechanism to help push the apples down, we ended up pushing harder
than before, and we broke the screw that holds the wooden grinder drum
onto the stainless steel shaft. Markus replaced
it with a bigger screw, which held up to any abuse since.
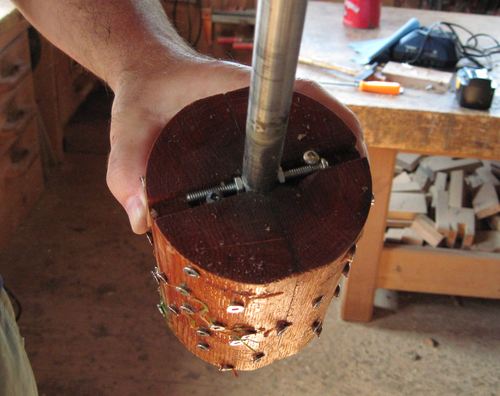
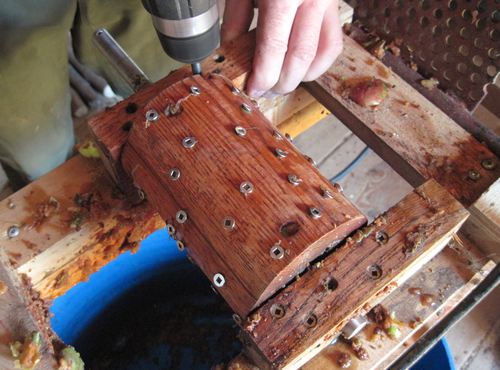
In this photo, Markus is re-installing the drum in the grinder frame after replacing
the screw. The funnel
and case fit over the bearing blocks. We didn't clean the grinder for
the repair, which is why there are bits of apple everywhere. Still, considering that
this is the sixth season this grinder is in use, its holding up pretty well. Oak
is a good wood to use in this regard, it stands up well to the elements.
The screws are all stainless steel. They are countersink screws, angled to slice
into the apple a little as they pass alhough my experience at this point is that
the screws really didn't need to be angled. Square head screws would have worked just
as well. The less efficiently the apple is mashed up, the easier it is to get
the juice out of the resulting mash. And with a half horsepower motor powering
the grinder, efficiency doesn't matter very much.
Before this apple grinder, my parents had experimented
with slicing the apples with a cabbage slicer - which produced very poor juice yield.
The apples really need to be mashed, not cut.
On with the grinding. The funnel on the grinder is actually less functional than
it looks. You can't fill it and push down, because the apples always jam against
each other. So it was always a matter of throwing about 10 apples in, and then
pushing them down with the plunger.
It takes 5 - 10 seconds to grind 10 apples, so it's not so bad.
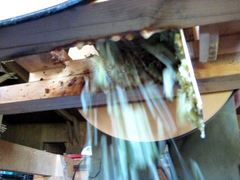
The small image at right shows the grounds coming out of the bottom of the grinder.
The grounds drop directly into this large plastic barrel, which I scooped out
as I needed them for the press. I could press about as fast as Markus ground, so the grinder
was running pretty much continuously.
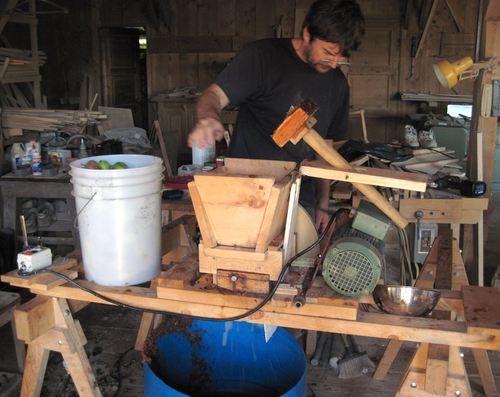
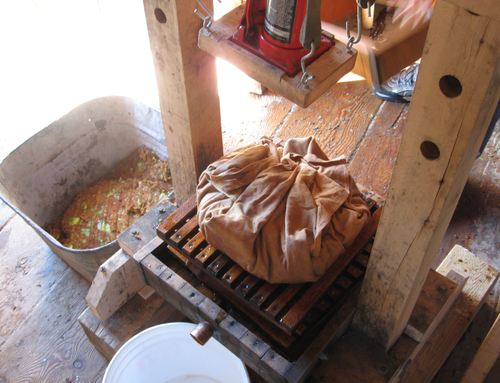
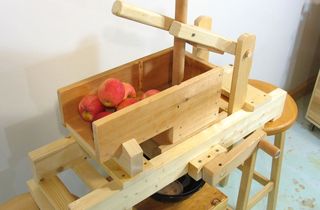
Loading the press. There's a wooden box, that we put a piece of sturdy cloth in
and then fill with apple grounds.
When the box is filled up, the cloth is folded over the
top of the grounds, and then the box is removed. Next, another oak lattice is put on
top of the cloth, and the procedure is repeated. I usually pressed three layers
like this, sometimes four.
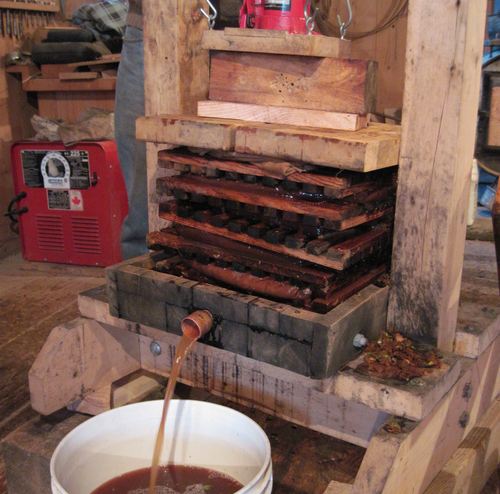
The purpose of the cloth bags and wooden lattices is to allows the juice to get
out of the compressed mash more easily. If you just squished a whole barrel full
of mash as one contiguous volume,
it would be harder for the juice to find its way through the tightly
squeezed mash all the way to the edges.
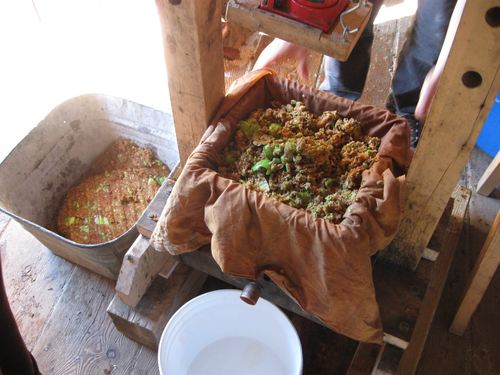
It's always satisfying doing the initial squeeze. The juice flows like it's coming
out of a tap. Each loading of the press resulted in almost five liters
of juice.
The press is made out of Maple, although maple doesn't stand up to the elements as
well as Oak does. The tray on the bottom of the press, which is also made out of maple,
has turned black over the years. But I'm fairly sure that apple juice is not that good
a host to nasty bacteria. It's pretty acidic. The copper spout that the juice
is coming out was completely etched clean, no patina on it whatsoever, and copper
stands up to acids a little better than most metals.
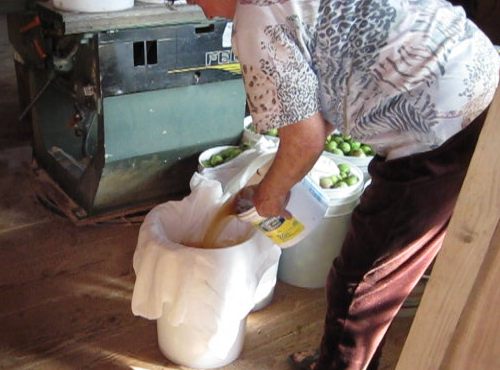
The final step is to screen the cider to remove any bits of pulp.
My mom is using some sheer curtain fabric to do this - you can
mostly see through the fabric, so I wouldn't call this process filtering. Whatever
pulp makes it through that screen just ends up becoming sediment. But sediment is a fact
of life for apple cider, much as it is for any sort of homebrew.
All in all, we extracted over 250 liters of juice. We started at 2 pm one day
and worked till 6. The next day, we started at 7:30 am, and finished at 11 am.
So it could have been done in a long day.
To ferment it, mom leaves it in open containers for a few days. Wild yeast from the air
will get it started. This leads to a few days of wild foaming fermentation. Once that
has settled down, my mom puts it in closed containers with a "fermentation lock" to
let out the gas but not let additional airborne bacteria in.
The cleanup is very important. With the grinder and press all made out of wood,
they'll take being covered in apple mash for a few days at a time, but it's very important
to hose everything down and then let it dry out, so the equipment will be good for the next
season.
I also made a video showing the various steps of the operation:
 We had about fifty 20-liter buckets worth of appes gathered, this picture doesn't show
quite all of them. That was a lot of apples - over one cubic meter's worth!
The apples are not the sort of apples you'd just eat - they are all half wild, and
kind of tart, gathered from apple trees from abandoned farms and such all around.
Aside from being free, the wild-ish apples are a little tart, but make some excellent
cider.
We had about fifty 20-liter buckets worth of appes gathered, this picture doesn't show
quite all of them. That was a lot of apples - over one cubic meter's worth!
The apples are not the sort of apples you'd just eat - they are all half wild, and
kind of tart, gathered from apple trees from abandoned farms and such all around.
Aside from being free, the wild-ish apples are a little tart, but make some excellent
cider.
 The first step in the process is grinding the apples. We were using my
 With the lever mechanism to help push the apples down, we ended up pushing harder
than before, and we broke the screw that holds the wooden grinder drum
onto the stainless steel shaft. Markus replaced
it with a bigger screw, which held up to any abuse since.
With the lever mechanism to help push the apples down, we ended up pushing harder
than before, and we broke the screw that holds the wooden grinder drum
onto the stainless steel shaft. Markus replaced
it with a bigger screw, which held up to any abuse since.
 In this photo, Markus is re-installing the drum in the grinder frame after replacing
the screw. The funnel
and case fit over the bearing blocks. We didn't clean the grinder for
the repair, which is why there are bits of apple everywhere. Still, considering that
this is the sixth season this grinder is in use, its holding up pretty well. Oak
is a good wood to use in this regard, it stands up well to the elements.
In this photo, Markus is re-installing the drum in the grinder frame after replacing
the screw. The funnel
and case fit over the bearing blocks. We didn't clean the grinder for
the repair, which is why there are bits of apple everywhere. Still, considering that
this is the sixth season this grinder is in use, its holding up pretty well. Oak
is a good wood to use in this regard, it stands up well to the elements.
 On with the grinding. The funnel on the grinder is actually less functional than
it looks. You can't fill it and push down, because the apples always jam against
each other. So it was always a matter of throwing about 10 apples in, and then
pushing them down with the plunger.
It takes 5 - 10 seconds to grind 10 apples, so it's not so bad.
On with the grinding. The funnel on the grinder is actually less functional than
it looks. You can't fill it and push down, because the apples always jam against
each other. So it was always a matter of throwing about 10 apples in, and then
pushing them down with the plunger.
It takes 5 - 10 seconds to grind 10 apples, so it's not so bad.
 The small image at right shows the grounds coming out of the bottom of the grinder.
The grounds drop directly into this large plastic barrel, which I scooped out
as I needed them for the press. I could press about as fast as Markus ground, so the grinder
was running pretty much continuously.
The small image at right shows the grounds coming out of the bottom of the grinder.
The grounds drop directly into this large plastic barrel, which I scooped out
as I needed them for the press. I could press about as fast as Markus ground, so the grinder
was running pretty much continuously.
 Loading the press. There's a wooden box, that we put a piece of sturdy cloth in
and then fill with apple grounds.
Loading the press. There's a wooden box, that we put a piece of sturdy cloth in
and then fill with apple grounds.

 When the box is filled up, the cloth is folded over the
top of the grounds, and then the box is removed. Next, another oak lattice is put on
top of the cloth, and the procedure is repeated. I usually pressed three layers
like this, sometimes four.
When the box is filled up, the cloth is folded over the
top of the grounds, and then the box is removed. Next, another oak lattice is put on
top of the cloth, and the procedure is repeated. I usually pressed three layers
like this, sometimes four.
 It's always satisfying doing the initial squeeze. The juice flows like it's coming
out of a tap. Each loading of the press resulted in almost five liters
of juice.
It's always satisfying doing the initial squeeze. The juice flows like it's coming
out of a tap. Each loading of the press resulted in almost five liters
of juice.
 The final step is to screen the cider to remove any bits of pulp.
My mom is using some sheer curtain fabric to do this - you can
mostly see through the fabric, so I wouldn't call this process filtering. Whatever
pulp makes it through that screen just ends up becoming sediment. But sediment is a fact
of life for apple cider, much as it is for any sort of homebrew.
The final step is to screen the cider to remove any bits of pulp.
My mom is using some sheer curtain fabric to do this - you can
mostly see through the fabric, so I wouldn't call this process filtering. Whatever
pulp makes it through that screen just ends up becoming sediment. But sediment is a fact
of life for apple cider, much as it is for any sort of homebrew.
 The cleanup is very important. With the grinder and press all made out of wood,
they'll take being covered in apple mash for a few days at a time, but it's very important
to hose everything down and then let it dry out, so the equipment will be good for the next
season.
The cleanup is very important. With the grinder and press all made out of wood,
they'll take being covered in apple mash for a few days at a time, but it's very important
to hose everything down and then let it dry out, so the equipment will be good for the next
season.
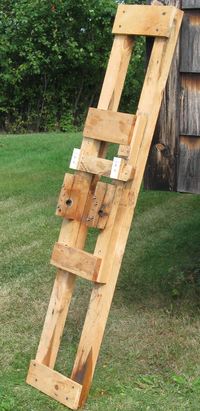
 Building an apple grinder
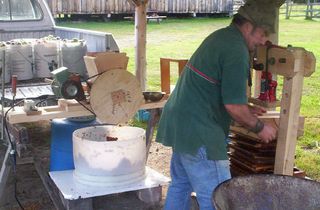 My parents making apple cider
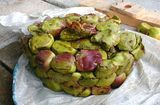 Attempting to press apples without grinding
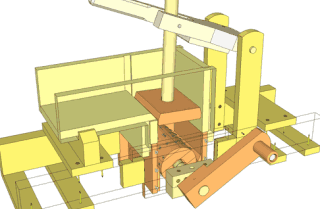 Apple grinder plans