Foundation for the new addition
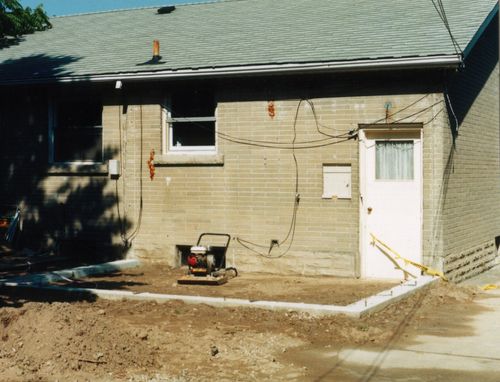
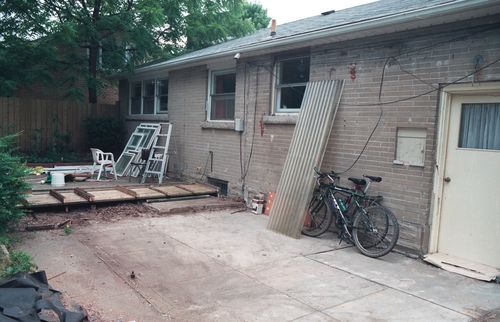 This photo shows the spot where the old addition had been before
I demolished it and where the new
addition was about to be constructed. The old addition had originally been
a sort of screened back porch on a concrete pad. At some point somebody
decided to shoddily convert it into a four-season "sunroom".
This photo shows the spot where the old addition had been before
I demolished it and where the new
addition was about to be constructed. The old addition had originally been
a sort of screened back porch on a concrete pad. At some point somebody
decided to shoddily convert it into a four-season "sunroom".
There was a wooden patio, which went right up to one edge of the addition. I cut the joists of the patio so that I could take the section of it that overlapped the concrete pad and flip it onto the rest of the patio.
 I hired a contractor to handle all the concrete work. I had neither
the skill nor the equipment to deal with concrete, and I wasn't inclined to
experiment as I usually do either. Mistakes in concrete tend to be set
in stone, quite literally.
I hired a contractor to handle all the concrete work. I had neither
the skill nor the equipment to deal with concrete, and I wasn't inclined to
experiment as I usually do either. Mistakes in concrete tend to be set
in stone, quite literally.
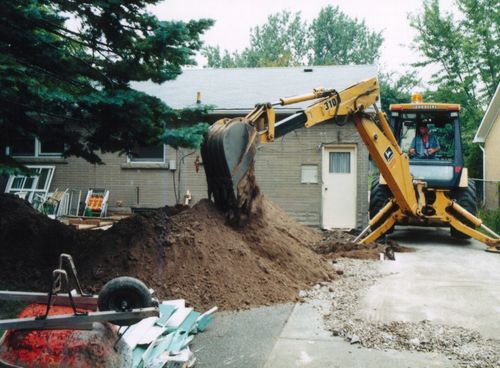
Before the foundation contractor came, I took a sledgehammer to the patio and made a reasonable size hole in it so that the backhoe could pry it up with its shovel. That helped somewhat, but the patio bits still needed to be broken into smaller bits for removal. The backhoe was not as effective at that as I had anticipated. The guy in the middle of the photo was my foundation contractor, wielding a 10-pound sledgehammer. He was a fairly small guy, but I was very impressed by how hard he could swing a 10-pound sledgehammer. I felt like a wimp with my 6-pound sledge.
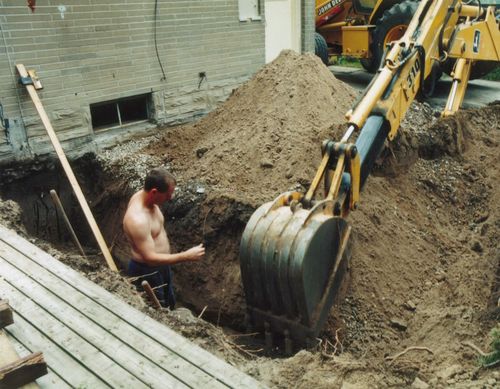 Although the new addition wasn't going to have a basement under it, it was
still necessary to dig 4 feet (1.2 m) to get below the frost line
with the foundation.
Although the new addition wasn't going to have a basement under it, it was
still necessary to dig 4 feet (1.2 m) to get below the frost line
with the foundation.
My original discussions with the contractor involved just putting some cement posts all the way down to the frost line and joining them at the top. But when I mentioned "building permit" to my contractor, his response was "You dumb f****, you got a building permit? Now It's gonna cost more!". Now it had to conform to code. So I needed a footing at the frost line all the way around the perimeter.
My contractor is the one in the trench, checking the size and depth of the trench. The long board leaning against the wall on the left has a gadget clamped to it that that senses the laser beam from a 360 degree projecting laser level that was set up nearby. It beeps slow if the laser hits the upper part of the sensor and fast if it hits the lower part. Makes for very quick checking of the trench depth. The footing was poured directly into the bottom of the trench, so the depth had to be fairly accurate.
 In retrospect, I don't regret getting a building permit and going with
the more solid foundation. I could have saved some
money if I hadn't got a permit though. With the new addition the same
footprint as the old one, nobody would have been the wiser in the end.
In retrospect, I don't regret getting a building permit and going with
the more solid foundation. I could have saved some
money if I hadn't got a permit though. With the new addition the same
footprint as the old one, nobody would have been the wiser in the end.
Or maybe I should have just avoided the $100 for the demolition permit for the previous addition. It turned out the city had no record of the previous addition ever getting built. I guess it was pointless to get a permit to demolish a "nonexistent" structure.
 Here they are removing the forms from the poured foundation. The concrete
work was done in three parts - first the footing, then the foundation walls, and
after that the slab. With waiting for a few days for the concrete to set
after each pour, the work stretched out over more than a week.
Here they are removing the forms from the poured foundation. The concrete
work was done in three parts - first the footing, then the foundation walls, and
after that the slab. With waiting for a few days for the concrete to set
after each pour, the work stretched out over more than a week.
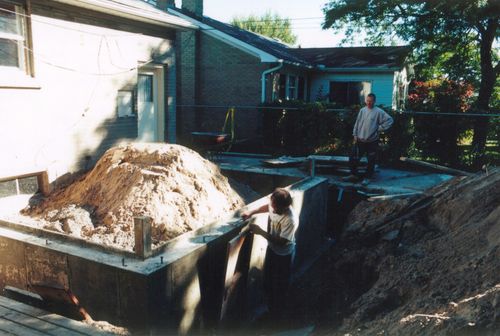
 After the forms were removed, it was time to backfill. By code, insulation
is required on the inside of the foundation. With the space getting backfilled,
insulation on the inside didn't make that much of a difference, but it still
had to be there.
After the forms were removed, it was time to backfill. By code, insulation
is required on the inside of the foundation. With the space getting backfilled,
insulation on the inside didn't make that much of a difference, but it still
had to be there.
In this photo, they are using the shovel of the backhoe to pound down the soil.
 After pushing the soil down with the backhoe, they used a vibrating soil compactor.
the thing is operated a bit like a lawnmower. It's heavy and doesn't have
any wheels, but with the thing jumping up and down from the vibration, it only
takes a modest amount of force to push it along.
After pushing the soil down with the backhoe, they used a vibrating soil compactor.
the thing is operated a bit like a lawnmower. It's heavy and doesn't have
any wheels, but with the thing jumping up and down from the vibration, it only
takes a modest amount of force to push it along.
They left the soil compactor behind with the intention of doing some more work with it later. They never got around to doing that, but I made myself busy with it in their absence to make sure it was all well compacted.
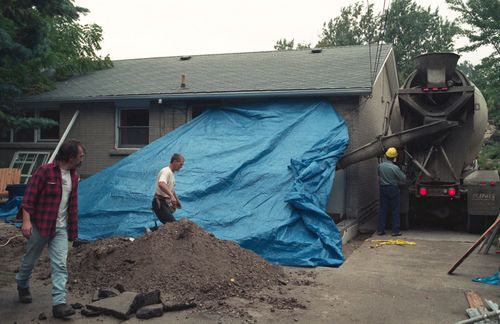 The day that my contractor poured the slab looked very threatening of rain,
so they fixed a tarp over the area. Rain is ok on concrete that has set for a
few hours, but it's not ok when troweling the top surface smooth. Troweling
concrete smooth is one of those amazing things to watch. It starts
out so rough, but when they are done with it, it's so smooth.
The day that my contractor poured the slab looked very threatening of rain,
so they fixed a tarp over the area. Rain is ok on concrete that has set for a
few hours, but it's not ok when troweling the top surface smooth. Troweling
concrete smooth is one of those amazing things to watch. It starts
out so rough, but when they are done with it, it's so smooth.
That finished up the concrete work. The contractor had still promised to take away the small pile of leftover dirt in the foreground. It took repeated nagging to get him to do that, and in the end, he just came with his pickup truck and we shovelled it onto the back of it.
Overall, I was pretty happy with the work my contractor did. The whole thing came to somewhere around $3000, though that was in 1997 dollars.