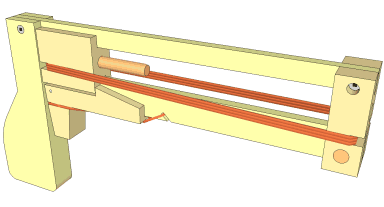
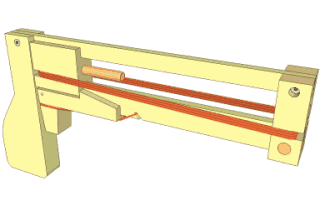
Jenga pistol, version 3

My previous Jenga pistol and video were a viral hit, with over one and a half million views on YouTube. I experimented with selling Jenga pistols, but there were a few things, such as the pulley and the trigger mechanism, in that design that were fiendishly tricky and time consuming to construct, so I didn't make any past the first batch.
I still get asked from time to time about buying a Jenga pistol, about dimensions for the Jenga pistol, and about plans for the Jenga pistol. So I thought I'd revisit that topic. Part of my goal was to try to simplify the design to make the Jenga pistol much easier to build.
With some experimentation, I was able to establish that it's possible to
stretch a rubber band enough that it is possible to pull the bolt all
the way back without breaking the rubber band, yet still have the bolt come all the way
forward without the bands becoming loose enough to fall off. This
allowed me to eliminate the pulley that I ran the rubber band around
on my old design. An added advantage is that it's now much easier to put extra
rubber bands on the pistol to make it shoot extra hard!
 I designed the revised pistol in Google SketchUp. I printed the parts
to 1:1 scale on paper to use as templates for cutting out most of the
parts on the bandsaw.
I designed the revised pistol in Google SketchUp. I printed the parts
to 1:1 scale on paper to use as templates for cutting out most of the
parts on the bandsaw.
Following the lines on the printout to cut out the slots worked accurately enough, although I did have to trim them a little bit (also with the bandsaw) to get the right tightness of fit.
 I also cut the slots in the "bolt" piece, by putting the piece upright
on the bandsaw table.
I also cut the slots in the "bolt" piece, by putting the piece upright
on the bandsaw table.
For this type of cut, having a very level surface around the blade is important. I clamped a piece of wood on the table to provide better, level support around the insert
 The original trigger was made out of two pieces of wood glued together.
This time, I made it out of one piece. The grain of the wood is oriented such
that the hook is strong. The trigger pull part is the cross grain part. I left
that fairly wide so there's no risk of it braking.
The original trigger was made out of two pieces of wood glued together.
This time, I made it out of one piece. The grain of the wood is oriented such
that the hook is strong. The trigger pull part is the cross grain part. I left
that fairly wide so there's no risk of it braking.
The trigger block has a deep slot cut into the middle so that it fits around both sides of the bottom rail.
 I reinforced the bottom corner where the muzzle is held on with a piece of dowel.
When the bolt is released and doesn't hit a Jenga block, its full force whacks
against the muzzle block, so that needs to be attached very securely.
I reinforced the bottom corner where the muzzle is held on with a piece of dowel.
When the bolt is released and doesn't hit a Jenga block, its full force whacks
against the muzzle block, so that needs to be attached very securely.
 It wasn't possible to cut everything on the bandsaw though. The straight rails that guide
the bolts are best ripped on a table saw. I'm using a
zero clearance insert to safely rip the rail. Without an insert,
ripping stock this narrow usually results in it getting pulled into the
slot next to the blade.
It wasn't possible to cut everything on the bandsaw though. The straight rails that guide
the bolts are best ripped on a table saw. I'm using a
zero clearance insert to safely rip the rail. Without an insert,
ripping stock this narrow usually results in it getting pulled into the
slot next to the blade.
 The top rail is just attached with two screws. It needs to be removed when replacing
the rubber bands. Having the rail removable also means I could still tweak the fit
of the bolt if it ever gets too loose or too tight. The fit of the bolt is critical.
It needs to be loose enough to slide freely, yet have very little play so that the pin
on the front of the bolt always aligns with the hole in the muzzle block.
The top rail is just attached with two screws. It needs to be removed when replacing
the rubber bands. Having the rail removable also means I could still tweak the fit
of the bolt if it ever gets too loose or too tight. The fit of the bolt is critical.
It needs to be loose enough to slide freely, yet have very little play so that the pin
on the front of the bolt always aligns with the hole in the muzzle block.
Plans for the jenga pistol
 A frequently asked question from people wanting to build their own Jenga pistol is "how long
is the pistol". To get a sense of scale. The rails that the bolt slides along are 24 cm
(9.5 inches) in length, including the part that goes through the muzzle block and the handle.
The bolt travel itself is 15 cm (about 6").
A frequently asked question from people wanting to build their own Jenga pistol is "how long
is the pistol". To get a sense of scale. The rails that the bolt slides along are 24 cm
(9.5 inches) in length, including the part that goes through the muzzle block and the handle.
The bolt travel itself is 15 cm (about 6").
An even better way to build your own Jenga pistol is to just buy the Jenga pistol plans. The plans include copies of the paper templates for all the parts, detailed instruction, and a 3D CAD model that you can load into the free Google SketchUp. And it's only $6 (it is just a toy, after all)
|
A video showing how the Jenga pistol is constructed, using my
paper template plans.
 |
-
Jenga pistol v2
My experiment at Selling Jenga pistols
Back to my Woodworking website.