 Based on the experience with my previous
apple grinder, I already knew this one would work. Because I wanted to
make a detailed set of plans available for this one, I carefully
designed the whole thing in CAD before I cut any wood.
Based on the experience with my previous
apple grinder, I already knew this one would work. Because I wanted to
make a detailed set of plans available for this one, I carefully
designed the whole thing in CAD before I cut any wood.
Based on the experience with my previous
apple grinder, I already knew this one would work. Because I wanted to
make a detailed set of plans available for this one, I carefully
designed the whole thing in CAD before I cut any wood.
I printed out a 1:1 side view of the apple grinder using my
BigPrint program.
I used a 1:1 template because I hadn't yet produced dimensioned drawings for the plans. So I just worked from the 1:1 template in the workshop.
I cut up a thick board of white oak for the drum. White oak is probably
an ideal material. Wine barrels are always made of white oak, so I know
it stands up well to fruit juices.
Realistically though, most hardwoods should do.
Here I'm marking a circle on the end for cutting out the approximate shape on the bandsaw.
I put the drum on its end on the bandsaw and cut it out.
The drum is just under 15 cm (6") long,
so a regular 14" bandsaw should have just barely enough cutting capacity.
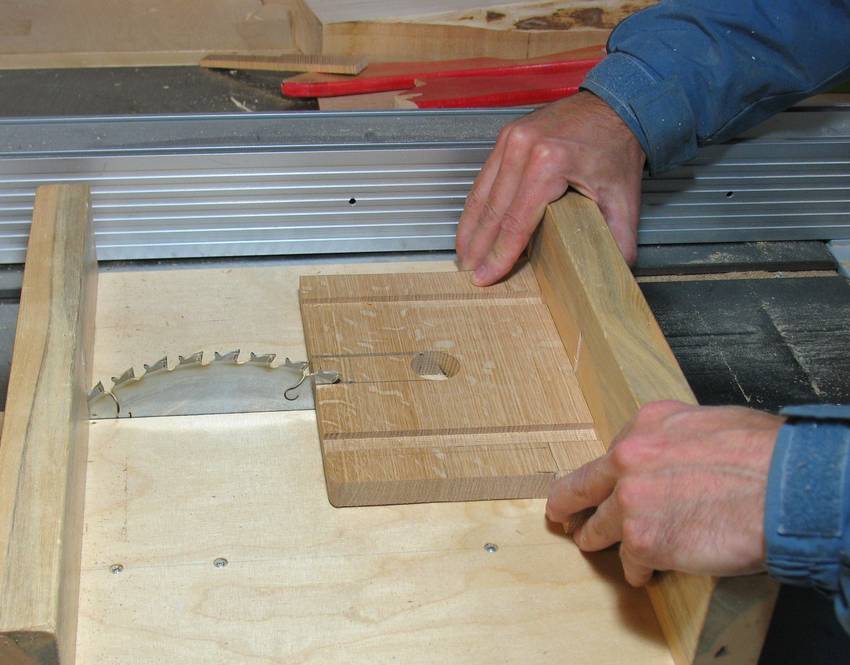
I had what seemed like a clever idea for final shaping the drum on the table saw.
Basically, I spun it over the running saw blade.
The apple grinder frame is clamped (not firmly enough)
to my table saw sled. You can also see the motor and gearing that I was initially going to
use for the grinder on the left.
Oops!
Shaping went well, but slowly, until disaster struck. The blade caught the drum and threw everything forward, putting a gouge in the drum. I could have avoided this if I had clamped it to the sled better. But I figured if I had any accident with this method, it's not something I should encourage anybody else to try. So if you build an apple grinder, my advice is: Don't try this on the table saw!
I was startled but unharmed, but I had to make a new drum.
So for the second drum, I went back to the method I used for my first apple grinder, although with things fixed a little better for added safety.
The shaft passes through two blocks that hold it at the right height above the jointer. I put a sort of collet around the shaft on either side of these two blocks to keep them at about the same position on the shaft.
I can pass the drum over the jointer to cut it down to the right diameter. Once I cut down to the right diameter on one spot, it's a matter of returning the drum to the start position, rotating it left until the drum hits the table, and taking another pass. It takes about fifty passes to round out the drum. You can also use this technique to make dowels and conical spindles.
Next I wrapped a printout of the hole pattern around the drum and transferred
the locations by punching through each screw position with an awl.
I included the hole pattern in the
apple grinder plans
Drilling pilot holes for the screws. The piece of paper taped to the end of the drum
helped set up the position of the vise so all the holes would go in at the right angle.
I'm only using the vise for support, not actually clamping the block.
I messed up a little in that I put the angle template on the wrong end of the drum. The screw pattern is designed to help nudge the apples towards the middle. Having drilled the holes at the opposite angle, I now have to spin it in the opposite direction, so that effect is reversed. I marked which side of the drum that the angle template goes on in the screw hole pattern in the plans.
The screws are put in to stick out just a little bit. This is actually quite enough
for grinding the apples. The shallower the screws are in, the finer the grinder will
pulp the apples, and the more juice the apples yield.
I made some bearing blocks that split apart to allow the drum to be removed from the bottom.
It's important to take everything apart for cleaning after using the grinder.
The wooden bearings need to be well oiled. Initially, a lot of oil will be
absorbed into the wood.
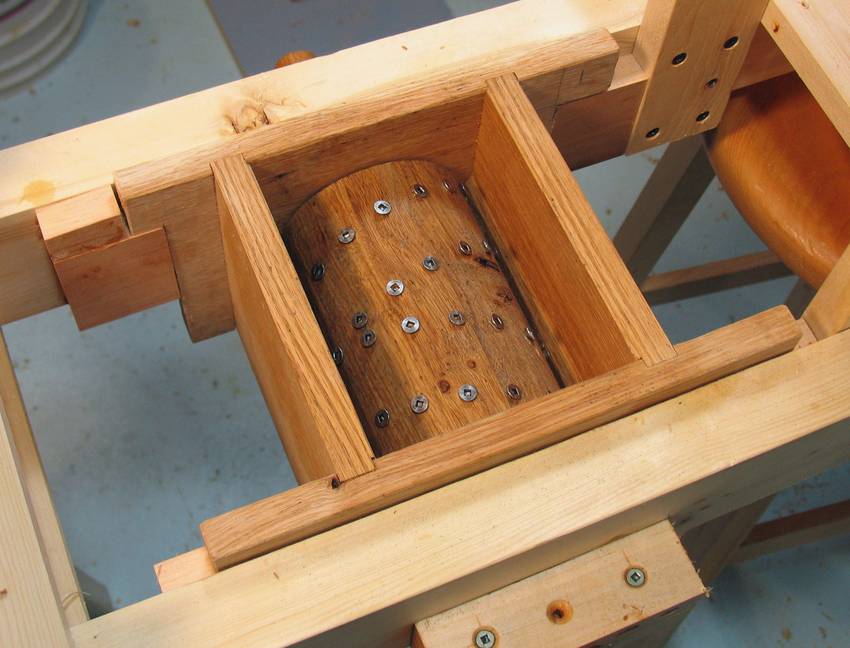 The drum with screws in it and the box enclosing it together form the
core of the apple grinder.
The drum with screws in it and the box enclosing it together form the
core of the apple grinder.
The box needs to be fairly sturdy and fit closely around the grinder drum.
 I cut a slot from the shaft holes towards the bottom of the box
so that the box can easily be lifted off the shaft for cleanup.
I cut a slot from the shaft holes towards the bottom of the box
so that the box can easily be lifted off the shaft for cleanup.
 Screwing the box together with stainless steel screws.
I'm using the same screws that I used in the grinder drum.
Screwing the box together with stainless steel screws.
I'm using the same screws that I used in the grinder drum.
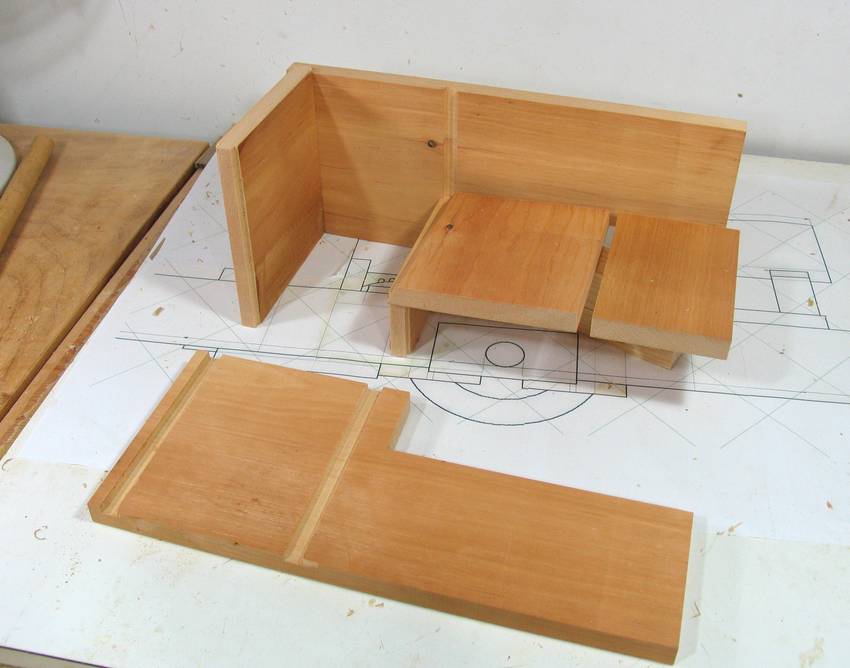 Next I made the apple chute. I used rabbet joints for part of this box, but in retrospect, that
was overkill. The chute is not subject to significant forces, so just glued and nailed butt joints
would have been enough.
Next I made the apple chute. I used rabbet joints for part of this box, but in retrospect, that
was overkill. The chute is not subject to significant forces, so just glued and nailed butt joints
would have been enough.
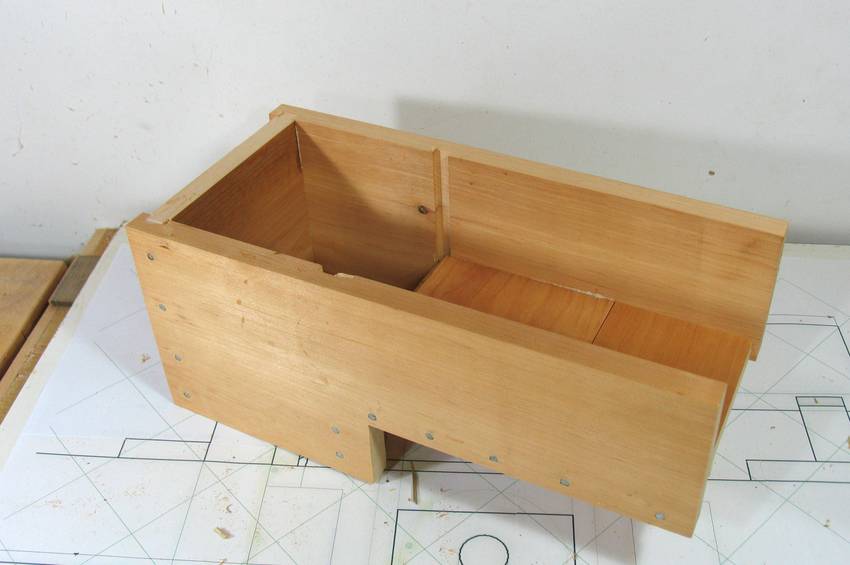 The chute assembled. The bottom end of this
box may get a little bit wet. Actually, if your drum spins too fast, it will
throw apple mash all over and much more of it may get wet. If you motorize
the grinder, running the drum at 200 RPM or less is best.
The chute assembled. The bottom end of this
box may get a little bit wet. Actually, if your drum spins too fast, it will
throw apple mash all over and much more of it may get wet. If you motorize
the grinder, running the drum at 200 RPM or less is best.
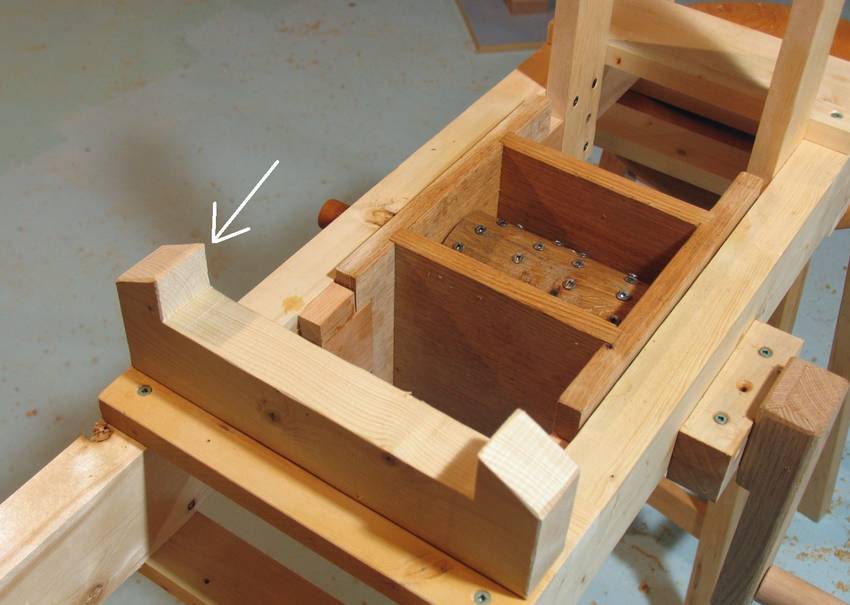 The long end of the chute is supported by a wooden block. The wooden block has hooks
on either end (see arrow) to help keep the chute aligned. There are also two tabs attached
to the bottom of the chute to align it with the grinding box.
The long end of the chute is supported by a wooden block. The wooden block has hooks
on either end (see arrow) to help keep the chute aligned. There are also two tabs attached
to the bottom of the chute to align it with the grinding box.
The chute isn't fastened down at all - these tabs, and gravity is all it takes to hold it in place.
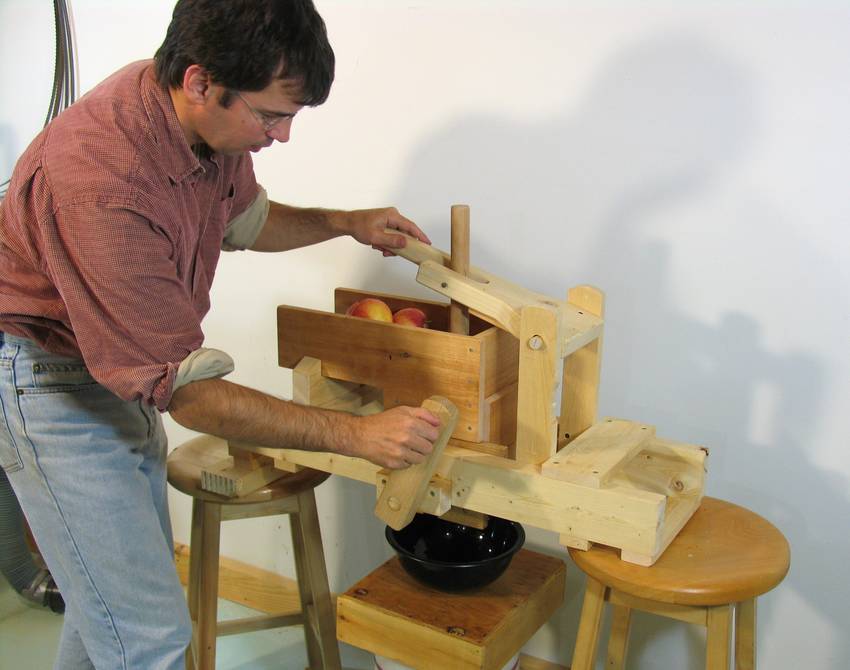
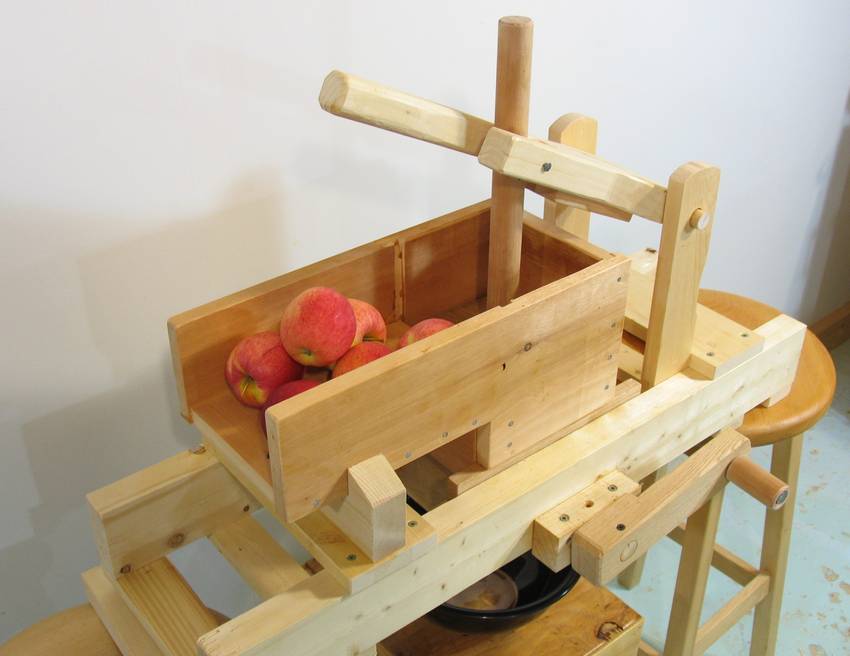 Ready for action.
In this photo, I have a hand crank on the grinder. The hand crank worked surprisingly well,
but you can also motorize it
Ready for action.
In this photo, I have a hand crank on the grinder. The hand crank worked surprisingly well,
but you can also motorize it
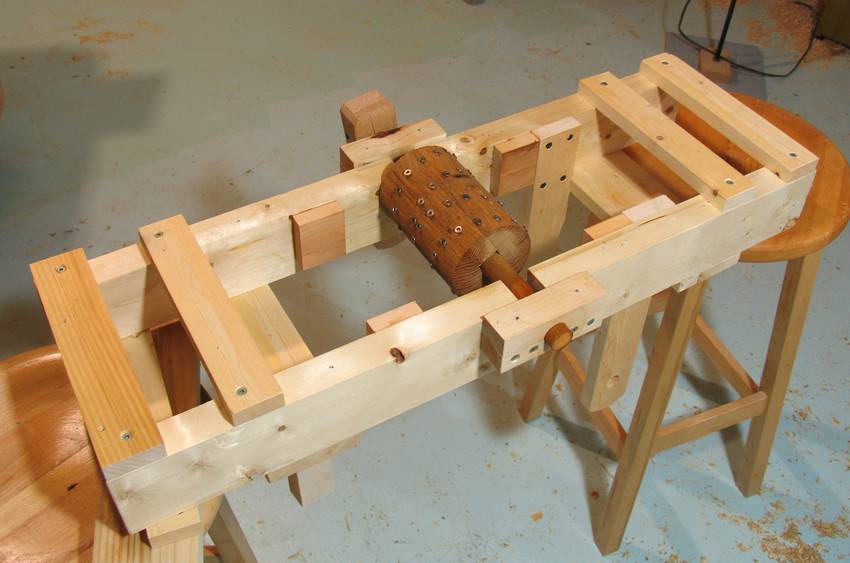 The frame of the apple grinder consists of just two 2x4's with some boards screwed across.
The image at left shows the frame upside-down. I screwed two narrow boards on either end with a gap between them to allow the grinder to be hooked over a pair of sawhorses.
The frame has two cutouts from the bottom where the shaft passes through. Wooden bearing blocks are screwed to the outside of the frame.
The idea is to keep the bearing blocks relatively far from the grinding action. The frame is open around the shaft to make it easier to remove the shaft, and to prevent that area from getting filled with apple pulp.
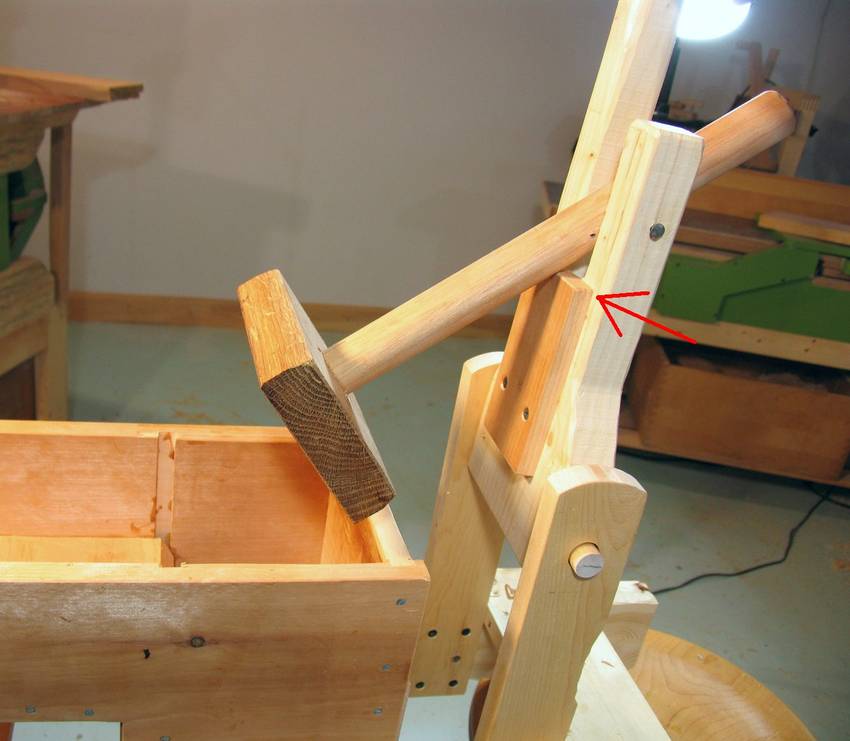 The plunger is attached to the grinder with a lever. This always keeps the plunger
close at hand and reduces the temptation to push the apples down by hand.
The plunger is attached to the grinder with a lever. This always keeps the plunger
close at hand and reduces the temptation to push the apples down by hand.
The lever also prevents the plunger from getting pushed down so far as to contact the drum.
A small block of wood is screwed to the bottom of the plunge lever to limit how far the plunger can angle down when the lever is lifted. This ensures the plunger enters the chute instead of bumping against it when the lever is lowered.
 And a third advantage of the lever is that it's easier to operate the plunger
while cranking the grinder.
And a third advantage of the lever is that it's easier to operate the plunger
while cranking the grinder.
For added safety, one could add a stop that prevents the lever from moving up far enough to lift the plunger completely out of the grinder.
If you have a lot of apples to grind, you probably want to motorize the grinder
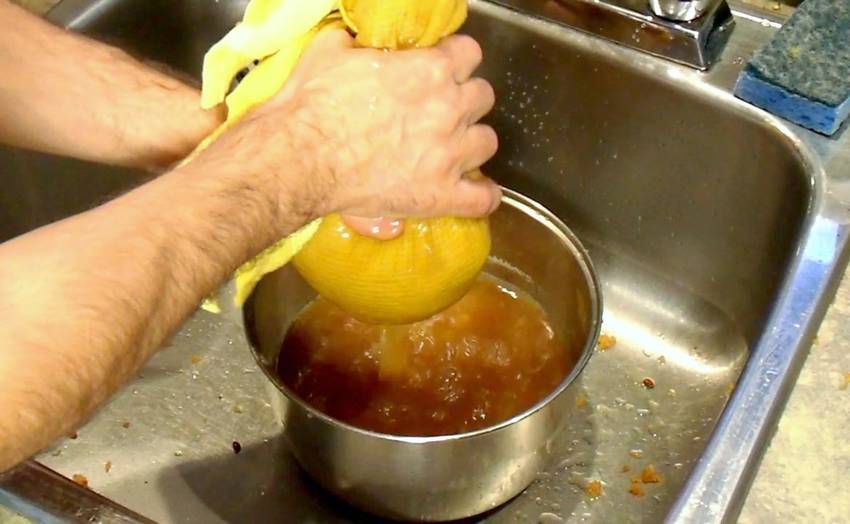 The amount of juice that apples yield is largely a function of how well they are
ground. I didn't have an apple press handy when I tested this grinder,
so I put the grounds in a dish cloth and wrung it out by hand. It was amazing
to see the juice just squirt out of that dish cloth when I squeezed it!
The amount of juice that apples yield is largely a function of how well they are
ground. I didn't have an apple press handy when I tested this grinder,
so I put the grounds in a dish cloth and wrung it out by hand. It was amazing
to see the juice just squirt out of that dish cloth when I squeezed it!
I squeezed most of the juice out, whereas when I had experimented earlier at pressing without grinding, I had very poor juice yield.
Nathan Orkon's apple grinder
Nathan sent me a video of an apple grinder he built based on my plans but up-scaled a little. I really like this video!
Making cider is actually quite easy. Even works with apple juice from the store, provided that it doesn't have preservatives in it.
Here's a video by Lar Erickson showing his experiments.
 Motorizing the apple
 Attempting to press
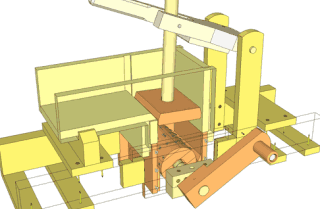 Apple grinder plans
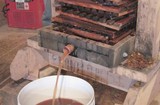 Making apple cider
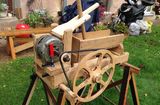 Oleg's apple grinder
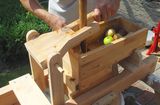 Bert's apple grinder