Plans for this machine
are available
|
|
|
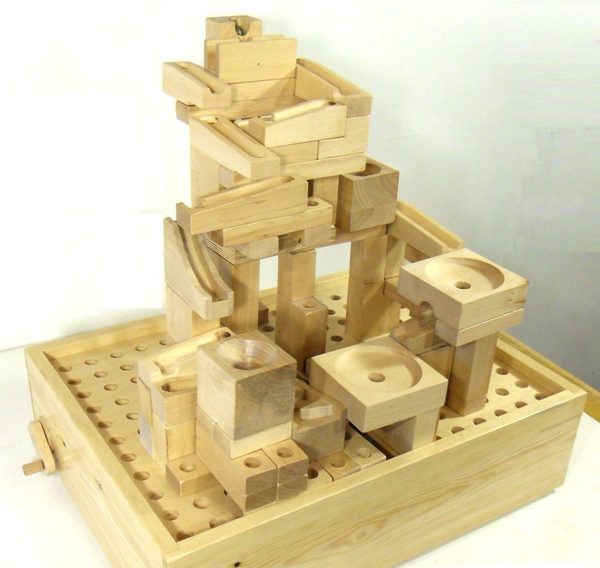
 This marble machine, like my
marble machine 1, uses a
marble pump to elevate the marbles. This marble pump is an optimized
design to make it easier to build.
This marble machine, like my
marble machine 1, uses a
marble pump to elevate the marbles. This marble pump is an optimized
design to make it easier to build.
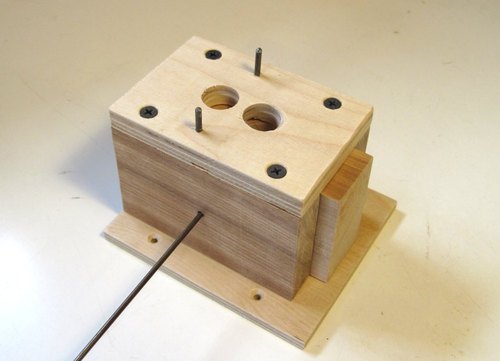
The pump takes marbles fed into one hole and pushes them up through the other. It's driven by a crankshaft made out of coat hanger wire.
The holes in this marble pump are 11/16" (17 mm would work too). This is an in-between size, not part of most drill bit sets, but you can buy this drill bit separately from places such as Lee Valley Tools, Rockler.com, Woodcraft.com, Amazon.com. I also have a YouTube video showing how to build the marble pump.
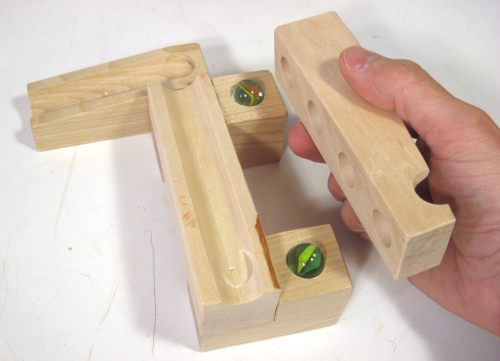
 This shows the insides of the marble pump.
You can see part of the crank on the left edge of the middle block, but it's
mostly obscured.
The crank moves a piston
up and down and side-to-side. The piston is in the middle thicker piece of wood,
which forms the slider. The piston is normally fully inside the slider, but I
propped it up higher for illustration. The crank
moves the piston in a circular motion. The side-to-side motion of the piston
slides the slider back and forth, while the piston moves up and down inside the slider.
This shows the insides of the marble pump.
You can see part of the crank on the left edge of the middle block, but it's
mostly obscured.
The crank moves a piston
up and down and side-to-side. The piston is in the middle thicker piece of wood,
which forms the slider. The piston is normally fully inside the slider, but I
propped it up higher for illustration. The crank
moves the piston in a circular motion. The side-to-side motion of the piston
slides the slider back and forth, while the piston moves up and down inside the slider.
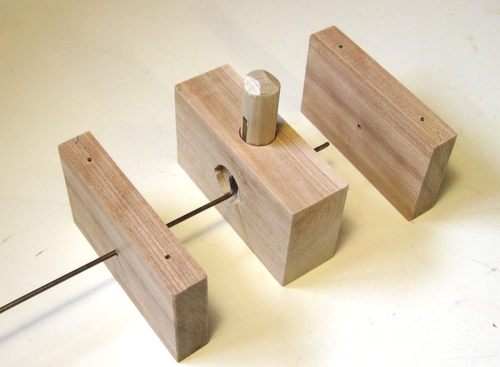
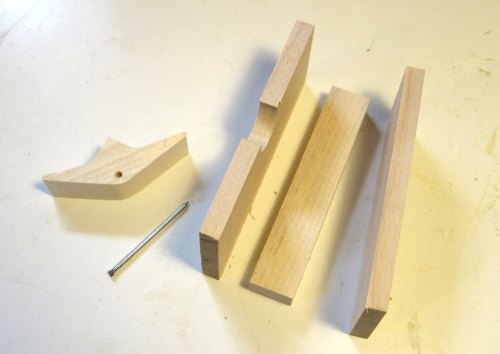
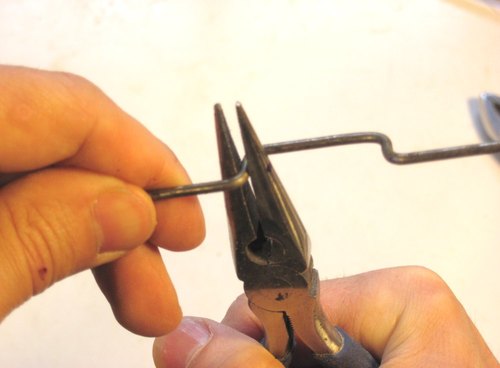 The crank is just made out of coat hanger wire, with a diameter of about 2.5 millimeters.
Bending the right angle bends in the wire is relatively easy. The tricky part is
when two bends are very close together.
The crank has a "throw" or eccentricity of just
over 10 millimeters. A sturdy stubby pair of needle nose pliers proved to be adequate
for grabbing the short straight segment that is the crank throw. The photo shows
the last bend of the crank being formed.
The crank is just made out of coat hanger wire, with a diameter of about 2.5 millimeters.
Bending the right angle bends in the wire is relatively easy. The tricky part is
when two bends are very close together.
The crank has a "throw" or eccentricity of just
over 10 millimeters. A sturdy stubby pair of needle nose pliers proved to be adequate
for grabbing the short straight segment that is the crank throw. The photo shows
the last bend of the crank being formed.
 The crankshaft connects to a hand-crank on the outside of the box. It was tempting
to just bend another crank onto the end of the coat hanger wire, but if the wire wasn't straight
on the ends, it would become impossible to take the machine apart again.
The crankshaft connects to a hand-crank on the outside of the box. It was tempting
to just bend another crank onto the end of the coat hanger wire, but if the wire wasn't straight
on the ends, it would become impossible to take the machine apart again.
And the wooden crank looks much nicer. The coat hanger / dowel coupling is achieved by inserting the coat hanger wire into a hole in the end of the dowel. The dowel is also slit at the end, and the bracket around the dowel clamps it firmly onto the wire.
This coupling isn't perfectly rigid, but that is actually a feature. It sort of serves as a slip clutch against overzealous torquing of the crank if the marbles jam. I haven't had this one jam on me yet, but it can happen if it runs out of input marbles, and a marble falls into the hole at the very same instant that the hole starts closing up because the slider is sliding away from the input hole.
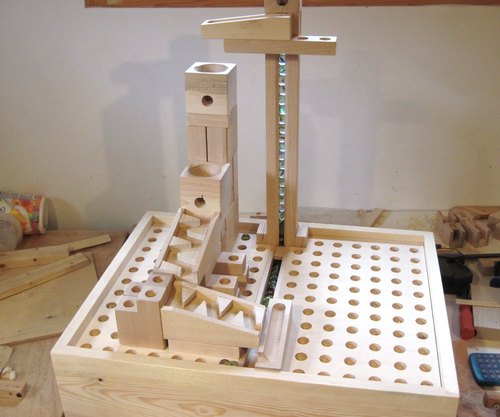
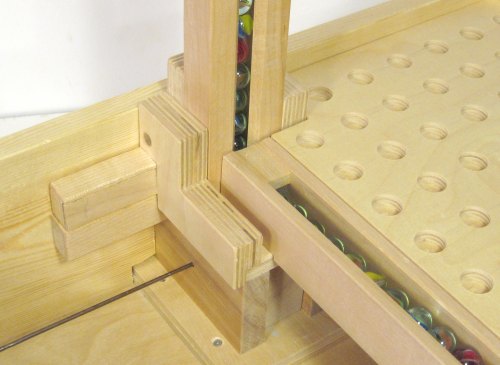 Here's the pump in the machine. To the bottom right is the 'feeder ramp'.
Any built-up track deposits the marbles into this ramp. The pump takes the
marbles from this track and pumps them up the column in the center of the photo.
It's a very elegant method of elevating the marbles, running efficiently and with
a minimum of space used up. It really doesn't take much force on the crank to lift a stack
of 25 marbles.
Here's the pump in the machine. To the bottom right is the 'feeder ramp'.
Any built-up track deposits the marbles into this ramp. The pump takes the
marbles from this track and pumps them up the column in the center of the photo.
It's a very elegant method of elevating the marbles, running efficiently and with
a minimum of space used up. It really doesn't take much force on the crank to lift a stack
of 25 marbles.
|
I made a rather long-winded video about building the marble pump.
|
 On my other marble machines, the descent paths are fixed. But this
machine has no pre-built descent path. The descent path
is something that is built when playing with the machine, making this one a highly
interactive machine!
On my other marble machines, the descent paths are fixed. But this
machine has no pre-built descent path. The descent path
is something that is built when playing with the machine, making this one a highly
interactive machine!
The building blocks are to some extent based on the marble run building block set that I built for a nephew. Though with the benefit of experience with the last set, I was able to refine my system.
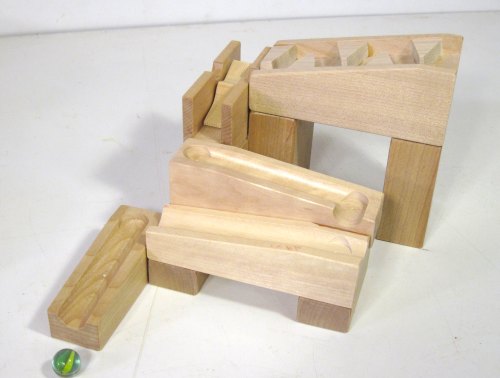 Like Lego blocks, the entire system of blocks is built around discrete units of
width and height. Basic side to side units are 3.2 cm (about 5/4"),
and height units are 2 cm (about 25/32"). The elements can all feed into
each other, but with a height difference of 2 cm from one ramp to the next.
Some units use up a multiple of 2 cm of height. The zigzag ramp, for example, uses
4 cm.
Like Lego blocks, the entire system of blocks is built around discrete units of
width and height. Basic side to side units are 3.2 cm (about 5/4"),
and height units are 2 cm (about 25/32"). The elements can all feed into
each other, but with a height difference of 2 cm from one ramp to the next.
Some units use up a multiple of 2 cm of height. The zigzag ramp, for example, uses
4 cm.
 I wanted the blocks to be able to interlock, but at the same time I wanted the
blocks to be usable without interlocking. So that ruled out putting Lego-like
studs on the tops or bottoms of the blocks. Instead, I opted for holes in both
the tops and bottoms of the blocks. To interlock the blocks, a marble is placed
in the space between the blocks. This won't lock together the same way
as Lego would, but it prevents the blocks from sliding around.
I wanted the blocks to be able to interlock, but at the same time I wanted the
blocks to be usable without interlocking. So that ruled out putting Lego-like
studs on the tops or bottoms of the blocks. Instead, I opted for holes in both
the tops and bottoms of the blocks. To interlock the blocks, a marble is placed
in the space between the blocks. This won't lock together the same way
as Lego would, but it prevents the blocks from sliding around.
I don't use the interlock all the time, just for certain track elements, especially where the marbles have to go around a corner - after twenty or so marbles, the tracks end up shifting a bit. And with each turn of the crank dropping one marble onto the top of the track, running twenty marbles down the track happens awfully fast. In fact, for elaborate runs, I end up pumping more than ten marbles to the top before the first marble even makes it all the way down.
 I spent a bit of time trying to come up with reasonably safe and repeatable
methods of making the parts. So I was less interested in trying
adventurous table saw plunge cuts. It's OK for me
to try stupid and dangerous methods in my workshop, but if I sell plans for a
project, I have to make sure such crazy tactics aren't necessary!
I spent a bit of time trying to come up with reasonably safe and repeatable
methods of making the parts. So I was less interested in trying
adventurous table saw plunge cuts. It's OK for me
to try stupid and dangerous methods in my workshop, but if I sell plans for a
project, I have to make sure such crazy tactics aren't necessary!
Just sandwiching some of the parts together out of layers worked pretty well.
 I had to do lots of testing along the way. The whole set is a bit of an engineer's toy.
It's one thing to build a run that looks pretty, but making sure the track doesn't
'leak' marbles is a matter of trial and error.
I had to do lots of testing along the way. The whole set is a bit of an engineer's toy.
It's one thing to build a run that looks pretty, but making sure the track doesn't
'leak' marbles is a matter of trial and error.
Momentum of marbles is a fun thing, but it can lead to errant bounces out of the tracks.
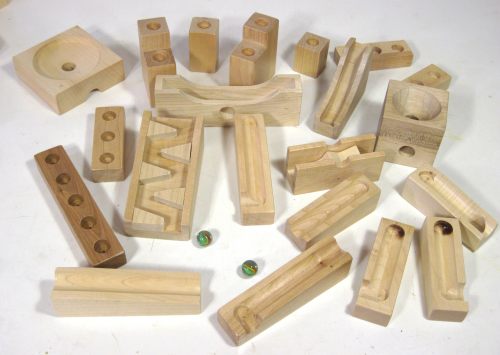
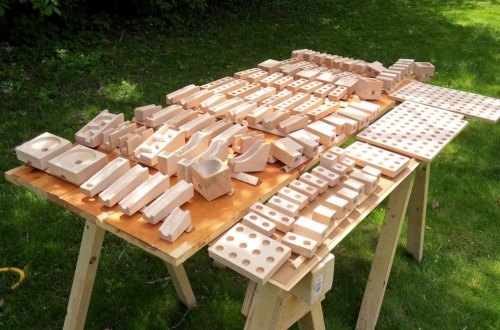 I made quite a set of blocks - it's easy to get carried away!
This image shows most of them, ready for varnishing.
I made quite a set of blocks - it's easy to get carried away!
This image shows most of them, ready for varnishing.
 I opted for the spray-gun to varnish the blocks. I find I can get a thicker, smoother
coat of varnish with a brush, but with all these little pieces, I figured I'd save the time.
The less smooth varnish is actually beneficial in this application because it prevents
the blocks from sliding around too easily.
I opted for the spray-gun to varnish the blocks. I find I can get a thicker, smoother
coat of varnish with a brush, but with all these little pieces, I figured I'd save the time.
The less smooth varnish is actually beneficial in this application because it prevents
the blocks from sliding around too easily.
I don't have a spray-booth in my workshop, so spraying is really only an option when the weather is nice.
I took this photo by setting the camera on movie mode on a tripod, and taking a frame from the video afterwards. Looking at the video, I think next time I should turn down the pressure on my spray gun to get a coarser mist. There seems to be an awful lot of overspray! I have only used that spray gun a few times, so I'm still learning.
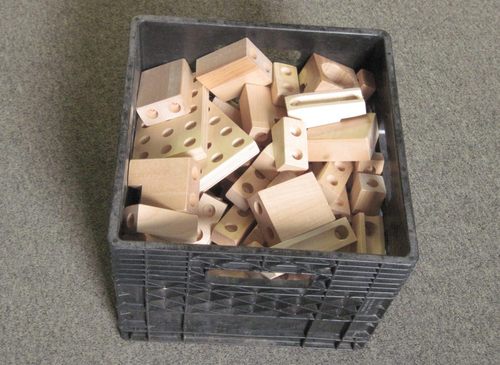 The building blocks fill up a milk crate nearly to the top if thrown in loosely.
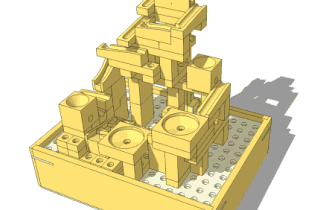
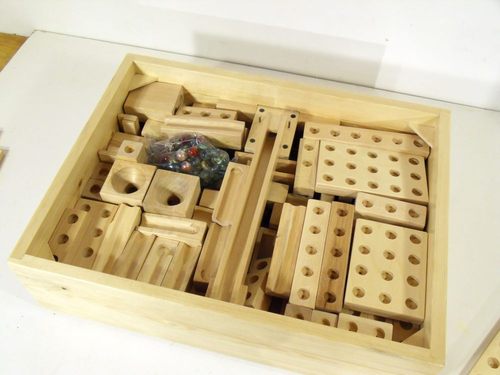 The cool part is though, that all the blocks still fit inside the base. But
getting them all to fit is a bit of a puzzle in itself,
so that is more something to do when putting the blocks
in the closet.
The cool part is though, that all the blocks still fit inside the base. But
getting them all to fit is a bit of a puzzle in itself,
so that is more something to do when putting the blocks
in the closet.
The blocks on the right side in the box are blocks for building up the structure. The block set is all about the ramps, but the ramps and other marble handling elements need to be supported at different heights and positions. So there are a lot of blocks whose sole purpose is to build up the "structure" to support the track segments.
The machine is of course best illustrated in action by means of a YouTube video!
And another video of another track built on the machine!
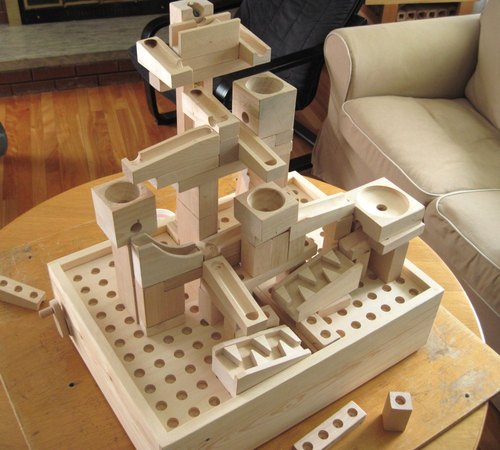 And here's another shot of the configuration from the above video.
I have drawn up some very detailed plans for the machine, pump, and building blocks, along with many photos and explanation on how to construct it. It's a very detailed set of plans. Considering how much you get, I think it's a bargain, but I might be biased :). There's also a free video to help you with the tricky part. I figure, even if you don't want to build the whole machine, it's still worthwhile if you just want plans for the building blocks or the marble pump. But I suspect once you get going, you'll end up building the whole machine.
|
Buy plans for the modular marble machine |
Jim writes:
Hi Matthias, I just wanted to thank you for making the modular marble machine plans available for purchase. As this was my first real woodworking project, it was a monumental undertaking! I learned so much about woodworking and I would have been totally out of my depth if I didn't have access to a mill with digital readouts (which made the precision work a bit more reasonable) I think I put in just over 100 hours and I feel like I have created a family heirloom. I've spent lots of quality time with my kids playing with the marble blocks. I've had lots of people say that they would buy one if I wanted to make another... I tell them I'd love to, but I charge $50 per hour! No takers yet.
Thanks again,
Jim Goodwin
|
Sylve Zen's modular marble machine
See also:
Back to the main woodworking website.
|
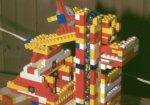 Lego marble machine
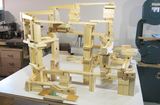 Marble run building blocks version 1
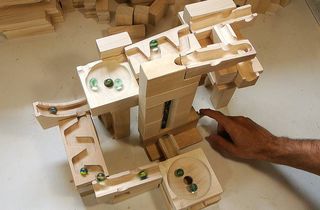 Marble run building blocks version 2
 Marble machine 1