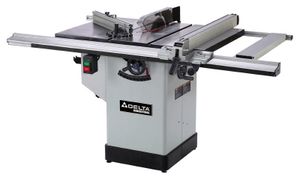
 I had been thinking of buying myself a contractor saw, when I saw the Delta hybrid saw
(model 36-655C) at Home Depot with two promotions on it at the same time in 2007.
It was a good deal.
I had been thinking of buying myself a contractor saw, when I saw the Delta hybrid saw
(model 36-655C) at Home Depot with two promotions on it at the same time in 2007.
It was a good deal.
I had been thinking of buying myself a contractor saw, when I saw the Delta hybrid saw
(model 36-655C) at Home Depot with two promotions on it at the same time in 2007.
It was a good deal.
When I set up the saw, I found everything on it to be ok, except that it didn't make very clean cuts. The included blade was not exactly finishing blade grade, so bought a better finishing blade, the kind that costs around $50.
Even with the good finishing blade installed, it still didn't produce the sort of cuts that one would consider finishing cuts. So I investigated further.
It turns out that the problem was the arbor of my saw - it had a slight wobble to it.
The nice people at Home Depot offered to take the saw back, but the prospect of haul it back out of my basement and to the store, and then haul another saw home was not very appealing. Besides, the saw wasn't really defective. After all, I didn't spend the sort of money one would spend on a good cabinet maker saw, so why would I expect it to cut like one?
I figured I'd just have to buy a new arbor, as I had done with my previous table saw. But before doing that, I figured I might as well experiment with the one that's on it. I figured out a cheap fix. So if you have a saw with a similar problem, you might want to try this procedure.
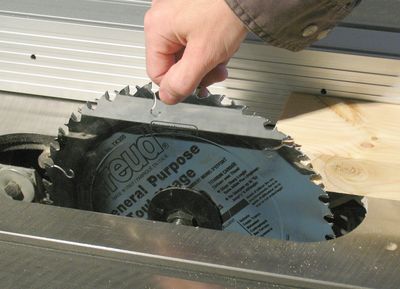 The first step is to make sure the problem is due to arbor wobble. Get a good finishing
blade, and start by cutting just a millimeter off the edge of a piece of lumber.
Then, stop the saw, slide the lumber back against the edge of the blade, as shown,
and turn the blade by hand to see where in the rotation
it rubs against the piece of lumber.
The first step is to make sure the problem is due to arbor wobble. Get a good finishing
blade, and start by cutting just a millimeter off the edge of a piece of lumber.
Then, stop the saw, slide the lumber back against the edge of the blade, as shown,
and turn the blade by hand to see where in the rotation
it rubs against the piece of lumber.
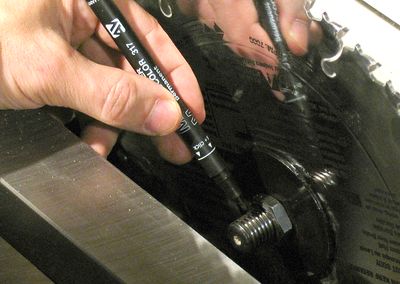 In the position where it rubs the most, mark the arbor shaft with a permanent marker.
After doing this, loosen the nut for the blade, turn the blade a quarter turn, and
re-tighten. Again, check where it rubs (previous step). Do this a few times.
If the place it rubs stays roughly at the same point of rotation of the arbor,
then it's the arbor that's wobbling, not the blade. If the rubbing moves with the blade,
then the wobble is from your blade.
In the position where it rubs the most, mark the arbor shaft with a permanent marker.
After doing this, loosen the nut for the blade, turn the blade a quarter turn, and
re-tighten. Again, check where it rubs (previous step). Do this a few times.
If the place it rubs stays roughly at the same point of rotation of the arbor,
then it's the arbor that's wobbling, not the blade. If the rubbing moves with the blade,
then the wobble is from your blade.
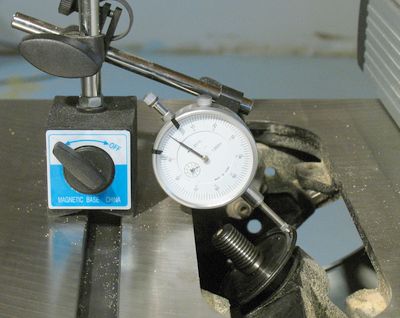
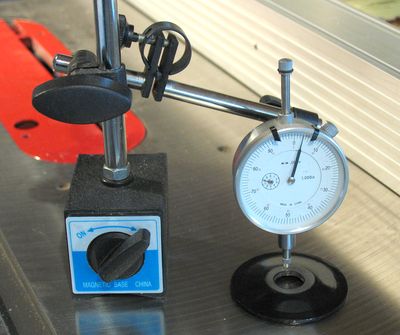
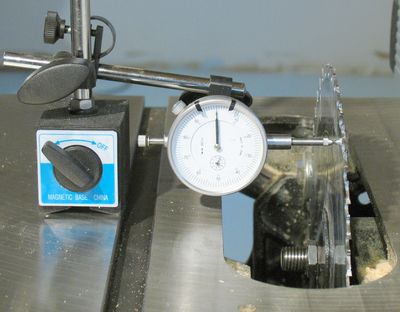 If you have a dial indicator, it's fun to measure the wobble. At about 1" from the tips
of the teeth .002" variation or less is good. But .005" variation or more won't give a
clean cut.
If you have a dial indicator, it's fun to measure the wobble. At about 1" from the tips
of the teeth .002" variation or less is good. But .005" variation or more won't give a
clean cut.
But just touching the blade to turn it will deflect it. It's best to take the drive belt off and just spin it by grabbing the arbor for this measurement.
If you don't have a dial indicator, skip this step. It's not really necessary.
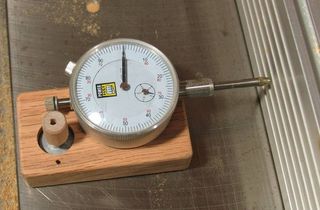
 On the arbor, the variation should be less than .001". My saw had 0.001" of range of
variation. Make this sort of measurement with the belt off, because tugging on
the belt will cause the whole mechanism to deflect by more than 0.001"
On the arbor, the variation should be less than .001". My saw had 0.001" of range of
variation. Make this sort of measurement with the belt off, because tugging on
the belt will cause the whole mechanism to deflect by more than 0.001"
But really, measuring this is unnecessary. It's mainly for the anal retentives who happen to own a displacement indicator.
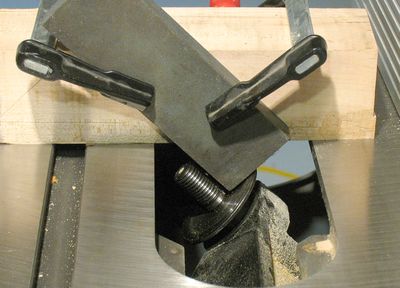 Clamp a rough (low grit number) grinding stone at a 45 degree angle to the heaviest
piece of hardwood you have. Some heavy angle iron or bar steel would be even better,
but use what you have.
Clamp a rough (low grit number) grinding stone at a 45 degree angle to the heaviest
piece of hardwood you have. Some heavy angle iron or bar steel would be even better,
but use what you have.
With the saw running (with the belt back on), lightly push the stone against the flange of the arbor. Ideally, push it so lightly that it only makes contact with the arbor intermittently. As it's rubbing against the flange of the arbor, move the stone forwards and backwards (away and towards you in the photo), and crank the blade up and down. The stone might get clogged up easily, so you might have to flip it over.
You may also see the occasional spark as you do this. This is ok. Just don't let the arbor get too hot, as that might affect the accuracy of the operation. You should see sparks coming off it.
 The ends of the stone do get full of metal this way, but seeing that this part of the
stone is not used for sharpening, it doesn't really matter. A coarse stone is better than
a fine stone because it takes longer to clog.
In the mean time, the saw arbor should end up being almost mirror smooth, even with
a relatively coarse stone.
The ends of the stone do get full of metal this way, but seeing that this part of the
stone is not used for sharpening, it doesn't really matter. A coarse stone is better than
a fine stone because it takes longer to clog.
In the mean time, the saw arbor should end up being almost mirror smooth, even with
a relatively coarse stone.
The whole procedure is rather iterative. I think I spent a total of about 5-10 minutes of actual grinding until I was satisfied with the results. But I went back and mounted the blade again and again for checking if it was good enough.
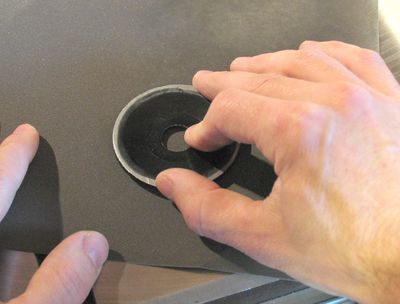
 You can check the flatness of the washer by putting it on a flat surface, and pushing it along
every spot along the edge. If it rocks up ever so slightly from doing this, then
it's not really flat. It's a good idea to have a finger straddle the table and flange on
the other side, and push firmly on the opposite side. It's easier to feel small displacements
with the finger on the opposite side than it is to see it rock up. A displacement of just
.001" can be felt very distinctively if your finger is in contact with both the flange and
the table.
You can check the flatness of the washer by putting it on a flat surface, and pushing it along
every spot along the edge. If it rocks up ever so slightly from doing this, then
it's not really flat. It's a good idea to have a finger straddle the table and flange on
the other side, and push firmly on the opposite side. It's easier to feel small displacements
with the finger on the opposite side than it is to see it rock up. A displacement of just
.001" can be felt very distinctively if your finger is in contact with both the flange and
the table.
 If the flange is not flat, put some fine sandpaper grain up on the table, and just sand
the flange flat. Use circular strokes, and push with a finger in the middle of the hole.
With pressure applied to the middle of the disk, and the disk rubbing against a flat surface
it should get flat. Turn the disk by 90 degrees every once in a while as you do this.
If the flange is not flat, put some fine sandpaper grain up on the table, and just sand
the flange flat. Use circular strokes, and push with a finger in the middle of the hole.
With pressure applied to the middle of the disk, and the disk rubbing against a flat surface
it should get flat. Turn the disk by 90 degrees every once in a while as you do this.
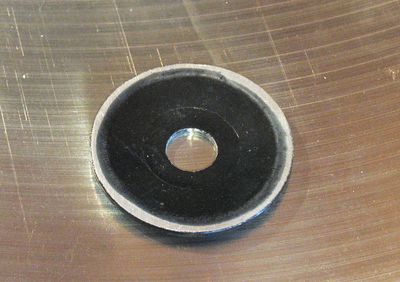 As you can see from the varying width of the sanded surface, my flange was not completely flat.
 Next, I checked to see if the surface where the nut touches the flange was parallel to the wide
side of the flange. Turns out mine varied by about .005".
Next, I checked to see if the surface where the nut touches the flange was parallel to the wide
side of the flange. Turns out mine varied by about .005".
You do need a displacement indicator for this step, unfortunately. Although I'm not sure how useful this step is, because I got my saw to cut quite clean before I did this. So if you don't have a dial indicator, don't worry about this step and the next.
 Sanding the nut side of the flange parallel is an iterative process. Once it's established where
the high spot is, put pressure on that part while sanding. Sand for a bit, then measure again
and repeat until the variation is somewhere less than .002". I don't think this part is
overly critical.
Sanding the nut side of the flange parallel is an iterative process. Once it's established where
the high spot is, put pressure on that part while sanding. Sand for a bit, then measure again
and repeat until the variation is somewhere less than .002". I don't think this part is
overly critical.
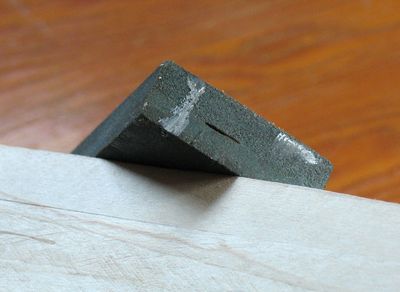
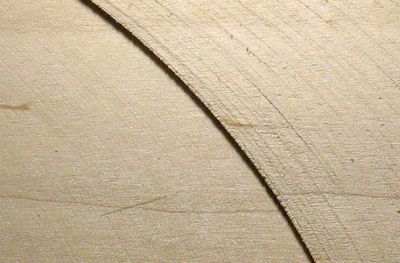 And finally, a comparison of cuts. I didn't have any pieces left that I'd cut with the saw
before fixing it, but the cut on the left is with a finishing blade, and the cut on the right
is with the included blade. Before fixing it, the finishing blade didn't cut any cleaner
than the included blade, so it gives you an idea how much of a difference this can make.
And finally, a comparison of cuts. I didn't have any pieces left that I'd cut with the saw
before fixing it, but the cut on the left is with a finishing blade, and the cut on the right
is with the included blade. Before fixing it, the finishing blade didn't cut any cleaner
than the included blade, so it gives you an idea how much of a difference this can make.
Note that the light on the photo at left is at a low angle to bring out any texture in the cut. Also, these cuts are in maple. I find it's easier to get a clean cut out of hard woods than soft woods. My guess is that the harder woods end up stabilizing the blade a bit, seeing that it only takes a small amount of force to deflect the blade by a few thousandths of an inch.
My saw is still not perfect. With my good blade, I still get about .002" of wobble near the theeth of the blade.
 Hello there!
I used your guide on how to do that, and it works great!
I bought a 1977 Craftsman 10" table saw, solid chuck of rust, it turned, but with major force. $60
After tearing everything apart, cleaning it and oiling, I got it going and the worst - it cuts like a dull chainsaw. Horrible wobble in the blade. I was depressed since I only spent another $26 on it so far (pulley, belt, oil, bolts). I was hoping for a low dollar end result, and getting a new arbor, bearings (might as well), and such would end up with a long delay and more money.
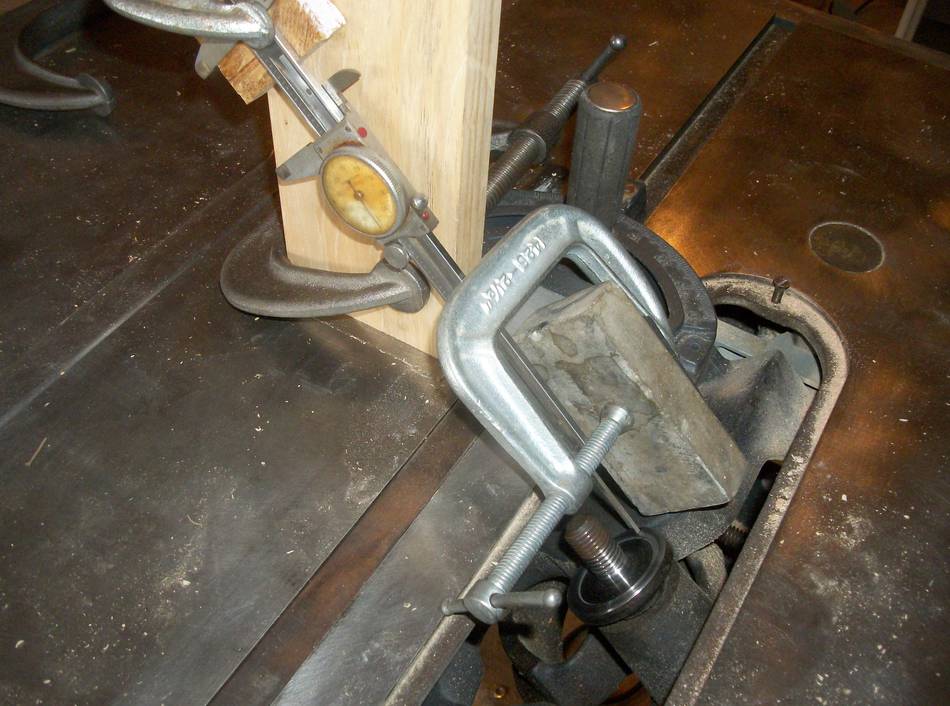
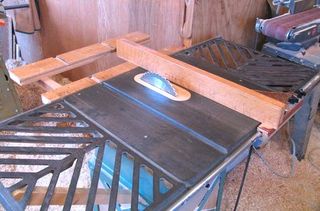
Then I ran across your article! Attached is a picture of my jig I used to hone them back to perfect.
I have the calipers and the stone on the miter device. I lift the miter and i can go back and fourth, and apply pressure in the wiggle room of the width of the miter slot.
Final verification of "perfect" was done by setting the calipers measuring stick pretty tight against a piece of paper on the arbor, then remove the paper. Shine a flash light from behind to bounce between the two. Spin arbor by manually turning the backside (no belt). Variations in brightness indicated the same in distance. When I was finished - you couldn't see any difference, was perfect.
Put a brand new 7.25" blade in there, and make a cut. It's garbage. ??? I forgot to remove the sticker from the blade before I mounted it. Cleaned that off, polish with steel wool and presto - almost perfect cut, can barely tell it was cut with a saw as opposed to on the jointer.
Thank you!
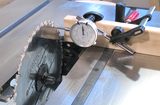 Table saw alignment
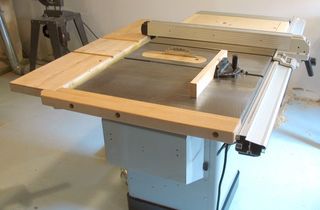
 Depth adjustment repair
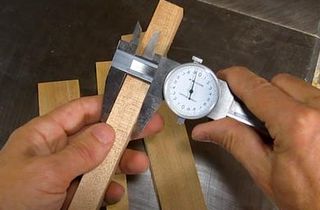 Making precise cuts
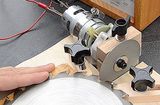 Saw blade sharpening jig
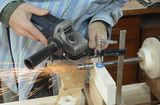 Grinding a machine taper with an angle grinder
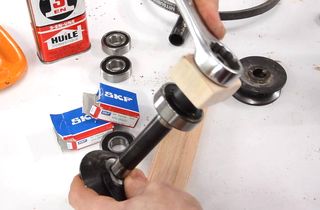 Hybrid table saw bearing replacement