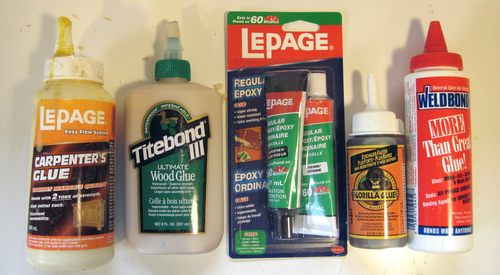
 The glues I used in my tests:
The glues I used in my tests:
LePage Carpenters glue
The glue I usually use. No shelf life issues that I know of. I buy a four liter jug of it
every few years. Over time, it gets thick, but stirring in a bit of water fixes it. This glue
is not waterproof and can be washed out of clothing.
Titebond 3
I heard that this was supposed to be a really good glue. Waterproof.
Couldn't find it in the local stores, but Lee Valley Tools carries it.
Gorilla glue
A polyeurathane based glue. Waterproof. A guy at work swears by it.
Many people like it because it expands as it cures.
Weldbond
A water resistant glue, which I had used before for
making lawn chairs.
Definitely has shelf life issues - I had a bottle of this glue go completely solid on me one time.
Epoxy
Never used it as a wood glue, but I figured Epoxy has to be strong.
Hot glue
Not really a wood glue, but I figured it might be interesting to see how it stacks up.
I used a heat gun to heat my pieces of wood before applying glue, then heated it again before
squeezing the parts together to make sure the glue soaked into the wood.
I also experimented a little with the water based varnish I usually use, to see how it would perform as a glue.
I bought small containers of Titebond 3, Gorilla Glue, Weldbond, and LePage epoxy glue
specifically for this test.
The carpenter's glue was over a year old, as I don't know of shelf life issues with it.
Most joints in woodworking either involve two pieces with the grain parallel or at a 90 degree angle. An example of the grain parallel would be gluing up a panel, or stacking pieces to get more thickness. I already knew that the joint is as likely to break beside the joint than at the joint when the grain is parallel, so there was little point in testing with this type of joint.
So joints with the grain running at 90 degrees (call it cross grain) would be a more logical choice. Most mortise and tenon joints are of this type, and in my previous tests the joint always failed mostly at the glue line.
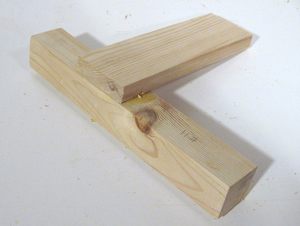
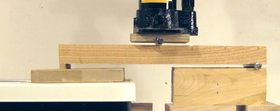
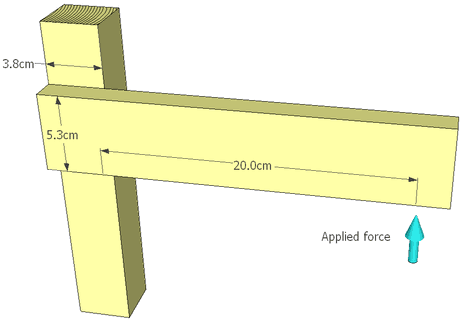 This picture shows the geometry of joint I decided on for my tests with spruce lumber.
I made one joint with each type of glue and let the glue set for 48 hours.
To break them, I then used the same setup as I used for my
joint strength tests.
This picture shows the geometry of joint I decided on for my tests with spruce lumber.
I made one joint with each type of glue and let the glue set for 48 hours.
To break them, I then used the same setup as I used for my
joint strength tests.
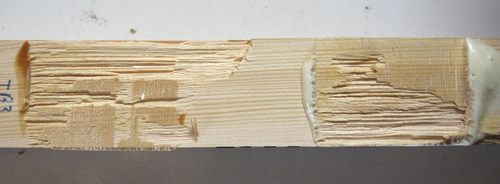 The force of breakage for each of my joints was very close to 140 pounds (64 kg) on my bathroom
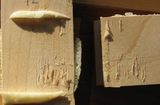
scale for all the joints except the epoxy glue joint. The broken joint surfaces all looked
roughly like the ones at left, with chunks of wood torn out of the post and/or rail. So for
the cross grain joints in spruce, the glue was stronger than the wood. I had similar results
for the cross grain joints in maple.
So I needed to devise other joints, ones where the glue, not the wood, would fail.
The force of breakage for each of my joints was very close to 140 pounds (64 kg) on my bathroom
scale for all the joints except the epoxy glue joint. The broken joint surfaces all looked
roughly like the ones at left, with chunks of wood torn out of the post and/or rail. So for
the cross grain joints in spruce, the glue was stronger than the wood. I had similar results
for the cross grain joints in maple.
So I needed to devise other joints, ones where the glue, not the wood, would fail.
 One type of joint I was sure would fail at the glue was the butt joint.
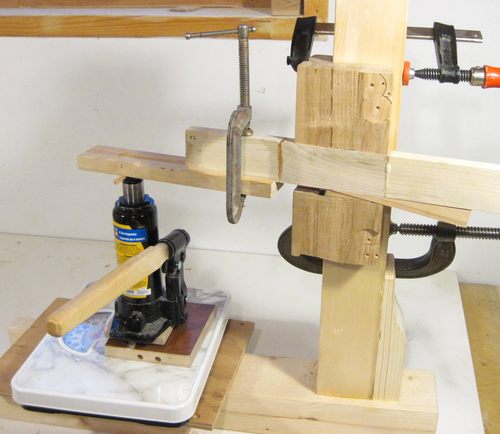
To economize on wood, I glued a whole lot of short pieces end-to-end, and then broke off one section at a time with my apparatus. I made a bracket to hold the piece against the post of my test stand, and used another piece of wood to extend the leverage out to 20 cm. Part of my economizing was to produce less scrap, but I also wanted to make sure that all of my test pieces came from the same piece of lumber to reduce variations that might exist between different boards.
I had some consistency problems with the butt joints, but I was getting noticeable variation in maximum breaking force for the different types of glue, so I was pretty certain I was testing the strength of the glue and not the strength of the wood this time. The only catch is that the butt joint isn't used in furniture construction, so perhaps my butt joint test results are not all that relevant.
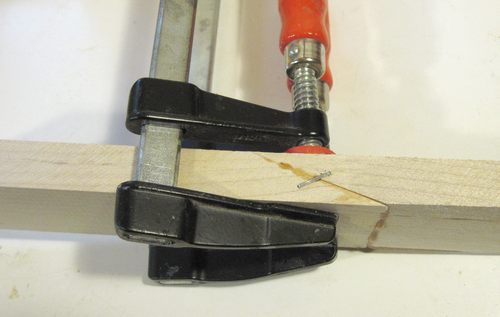 I wanted a joint that wasn't a butt joint, but would still fail at the joint. I figured a good
compromise would be a scarf joint, so that was the third type of joint I decided to test with.
I wanted a joint that wasn't a butt joint, but would still fail at the joint. I figured a good
compromise would be a scarf joint, so that was the third type of joint I decided to test with.
I cut the lumber at a 20 degree angle and then glued two pieces together. Because the glue really lubricates the joint, it was pretty tricky to clamp the scarf joints without having the pieces slide apart. A staple across the joint helped fix that. I didn't expect the staple to make a difference in the ultimate strength of the joint, but just to be safe I pulled all the staples out of my joints before testing.
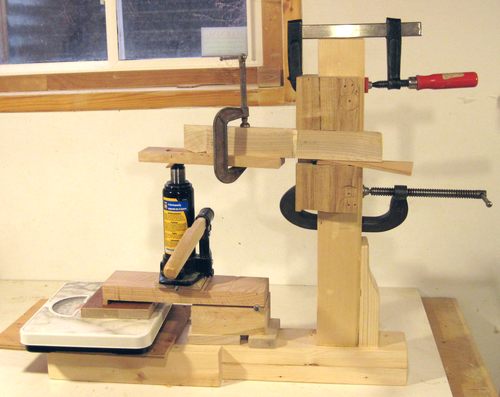 The scarf joints required a lot of force to break. Of the hardwood joints, a number of them required
more than the 300 pounds to break. My bathroom scale only reads to 300 pounds, so I set up
this lever contraption to split the force between my bathroom scale and a fixed pivot.
The pivots of my lever are 1/2" steel shafts on the middle and right,
and a small strip of wood glued to the bottom of the left end of my lever.
The scarf joints required a lot of force to break. Of the hardwood joints, a number of them required
more than the 300 pounds to break. My bathroom scale only reads to 300 pounds, so I set up
this lever contraption to split the force between my bathroom scale and a fixed pivot.
The pivots of my lever are 1/2" steel shafts on the middle and right,
and a small strip of wood glued to the bottom of the left end of my lever.
 I also put a small piece of wood on top of the jack, to act as a pivot there. The idea was to get the
whole jack and lever setup to act like pin joined members. That way, I could be sure
that the weight was applied exactly to the middle of the lever, and that the weight was split
evenly between the scale and the fixed pivot, even if I had some deflection in my setup.
I also put a small piece of wood on top of the jack, to act as a pivot there. The idea was to get the
whole jack and lever setup to act like pin joined members. That way, I could be sure
that the weight was applied exactly to the middle of the lever, and that the weight was split
evenly between the scale and the fixed pivot, even if I had some deflection in my setup.
It took a lot of force to break the scarf joints in hardwood, When they failed, they usually failed without warning and with a deafeningly loud bang. I got into the habit of holding the C clamp attached to my specimen while pumping the jack so that at least nothing went flying!
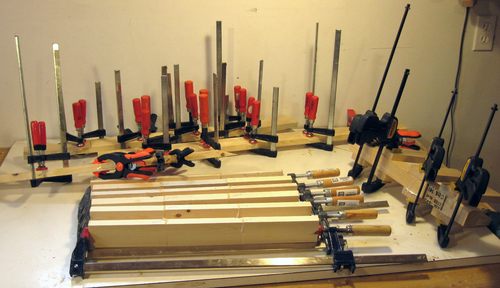 I made several joints with each type of glue. The photo at left shows most of my joints in spruce
clamped up after gluing. I also did the same with maple. The maple I used was not very nice looking
grey-ish stuff, probably sugar maple. Definitely not the light colored hard maple.
I figured in hardness, that it was a good representation of a middle of the road hardwood
in terms of hardness. Plus, I wasn't wasting really good lumber in the process.
I made several joints with each type of glue. The photo at left shows most of my joints in spruce
clamped up after gluing. I also did the same with maple. The maple I used was not very nice looking
grey-ish stuff, probably sugar maple. Definitely not the light colored hard maple.
I figured in hardness, that it was a good representation of a middle of the road hardwood
in terms of hardness. Plus, I wasn't wasting really good lumber in the process.
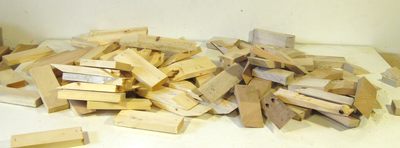 The most obvious result of all my testing is a pile of mutilated bits of scrap wood with
bits of glue on them. I hate producing this much scrap wood. When I build a project, at least
some of the wood gets used in the project. Overall, I built and busted over 60 joints.
It was a time-consuming affair.
The most obvious result of all my testing is a pile of mutilated bits of scrap wood with
bits of glue on them. I hate producing this much scrap wood. When I build a project, at least
some of the wood gets used in the project. Overall, I built and busted over 60 joints.
It was a time-consuming affair.
My hardwood joints were made from slightly smaller pieces of material than the spruce joints. I used
wood that was 17x51 mm for the hardwood rails, whereas the spruce rails were 18x53 mm. For the cross grain
joints, the posts in spruce were 38 mm wide, but only 36 mm for the hardwood joints. Overall, I would guess
the difference in geometry makes about a 10% difference in breaking force - keeping in mind
that strength in terms of bending moment goes up more than proportionally with joint size.
| Joint type | Joint area (cm) | Breaking force (pounds) at 20 cm from joint as a function of wood, joint type, and glue type | ||||||||||||||||||||||||||||||||||||||
|---|---|---|---|---|---|---|---|---|---|---|---|---|---|---|---|---|---|---|---|---|---|---|---|---|---|---|---|---|---|---|---|---|---|---|---|---|---|---|---|---|
| Hot glue | Carpenter's glue | Weldbond | Gorilla Glue | Titebond 3 | Epoxy | Varnish as glue | ||||||||||||||||||||||||||||||||||
| Spruce cross grain | 5.3 x 3.8 | 145 | 140 | 150 | 150 | 135 | 100 | 50 | ||||||||||||||||||||||||||||||||
| Spruce butt joint | 5.3 x 1.8 | 100,| 90, | 125, | 100, | 110, | 70, | 25
| Spruce | scarf joint 5.3 x 5.2 | 180 | 185, | 210, | 245, | 210, | 150, | 55
| Maple | cross grain 5.1 x 3.5 | 90, | 210, | 200, | 230, | 220, | epoxy and | varnish not tested with maple Maple | butt joint 5.1 x 1.7 | 90, | 110, | 110, | 90, | 150, | Maple | scarf joint 5.1 x 4.9 | 180, | 290, | 260, | 220, | 350, | | |
With the cross grain joints failing in the wood, and the butt joints being unrealistic and unreliable, that leaves the scarf joints as the most useful measure. But even my spruce scarf joints had a tendency to sometimes fail in the wood. That leaves the scarf joint in maple as the most useful indicator.
And the strongest glue is...
I'm a little disappointed with Gorilla Glue. Although some joints were quite strong, I didn't get good consistency with it. Gorilla Glue does foam up and expand as it cures, and I suspect the glue got pushed out of my joints by the foaming up. The expansion and foaming up was quite messy. I guess it's a good glue to expand into inaccurate joints, but I prefer to just make my joints so that they are accurate.
I got to liking the Weldbond glue. It didn't perform as well as Titebond 3, but of the waterproof glues, it was the least messy. Also, that glue dries transparent and retains some flexibility. I think that may give it some toughness and reduce the likelihood of the glue joint cracking over time. I didn't like how the Titebond 3 dries to a dark brown. Any time there is a gap that is filled with glue, it really shows. I think Weldbond will be my waterproof glue of choice.
My joint area was just 4.1 x 4.1 cm. Again, I applied force at 20 cm, causing the joint to be twisted off in a shearing motion. I used fresh planed smooth surfaces for all the joints, and was careful not to get any fingerprints on the joint area.
| Breaking force (pounds) at 20 cm from joint for a 4.1 x 4.1 cm hard maple cross grain joint | |||||||
|---|---|---|---|---|---|---|---|
| Glue type: | Carpenter's glue | Weldbond | Gorilla Glue | Titebond 3 | |||
| Individual readings: | 130,135,145 150,155,135 | 175,160,170 195,195 | 165,170,165 135 | 165,165,165 175,165 | |||
| Average: | 141 | 179 | 159 | 165 | |||
With the cross grain joint in hard maple, it looks like the Carpenter's glue is out of its league. It was the only glue that didn't cause wood fibers to tear out of the wood, so the carpenter's glue was probably not as strong as the wood in this test. I had some consistency problems with Gorilla glue, and excluded one sample that failed at just 105 pounds. I think the foaming up of the glue may have pushed some of the glue out of the joint. The foamed up part isn't nearly as strong as solid glue.
What's interesting is that Weldbond wins this round by a narrow margin. My guess is that it's at a slight advantage with the very hard wood because it retains a little bit of flexibility after drying. This would make the joint less likely to crack open gradually from the side, giving Weldbond an edge over the other glues that become hard. But overall, other than yellow carpenter's glue, all the glues I tried were tearing small chunks of wood out of the wood, so mostly we are looking at a failure of the wood.
I have since taken some macro photographs of the joint surfaces for my hard maple tests.
The bow in question was at -1 degrees, and stringing it up made the handle fall off. (not drawn, just strung). I guess the staying flexible aspect of weldbond doesn't deal well with cold.
 Examining the joint surfaces
 Which glue is strongest
 Construction adhesive as woodworking glue: test
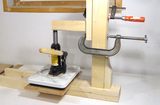 Testing different types of wood joints
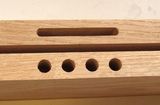 Mortise and tenon vs dowel joints revisited
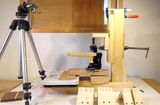 Dovetail vs box joint strength test
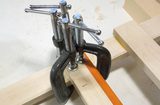 Testing different methods of gluing
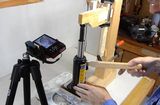 Testing gorilla glue with gapped joints
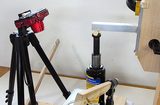 Brazed aluminium joint strength test