Wood joint strength testing
 I had previously tested a mortise and tenon joint
against a dowel joint for strength.
In that test the mortise and tenon joint won.
But questions remained - how much stronger is one joint vs. the other, and is it possible
to improve on the dowel joint?
I had previously tested a mortise and tenon joint
against a dowel joint for strength.
In that test the mortise and tenon joint won.
But questions remained - how much stronger is one joint vs. the other, and is it possible
to improve on the dowel joint?
So I set out to do some more thorough experiments, this time using more samples
and actually measuring the breaking force of the joints.
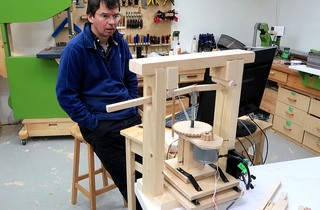
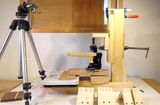
Building the test stand
I needed some sort of sturdy test fixture that would allow me to slowly apply
a measured amount of force to the joint.
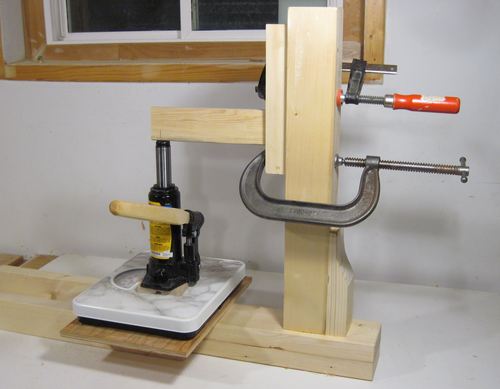
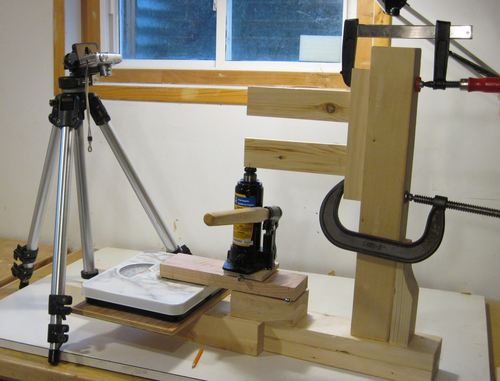
At left, you can see the test stand I came up with. It consists of an L-shaped frame that
the joint under test is clamped to, a bathroom scale, and a hydraulic jack.
 Like just about everything else, I made this test stand out of wood.
With the frame made out of wood, I had to
make sure that it would be stronger than any joint I might try to break with it. Nevertheless,
I still used spruce, seeing that it's so much cheaper. I compensated
for the softer wood by joining it with a really massive triple tenon joint.
Like just about everything else, I made this test stand out of wood.
With the frame made out of wood, I had to
make sure that it would be stronger than any joint I might try to break with it. Nevertheless,
I still used spruce, seeing that it's so much cheaper. I compensated
for the softer wood by joining it with a really massive triple tenon joint.
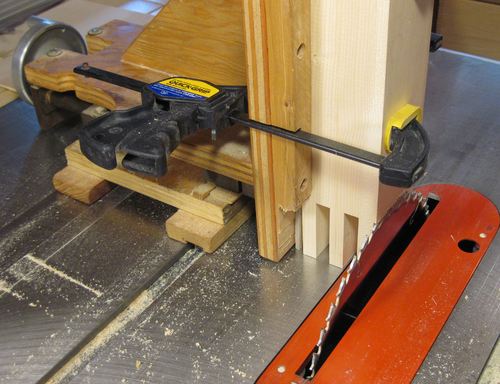
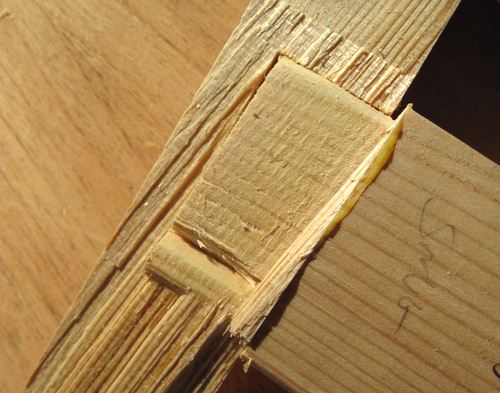
The triple tenon joint is about 6 cm deep. This meant that I couldn't use my
screw advance box joint jig to cut the tenons. I also couldn't use my
quick-set tenon jig, because that jig doesn't move far enough side to side. My crummy
delta tenon jig has even less range of motion.
So I ended up pulling out my old tenon jig
which I built more than 10 years ago.
This jig, placed on the
right side of the saw had just barely enough stroke to cut this massive joint with. The adjustment
screw on it is a 10 turn per inch acme screw. That came in handy for spacing the 1/2" wide tenons
at exactly one per inch.
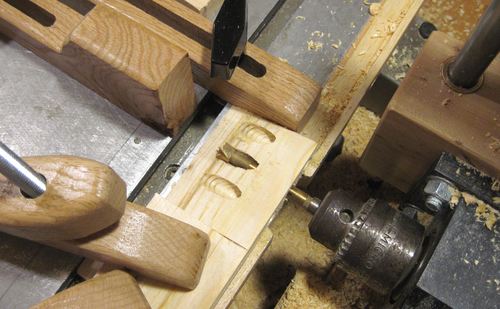
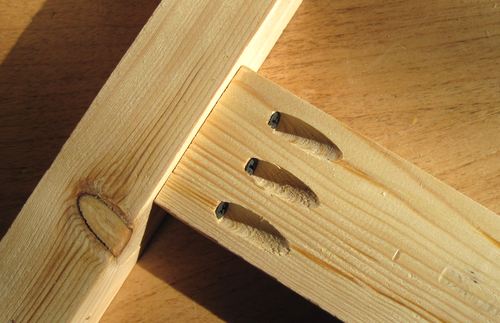
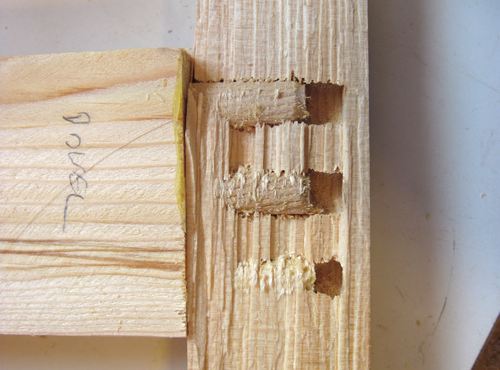
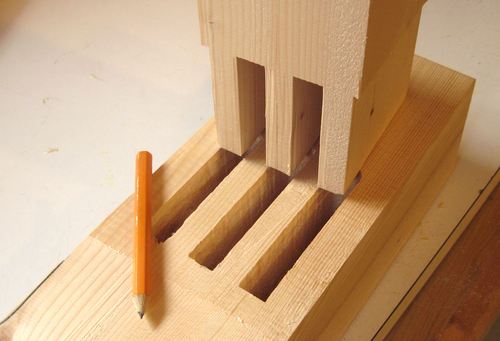 I cut the triple mortises with an endmill in my
horizontal boring machine. The endmill cuts deeper than most router bits, but it
works better at lower speeds. So I just used my horizontal boring machine as a slot mortiser
to cut the mortises, and then chiselled the ends of the mortises square.
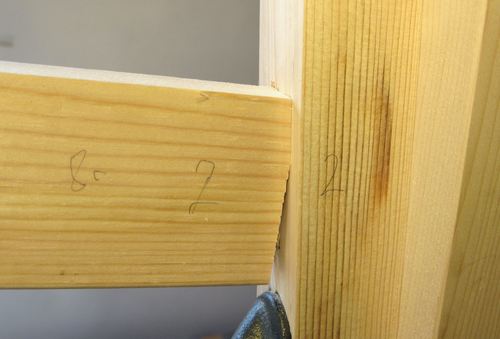
Each mortise is 1/2" (13 mm) wide, 6 cm deep, and 8 cm long. The pencil gives a bit of a
sense of scale.
I cut the triple mortises with an endmill in my
horizontal boring machine. The endmill cuts deeper than most router bits, but it
works better at lower speeds. So I just used my horizontal boring machine as a slot mortiser
to cut the mortises, and then chiselled the ends of the mortises square.
Each mortise is 1/2" (13 mm) wide, 6 cm deep, and 8 cm long. The pencil gives a bit of a
sense of scale.
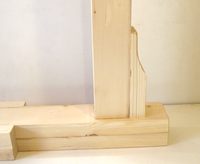 After gluing it together, I glued another piece to the backside of the joint where it pushes
together to give it an extra support.
After gluing it together, I glued another piece to the backside of the joint where it pushes
together to give it an extra support.
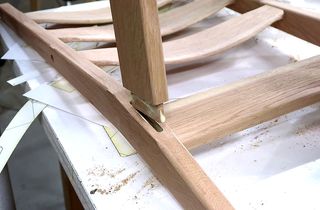
Making joints to test
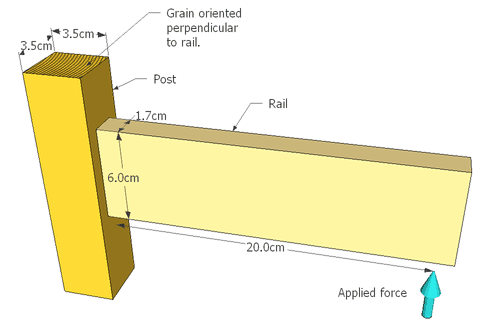
I decided to standardize the size of my joints to be a 6 x 1.7 cm rail attached to a
post 3.5 x 3.5 cm in size. This is close to the size of joint one might use putting together
a chair or a stool.
It's that sort of joint that gets stressed a lot - so much so that most store-bought wooden
chairs will come apart at the joints eventually.
I used yellow carpenters glue for all of my tests. For the wood, I used spruce and
then retested with maple.
 My favourite is of course the mortise and tenon joint. I made all my tenons 3/8" (10 mm) thick,
27 mm deep, and 55 mm wide.
My favourite is of course the mortise and tenon joint. I made all my tenons 3/8" (10 mm) thick,
27 mm deep, and 55 mm wide.
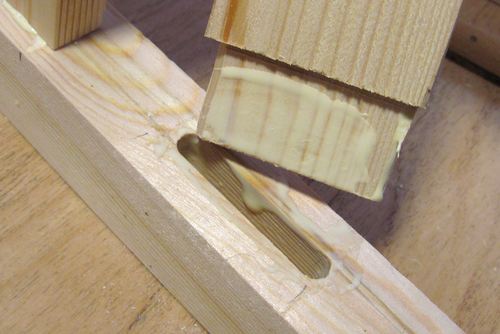
I made a number of mortise and
tenon joints, ranging from tight enough that I had to drive it in with a hammer, to some being
loose by a few thou, so that the dry fitted joint would still have a tiny bit of play.
More about mortise and tenon joint fit and accuracy
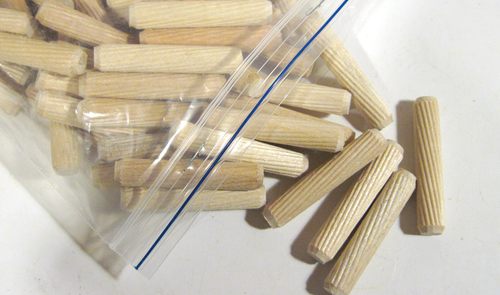 I bought a bag of these pre-cut dowels, 2" long, and 3/8" in diameter (10 x 51 mm).
They have ridges, which I figure should help with gluing. They are also supposed to
be pre-compressed, and re-expand when glue is applied, for a better fit. I figured
these dowels should really give the dowel joints a better chance.
I bought a bag of these pre-cut dowels, 2" long, and 3/8" in diameter (10 x 51 mm).
They have ridges, which I figure should help with gluing. They are also supposed to
be pre-compressed, and re-expand when glue is applied, for a better fit. I figured
these dowels should really give the dowel joints a better chance.
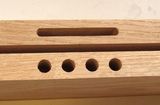
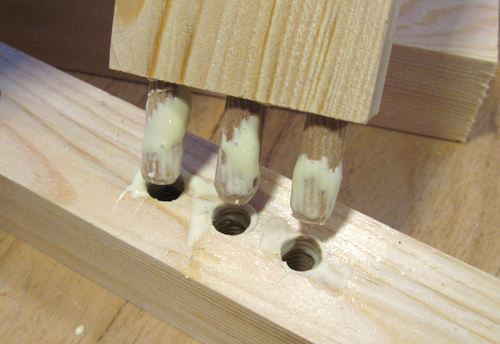 I also went for three dowels, instead of two. The spacing of these dowels is at
3/4" (18 mm). I used my horizontal boring machine,
with its indexing function to exactly
space my holes.
I also went for three dowels, instead of two. The spacing of these dowels is at
3/4" (18 mm). I used my horizontal boring machine,
with its indexing function to exactly
space my holes.
 In terms of strict wood joints joining a rail to a post, I couldn't think of anything else
other than maybe to use biscuit joints. But I don't have a biscuit jointer.
Besides, if you cared about strength, you wouldn't be using biscuit joint.
In terms of strict wood joints joining a rail to a post, I couldn't think of anything else
other than maybe to use biscuit joints. But I don't have a biscuit jointer.
Besides, if you cared about strength, you wouldn't be using biscuit joint.
I also decided to test several types of screw joints. I rigged up an inclined
plane on my horizontal boring machine, which would allow me to mount the work piece at
an angle for drilling pocket holes.
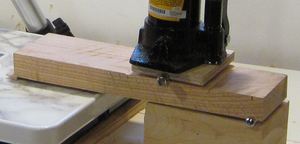
 Here's one of my pocket hole joints. This one I fastened with 2" drywall screws.
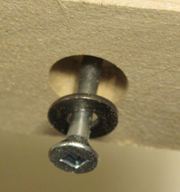
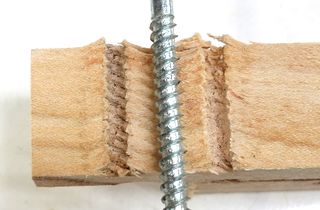
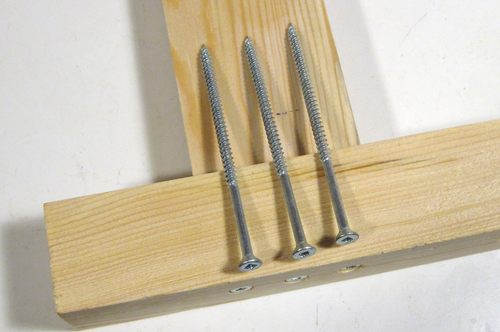 I also tested a joint with the screws through the post and into the endgrain of the rail.
I used three 3.6" (80 mm) #8 wood screws, screwed
through the post, and straight into the end grain of the spruce. I drilled the pilot holes
quite small, so that the thread could really bite into the wood. You can get away with a
lot with spruce, because it's quite resilient and doesn't split easily.
I also tested a joint with the screws through the post and into the endgrain of the rail.
I used three 3.6" (80 mm) #8 wood screws, screwed
through the post, and straight into the end grain of the spruce. I drilled the pilot holes
quite small, so that the thread could really bite into the wood. You can get away with a
lot with spruce, because it's quite resilient and doesn't split easily.
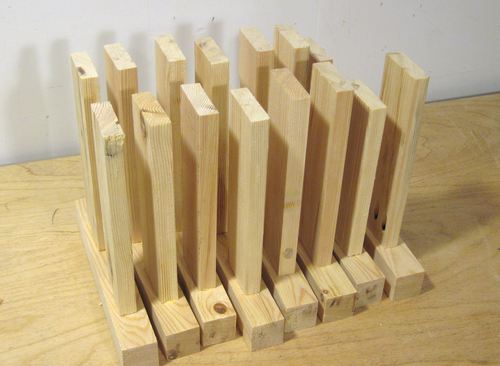 Here are all of my test pieces in spruce. All cut from the same piece of 2x8 spruce lumber.
I figured that way, I'd reduce the effect of variations in the wood between different boards
as a source of bias. I was careful to select a board that had relatively consistent
grain throughout.
Here are all of my test pieces in spruce. All cut from the same piece of 2x8 spruce lumber.
I figured that way, I'd reduce the effect of variations in the wood between different boards
as a source of bias. I was careful to select a board that had relatively consistent
grain throughout.
For economy, I always joined two rails onto one post. I always combined two different types
of joint on the same post, to reduce any bias that might come from one post being slightly better
than another.
Spruce can vary quite a lot in weight and hardness, as I found out when doing some
wood hardness testing
experiments earlier. I used a relatively heavy piece of spruce for these tests, simply because
all the stock on my lumber rack was of the heavy variety.
I always select the heaviest boards when I buy lumber.
Testing the joints
 It's easy to forget to note down the result, or miss the actual point where the force was maximum
before the joint lets go. So I set up a digital camera to take a video of my bathroom scale as I was
running the tests.
It's easy to forget to note down the result, or miss the actual point where the force was maximum
before the joint lets go. So I set up a digital camera to take a video of my bathroom scale as I was
running the tests.
 I also set up a lever, with some 1/2" metal shafts as pivots, to cut the load on my bathroom scale
by a factor of two in case I needed to push harder than the 300 pounds that my scale goes to.
For the softwood joints though, it turned out that none of the joints exceeded 300 pounds, so I just
put the jack directly on the scale.
I also set up a lever, with some 1/2" metal shafts as pivots, to cut the load on my bathroom scale
by a factor of two in case I needed to push harder than the 300 pounds that my scale goes to.
For the softwood joints though, it turned out that none of the joints exceeded 300 pounds, so I just
put the jack directly on the scale.
I applied the force exactly 20 cm (8") from the post for each test, so that the same load reading
would result in the same amount of torque at the joint.
I also adjusted the zero knob on my scale to compensate for the weight of the jack, so that
it read zero pounds with the jack standing on it.
This saved me the trouble of having to subtract the weight of the jack every time.
 I made three identical dowel joints. The dowel joint test samples failed at 120, 140, and 145 pounds.
I expected some variation, and was satisfied that these were all fairly close to each other.
I made three identical dowel joints. The dowel joint test samples failed at 120, 140, and 145 pounds.
I expected some variation, and was satisfied that these were all fairly close to each other.
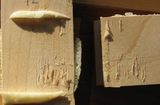
I split apart the wood afterwards to inspect how the joint had failed. As expected, bits of the
post adhered to the dowels, so even though the joint failed along the glue line, it doesn't suggest
that the glue itself failed. All three joints failed with the dowels pulling out of the post, none
with the dowels pulled out of the rail. So this suggests that the long grain to long grain
in the rail is slightly stronger than the long grain to cross grain joint in the post.
 I made quite a lot of mortise and tenon joints, which fit with different degrees of
tightness. I split apart some of these after testing them
to inspect the result. As expected, bits of the post were stuck to the tenon,
so this again suggests that the glue itself was not the cause of failure.
I made quite a lot of mortise and tenon joints, which fit with different degrees of
tightness. I split apart some of these after testing them
to inspect the result. As expected, bits of the post were stuck to the tenon,
so this again suggests that the glue itself was not the cause of failure.
The mortise and tenon joints failed at 170, 175, 140, 180, 185, and 190 pounds.
There wasn't any detectable difference between the loose, snug, and overly tight joints
that I made. My conclusion is that the fit, to the last few thousandth of an inch,
is not that important to the actual strength of the joint, so long as there is glue
in the joint everywhere.
The mortise and tenon joints averaged 172 pounds, whereas the dowel joint averaged 135 pounds.
So the mortise and tenon joints still beat out the dowel joints, but not by a dramatic
margin. On average, the mortise joints were only about 25% stronger.
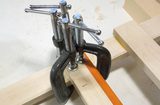
Testing the screw joints
Next I tested the screw joints. Testing these was rather unsatisfying, because, in general, the
joint would just yield and yield. There was no explicit point of failure. The joint at left,
for example, is still not at its maximum amount of force. What happened is that the rail would
 just push itself into the post, and the screw heads would pull into the wood on the other side.
This started happening at a force of just 85 pounds.
As the screw heads pulled further into the wood, force was still increasing. But the joint
was bent on the order of five degrees. From an aesthetic point of view, the joint was way past
a point of unacceptable deflection.
just push itself into the post, and the screw heads would pull into the wood on the other side.
This started happening at a force of just 85 pounds.
As the screw heads pulled further into the wood, force was still increasing. But the joint
was bent on the order of five degrees. From an aesthetic point of view, the joint was way past
a point of unacceptable deflection.
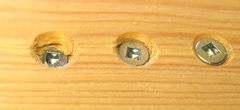
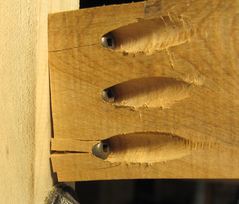
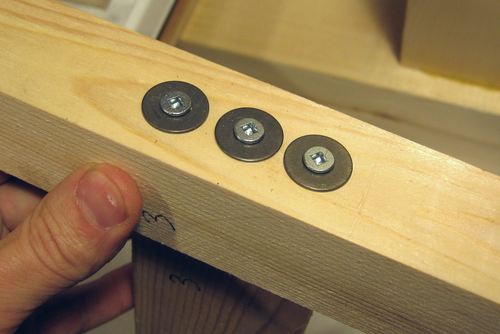 I experimented with reinforcing the screw heads with washers, which allowed me to increase
the load to 210 pounds before the screws finally pulled out of the end grain.
I was really surprised how well the screws held in the end grain of the rail.
But I was still getting a lot of deflection in the joint as I tested.
Even these 5/8" (16 mm) washers got pulled into the wood, and the rail also compressed into the post.
I experimented with reinforcing the screw heads with washers, which allowed me to increase
the load to 210 pounds before the screws finally pulled out of the end grain.
I was really surprised how well the screws held in the end grain of the rail.
But I was still getting a lot of deflection in the joint as I tested.
Even these 5/8" (16 mm) washers got pulled into the wood, and the rail also compressed into the post.
The lesson from this is that the screw joints' strength were not limited by the screw
thread's ability to hold in the wood, even for end grain. The screw head without a washer
just didn't provide enough contact area against the wood compared to what a long screw
thread could hold - even if its in the endgrain.
My pocket hole joints failed at just 115 and 110 pounds, with the 2" #7 screws pulling out
of the post. I unscrewed one of the rails, and screwed it against a maple rail and re-tested.
This time, it went up to 140 pounds before it failed, with the rail splitting around
the pocket holes. So 140 pounds is what I would have achieved if I had used longer, larger screws.
Again though, the amount of deflection was past unacceptable well before the joint let go.
Retesting with maple
I tested two dowel joints with maple. These failed at 230 and 245 pounds.
For the mortise and tenon joint in maple, I tested just two joints, which failed at
300 and 270 pounds.
 Overall, the hardwood mortise and tenon and dowel joints showed a minimal amount of deflection
before failure, whereas the spruce joints deflected a bit before the point of letting go.
Overall, the hardwood mortise and tenon and dowel joints showed a minimal amount of deflection
before failure, whereas the spruce joints deflected a bit before the point of letting go.
I used 2" #8 screws for the pocket hole joint in maple. The joint failed at 220 pounds, with the
pocket holes splitting apart.
The joint with the 3 1/2" screws screwed through the post and into the end grain held
up to 160 pounds before the screw heads got pulled into the post.
After I put washers behind the screw heads, I was able to load the joint
to 300 pounds. At 300 pounds, the joint hadn't 'failed' yet, but it had deflected so far that
I considered it pointless to go any further. Even with the extra contact area provided by
the washers, the screw heads and washers were just pulling further and further into the maple.
The washers also got seriously bent out of shape.
The trouble with screw joints
Overall, all the screwed joints had an unacceptable amount of opening up of the joint before they
actually let go. From a furniture building perspective, having a joint open up by a few degrees
is unacceptable, so the ultimate strength where the screwed-together joint comes apart really
isn't a useful measure in terms of making furniture.
That said, the amount of yielding before failure of a screw joint does give it a certain amount of
toughness. Failure is gradual, and it takes a lot of energy to get a joint to let go. This means
whatever you fasten with screws takes a lot of beating before it fully comes apart. This property
is useful if you are building sawhorses, scaffolding, or packing crates. But for furniture making,
it doesn't help much. So my conclusion is that for furniture applications where strength is critical,
screw joints should be avoided. That said, it's fine to use screws to attach
a panel to the back of a dresser or bottom of a box, but you shouldn't rely on screws to hold
a chair frame together. If you do use screw joints, I think it's best not to cover the heads,
so that if the joint does open up a little, you can at least re-tighten the screws.
 The main problem with screw joints with longer screws is that the screw heads pull through the material.
A typical countersink
screw is quite bad for this because the screw head forms a nice cone that is easier to push into
the wood. The flatter head of a drywall screw is probably better in this regard.
If you build something
where the screw is hidden, it may be a good idea to put a washer behind the screw head
to give it a bit more contact area with the wood.
The main problem with screw joints with longer screws is that the screw heads pull through the material.
A typical countersink
screw is quite bad for this because the screw head forms a nice cone that is easier to push into
the wood. The flatter head of a drywall screw is probably better in this regard.
If you build something
where the screw is hidden, it may be a good idea to put a washer behind the screw head
to give it a bit more contact area with the wood.
The screws held surprisingly well in the end grain. I also experimented with drilling a slightly
larger hole for the screw, and filling the hole in the end grain with glue before inserting the screw.
This did improve the holding power even more, yet the screw could still be unscrewed.
So that may be an effective technique to repair furniture where the screws have pulled out
of the wood.
| | Force of failure in pounds, applied at 20 cm
1 pound = 0.45 kg = 4.4 Newtons
|
|---|
| Joint type | Spruce | Maple
|
|---|
| Mortise and tenon | 170,175,140,180,185,190 | 300, 270
|
|---|
| Dowel | 120,140,145 | 230, 245
|
|---|
| Pocket hole * | 115,110,140 | 220
|
|---|
| End grain screw * | 85 | 160
|
|---|
| End grain screw + washers * | 210 | 300
|
|---|
* All screw joints deflected to such a large extent before failure that the ultimate
failure strength is useless as far as furniture making is concerned.
For reference, I also tested the hardness of the wood I used, using my
screwdriver drop hardness test method.
My spruce samples divoted by .115" on average, which made it slightly
softer than many of the spruce samples in my hardness table. All my spruce is selected
for being heavy, so I'm pretty sure the spruce I was using was still slightly harder
than the average piece. My hardwood samples tested with divot depths of .035"
to .043", which puts it in the middle of the range for the hardwoods.
Further observations
- In my tests, mortise and tenon joints outperformed dowel joints by an average of 25%.
This is actually impressive performance for the dowel joints. The outside two dowels
were only 47.6 mm apart at the furthest edges, whereas my tenons were 56 mm wide - nearly
the width of the stock. I couldn't put the dowels all the way out to the edge of the rail
because they still needed wood around them to glue into.
The dowels also only protruded 25 mm into the post (half of the length of the pre-cut 2" dowels),
and the taper at the end of the dowels also shortened their effective glue area by
another millimeter or two.
If I had restricted my tenons to the geometry I was forced to with the dowels,
I'm pretty sure they would have lost the advantage. That all said, the tenon joints were
faster to make and glue up.
- In one of my spruce mortise and tenon joints, I had the growth rings parallel to the
tenon. This joint failed by the wood in the post shearing along the growth rings, and
failed significantly sooner than expected. So for strength it's probably best to
orient the wood so that your tenons cross as many growth rings as possible. I excluded
this one sample from my results.
- The first maple mortise and tenon joints that I tested failed much sooner than expected.
On close examination, I did not see the usual transfer of fibers from one part to the other.
The glue, not the wood had failed. Apparently, for that joint, 36 hours had not been enough to
let the glue fully dry. I excluded that sample and waited another 24 hours before testing
the remaining hardwood joints.
- The hardwood joints did not show any noticeable deflection or strain on the joint right
up to the point of failure. Spruce showed more deflection. The screw joints all
caused the joint to open up to an unacceptable degree long before they actually let go.
- A big long screw holds surprisingly well in the wood's end grain. I drilled the pilot
holes quite small, so all my rails were in danger of splitting when I put the screw in
the end grain. However, another quick test I did was to drill the hole larger, fill it
with glue, and then put the screw in. This arrangement held very well, and the screw
could still be unscrewed and re-screwed.
 Which wood is strongest, hardest, stiffest
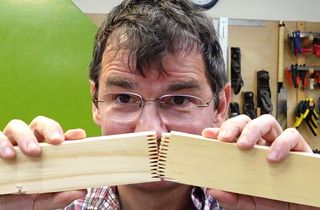 How strong is finger jointed lumber
 Which glue is strongest
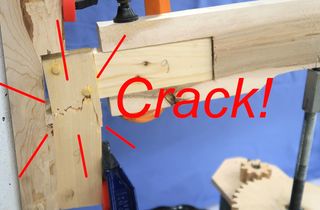 Can reinforcing a joint weaken it?
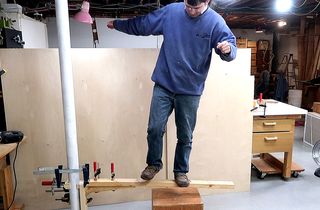 Shelf brackets: Double tenons vs. screwed vs pocket holes
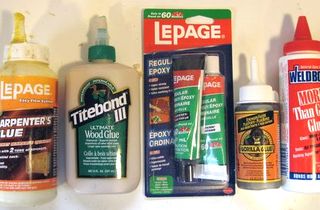
 More about chairs and chair joinery
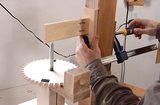 Pocket hole strength tests
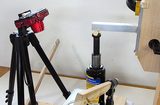 Brazed aluminium joint strength test
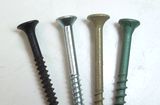
 Yanking out screws to test for strength
 Drywall screws in steel works surprisingly well
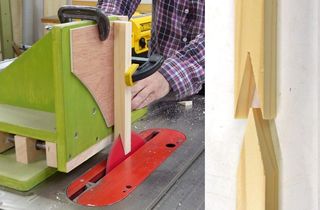 End-to-end V-joint strength test
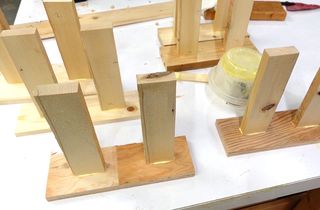 Glue surface preparation: Matters less than I thought