LCD monitor stand

|
My 21" Samsung LCD monitor came with a stand that could tilt, swivel, rotate, and height adjust. Quite a lot for a monitor stand to be able to do, but at the same time, it wasn't overly sturdy. In fact, if subject to vibration, the monitor would inevitably start tilting down on its own. I ended up resorting to jamming an eraser between the monitor and the stand to keep this from happening. And I never did find a use for all those other adjustments it had.
When I bought my new slimline HP computer, I figured an ideal place to keep the computer would be directly behind the LCD monitor. This would put the PC neatly out of the way. Also, although the PC is not very loud, whatever noise does come out of it, some of it would then be blocked by the monitor. But to make for a compact and secure arrangement of this sort on my wheely desk required that I build a custom LCD monitor stand.
 Because I wasn't quite sure how I wanted the monitor stand to look, I spent a bit of time
creating models for my computer and monitor in Google Sketchup.
Because I wasn't quite sure how I wanted the monitor stand to look, I spent a bit of time
creating models for my computer and monitor in Google Sketchup.
Because the monitor mount is narrower than I wanted the stand to be, I put the pieces that hold up the monitor at an angle. I first thought of angling the legs also, but that actually looked kind of strange in the model. I kept the legs upright, and use angled tenons to attach the monitor support to the legs.
You can Download my plans in Google Sketchup.
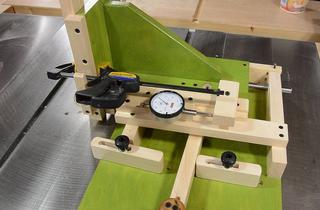
 To cut the angled tenons on my tenon jig, I had to make
a small wedge to hold the piece at an angle. I could have used my
delta tenon jig
which can be set to angles, but my quick set tenon jig is so much faster and more
accurate to use, so the wedge kludge was a better solution.
To cut the angled tenons on my tenon jig, I had to make
a small wedge to hold the piece at an angle. I could have used my
delta tenon jig
which can be set to angles, but my quick set tenon jig is so much faster and more
accurate to use, so the wedge kludge was a better solution.
 That wedge came in handy for a few other things though, such as trimming the tenon
to width on the band saw. I also used it with my miter sled to cut the other angled
pieces. It was quicker than adjusting the miter gauge back and forth for
cutting 90 degrees + the 11 degrees, and 90 degrees minus the 11 degrees.
That wedge came in handy for a few other things though, such as trimming the tenon
to width on the band saw. I also used it with my miter sled to cut the other angled
pieces. It was quicker than adjusting the miter gauge back and forth for
cutting 90 degrees + the 11 degrees, and 90 degrees minus the 11 degrees.
With the tenon at an angle, the mortises were straight in, and I cut them with
my home made mortising machine.
A regular plunger router could also have been used, but that would have been
less accurate and more time consuming. More on
mortise and tenon joinery
 The cross-piece on the top is dadoed, and inserted into a slot at the top of the
two angled support pieces. I was rather lazy and jigged both of those up on
my tenon jig at the same time. With a few successive cuts, I cut the slot out,
saving the effort of having to cut the middle part out with a band saw.
The cross-piece on the top is dadoed, and inserted into a slot at the top of the
two angled support pieces. I was rather lazy and jigged both of those up on
my tenon jig at the same time. With a few successive cuts, I cut the slot out,
saving the effort of having to cut the middle part out with a band saw.
You can also see the angled tenons at the top end of the work pieces.
I neglected to take any other photos of the actual angled tenons.
 And finally, all the parts that had mortise and tenons in them for the monitor stand,
prior to assembly.
Not visible in this photo is the mortises on the sides of the legs, which are not
facing the camera.
And finally, all the parts that had mortise and tenons in them for the monitor stand,
prior to assembly.
Not visible in this photo is the mortises on the sides of the legs, which are not
facing the camera.
Assembling the monitor stand turned out to be a little bit tricky. I started by assembling the
monitor support (the two angled pieces) with their cross-pieces. This was tricky because
I had to slide the top piece with its dados over the angled pieces at the same time
that I pushed the cross-piece between these two into their mortises.

Next was to assemble the legs with the cross-piece in between, and then mate the two tenons from the support pieces into the legs at the same time.
If I was building it again, I'd omit the cross-piece between the two angled uprights.
With the legs already tied together with a piece, joining the angled uprights
was a bit redundant.
 After assembling it, I decided to trim the top at a bit of an angle. I just put the
whole stand on my table saw sled, putting a block of wood between the fence and the top
of it to keep it from moving and cut the top off. I wouldn't know what to do
without my big table saw sled
After assembling it, I decided to trim the top at a bit of an angle. I just put the
whole stand on my table saw sled, putting a block of wood between the fence and the top
of it to keep it from moving and cut the top off. I wouldn't know what to do
without my big table saw sled
I removed the zero clearance insert for this cut because I also set the blade at
an angle. I could of course have used my regular insert for this cut, but seeing that
I was already using the sled, it wasn't worth the bother.
 This is what the main part of the stand looks like assembled. I put some dowels in the
back of the legs, to guard against the PC accidentally tipping off the stand.
This is what the main part of the stand looks like assembled. I put some dowels in the
back of the legs, to guard against the PC accidentally tipping off the stand.
Also you can barely see the tenons sticking out from the angled pieces. I decided to make these through tenons. My plan was to cut these flush after assembly, but with the tenons sticking out of the wood by about a millimeter and a half, it actually looked kind of cool, so I just rounded the edges of the tenons a little bit and left them like that.
A further change was to glue another piece of wood below the crosspiece at the top.
I put that there to mount some sort of screw in there for a tilt mechanism.
 The monitor mount itself is round, with four holes arranged in a square 10 cm to a side.
I made this out of birch plywood, and mounted it with a pair of hinges to the top of the stand.
A screw is used to push the bottom of this disk away from the stand to tilt
the monitor upwards.
I used one of those funny nuts that is meant to be pounded into softwood
to give a thread for machine screws. For where I mounted this nut, especially it being in
ash hardwood, I pre-drilled holes for the prongs of this nut to keep it from splitting
the wood.
The monitor mount itself is round, with four holes arranged in a square 10 cm to a side.
I made this out of birch plywood, and mounted it with a pair of hinges to the top of the stand.
A screw is used to push the bottom of this disk away from the stand to tilt
the monitor upwards.
I used one of those funny nuts that is meant to be pounded into softwood
to give a thread for machine screws. For where I mounted this nut, especially it being in
ash hardwood, I pre-drilled holes for the prongs of this nut to keep it from splitting
the wood.
 This photo shows the complete LCD monitor stand, prior to mounting the screen to it.
I have to admit, it looks kind of weird all by itself. But then again, when I took
the old stand off the monitor, that stand on its own looked pretty strange too.
This photo shows the complete LCD monitor stand, prior to mounting the screen to it.
I have to admit, it looks kind of weird all by itself. But then again, when I took
the old stand off the monitor, that stand on its own looked pretty strange too.
You can see the adjustment screw sticking out of the back. Though I had a nice thumb screw that would have worked, the hex nut was easy enough to turn on its own, and that bolt was a little longer, and took up less space. to adjust the angle of the monitor, it's best to just tilt it way up, and reach behind and turn the screw with one's fingers.
It's not as easy to adjust as the old monitor stand was, but at least it won't sag, and really,
how often does one adjust that anyway?
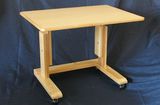
 With the monitor attached, and computer on the stand, the stand doesn't look so odd
anymore. In fact, it's kind of hard to see much of the stand. But that's ok. It's meant
to be functional more than anything.
With the monitor attached, and computer on the stand, the stand doesn't look so odd
anymore. In fact, it's kind of hard to see much of the stand. But that's ok. It's meant
to be functional more than anything.
The one thing that I might do different if I was building it again is that
the monitor could have been moved closer to the computer by a centimeter or two, which
would have made the whole arrangement even more compact.
 And here's the whole thing, seen from the back, on my
wheely desk. I screwed some hooks into the back
of the desk to hold all the cabling. Some of the cables are strung side to
side several times just to take up the slack.
And here's the whole thing, seen from the back, on my
wheely desk. I screwed some hooks into the back
of the desk to hold all the cabling. Some of the cables are strung side to
side several times just to take up the slack.
The "subwoofer" for the speakers is mounted to the table legs (you can see it bottom right). Also, I screwed a mini power-bar to the legs.
I'm using the computer's built in wireless networking in this photo. When I needed
to transfer gigs and gigs of files from my old computer though, I ended up
going back to a network cable - it's so much faster!
See also:
 Compact Comuter/ monitor stand |
 Laptop desk |
 Wooden computer keyboard mod |
 Home made quick-set tenon jig |
 Wooden computer case |
More on Mortise and tenon joinery
Back to my Woodworking website
![]()