I have seen various positive reviews of this delta tenon jig or it's various knockoffs on the net. So I felt compelled to add my two cents worth and point out some of the problems I encountered with this tenon jig.
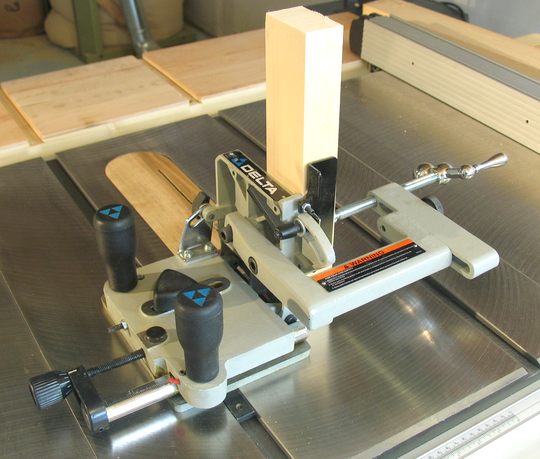
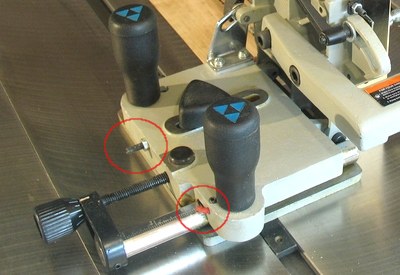
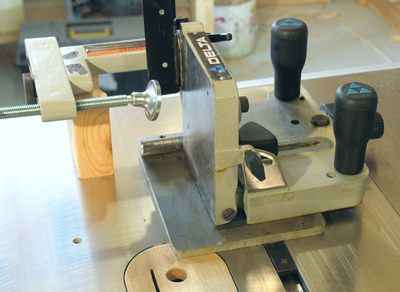
 My Quick-set tenon jig
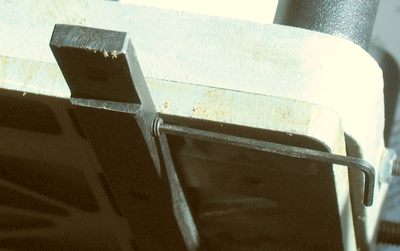
 The tenon jig comes with these washers that lock it in the T slot of the table saw.
By default, these washers were high enough in that the jig could not freely slide
in the T-slot. The problem could be solved by placing some smaller washers under
the big washer, but no extra washers were included for this purpose.
I didn't much like the idea of relying on these washers to hold
the tenon jig though - I figure the jig should hold itself level on the table on its own,
without these washers. So the first thing I did was to remove those.
The tenon jig comes with these washers that lock it in the T slot of the table saw.
By default, these washers were high enough in that the jig could not freely slide
in the T-slot. The problem could be solved by placing some smaller washers under
the big washer, but no extra washers were included for this purpose.
I didn't much like the idea of relying on these washers to hold
the tenon jig though - I figure the jig should hold itself level on the table on its own,
without these washers. So the first thing I did was to remove those.
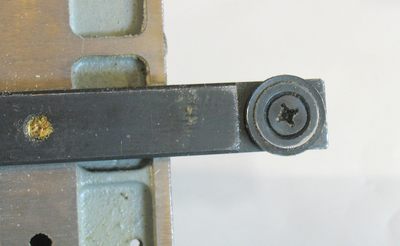
Adjusting to the T-slot width
 The bar that slides in the T slot has quite a lot of play. To compensate for this, there
are two set screws on the side of the bar, which allow the jig to be adjusted so it
slides in the T-slot with no play.
The bar that slides in the T slot has quite a lot of play. To compensate for this, there
are two set screws on the side of the bar, which allow the jig to be adjusted so it
slides in the T-slot with no play.
Except there's a problem. There is no way of locking these screws in place. I suppose a bit of locktite or some soft glue to put in the threads would do the trick. But I also didn't like the idea of having just this little screw scrape away at the cast iron in my T-slots. I didn't think this was a good design. A better design perhaps would have been to have the bar have a slot in it towards the end, and have the set screw force the pieces apart.
At any rate, I decided not to use the set screws. Instead, I widened the ends of the bar by pounding it flat with a hammer until there was almost no play in the T-slot. This way, I have the mild steel of the bar sliding against the cast iron, and also don't have to worry about the screw moving on its own.
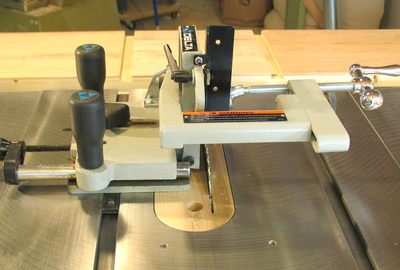
Adjustments
 The jig has a nice screw for adjusting it laterally. It's operated by the big knob leftmost
in the picture. The button at the other end of the screw can be pressed to release the screw,
so that the jig can be slid without turning the screw.
The jig has a nice screw for adjusting it laterally. It's operated by the big knob leftmost
in the picture. The button at the other end of the screw can be pressed to release the screw,
so that the jig can be slid without turning the screw.
There's also a little indicator needle that points to a scale along the bar. The needle can be moved a little bit, but the scale really has no reference. I don't think the scale is fine enough to really be of use anyways. I always measure to the blade, so I don't know how useful this is.
There's also a screw that can set a limit to how far towards the blade the jig can move. This screw only pushes up against the rather loose locking screw, so it's not suitable as a precision stop. It's also too short to use as a stop when making cuts. It's really more meant as a safety feature, meant to be set in a way to keep you from accidentally moving the jig forward enough that it hits the blade. Though that seems a bit silly, because if the T-slot bar is mounted in the other set of mounting holes, even the base plate itself will end up hitting the blade when you try to use it from the left side. This is because the blade on the delta hybrid saw is unfortunately not centered between the T-slots.
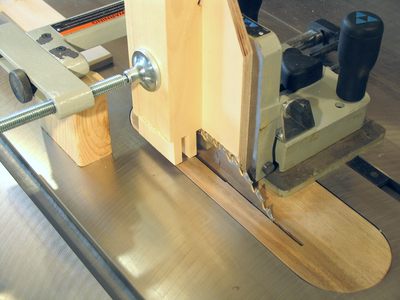
 Stability problems
The next problem is that the tenon jig, when used in the normal way, has its base plate extend over the throat insert quite a bit. So much so in fact that if I slide it next to the blade with the throat insert removed, it will actually tip into the hole..
Obviously, if I left the washers on the T-slot bar, they would prevent it from tipping, but it's not reassuring to know that the precision of your tenons depends on the jig holding itself in the T-slot by some little washers.
It makes me think the jig is not designed for a right tilt saw like this one. But then again, it came with this saw.
 The using it backwards option:
If the jig were used on a left tilt table saw, the throat insert would be wide on the right and narrow on the left, and the jig would not have to rely on the insrt for support. Another alternative is to just flip the jig around. Seeing that it has handles on both sides, this works reasonably. Though the blade now pulls the work piece away from the fence, instead of towards it. In this photo, I also moved the jig's T-slot bar to its outer position (it has two sets of mounting holes), so that the jig moves closer to the blade. Really, out of the box, this is the most stable configuration of this jig.
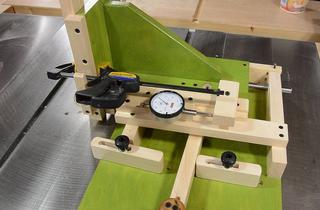
 My stability solution
My preferred solution though is to mount a block of wood under the arm with the clamp on it. It's best to mount this by drilling a few screw holes through the cast iron. A support block like this makes the jig more stable, and make the top not tip forward slightly whenever the triangular locking knob is loosened. The trick is to make the block of exactly the right height. This only works for right angle tenons, but angled tenons really aren't such a good idea anyway. And besides, I can already tilt the blade. The angle adjustment of this jig is mostly yet another thing that can get out of alignment.
 Stock thickness limitations
The next catch is that if you move the jig back more than about 3/4" from the blade, the base plate starts to protrude out from under the jig. So if you want to rest the work piece on the table saw table, you are limited to pieces about 3/4" thick.
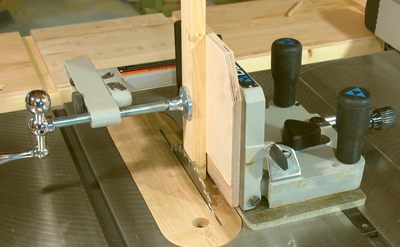
![]() Stock thickness solution
Stock thickness solution
This can be solved by putting a space under the front of the jig, and use that as a vertical reference. That way, as the jig is moved back for thicker work pieces, the tenon is already up far enough so that it won't hit the base plate.
Some of these problems could also be avoided by simply flipping over the work piece. But it's my view that flipping over the work piece is a cardinal sin of precision. Basically, you should always use the same reference surface. Flipping the work piece means you end up using the other side as a reference surface, and any inaccuracy in the dimensions of your work pieces will now result in changes of the thickness of your tenons. Granted, flipping the piece does guarantee that the tenon will be in the center even if the work pieces are inconsistent in thickness. Except that the error manifests itself in changes in tenon thikness, which is even more undesirable.
![]() Another photo showing the piece used for the vertical reference. It's clamped to the table.
I chamfered it at the front, so that when the jig is pulled back over this piece, it doesn't
end up catching the tenon.
Another photo showing the piece used for the vertical reference. It's clamped to the table.
I chamfered it at the front, so that when the jig is pulled back over this piece, it doesn't
end up catching the tenon.
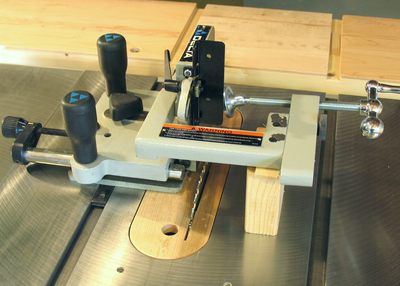
 Here's a shot of making the last cut for a double tenon in a piece of 1.5" thick spruce.
Part of the sacrificial fence is cut into in the process.
I used this double tenon for some shelving supports
that I built for my basement.
Here's a shot of making the last cut for a double tenon in a piece of 1.5" thick spruce.
Part of the sacrificial fence is cut into in the process.
I used this double tenon for some shelving supports
that I built for my basement.
Overall, with a support block added to the clamp arm, a sacrificial fence screwed onto the jig, and a block to use a vertical reference, it's a pretty nice jig. But it takes a lot of twiddling to get this jig to really work well.
If you buy one of the many knockoff jigs, you will encounter mostly the same problems. Rather than improve on the delta jig, it seems the makers of the knockoff jig were happy to just copy most of the design errors that Delta made. The knockoff jig comes under many names. 'Grizzly' and 'Craftex' just to name a few. Having examined some of these, the same issues would apply to them as well.
My Quick-set tenon jig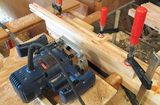 Table saw mortising jig
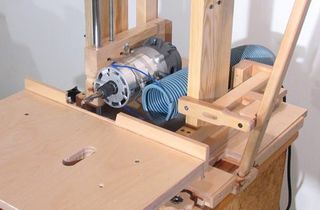 Home made mortising machine
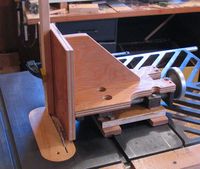 Home made tenon jig
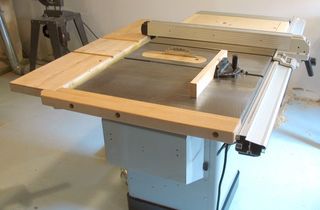
 Reviewing a not-so-great jobsite saw