 Bandsaw blade sharpener jig
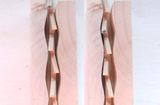 Why bandsaw blades whine
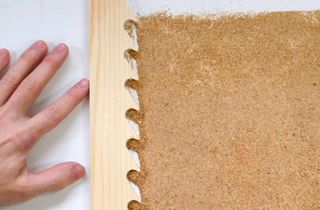 The physics of bandsaw resawing
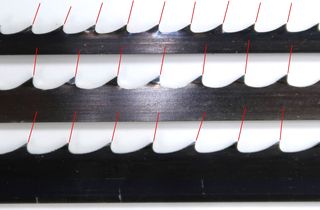 Bandsaw blade chatter and tweaking the tooth set
 Sharpening jointer knives
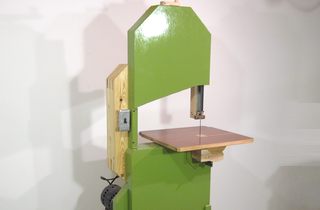 Homemade bandsaw
 Homemade
 Stoning bandsaw blades for a cleaner cut
My first video on this was in 2010. I've gotten better at making videos, so in 2015, I made a new, shorter video on this topic.
 "Life is too short to be sharpening your own bandsaw blades" is what a co-worker
remarked when asked him if he sharpens his own blades.
I was inclined to agree until I hit a staple with a nearly new
blade. My new blade turned into a crappy one instantly.
My previous blade had suffered a similar demise with nails,
so I wanted to fix this without buying yet another blade.
"Life is too short to be sharpening your own bandsaw blades" is what a co-worker
remarked when asked him if he sharpens his own blades.
I was inclined to agree until I hit a staple with a nearly new
blade. My new blade turned into a crappy one instantly.
My previous blade had suffered a similar demise with nails,
so I wanted to fix this without buying yet another blade.
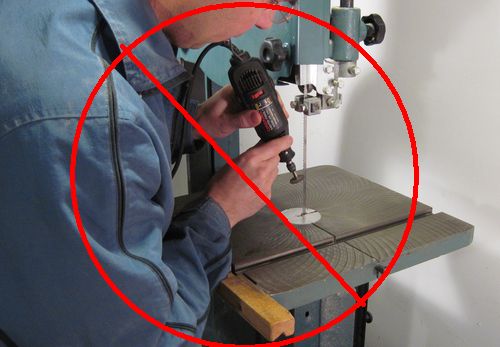 My first attempt at sharpening was to go at it with a
cut-off disk on a Dremel tool and the blade still in the saw.
My first attempt at sharpening was to go at it with a
cut-off disk on a Dremel tool and the blade still in the saw.
I was able to get the blade sharper than before, but the sharpened blade ended up making a wavy sort of cut in the wood. It was also hard to focus on the blade and the cutting wheel without another visual reference nearby. I often ended up nicking the corners of teeth that I just sharpened. So I figured this was not the best way to do it.
Why the red lines on the drawing? Not everyone reads the text.
 To start over, I held a sharpening stone against the tips of the teeth for
a few seconds with the saw running, so that they'd all be flattened
to a consistent height.
If your blade is inconsistently dull, perhaps as a side effect of cutting
a nail or a staple, this may be a good idea. But if your blade is dull
from regular use, I wouldn't recommend this.
To start over, I held a sharpening stone against the tips of the teeth for
a few seconds with the saw running, so that they'd all be flattened
to a consistent height.
If your blade is inconsistently dull, perhaps as a side effect of cutting
a nail or a staple, this may be a good idea. But if your blade is dull
from regular use, I wouldn't recommend this.
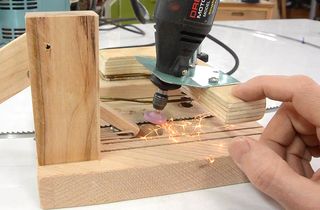
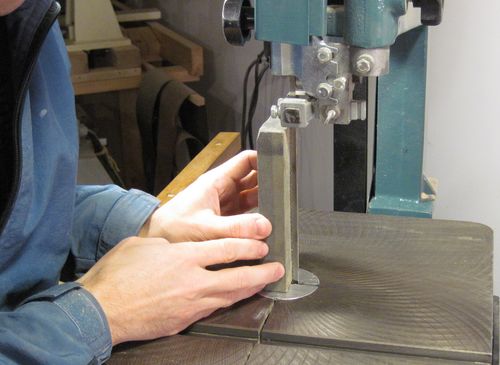
 The next step was to rig up a set-up for grinding the teeth.
My rationale was that the more comfortable
I was while sharpening, the less tiring it would be, and
I would end up doing a more consistent job.
The next step was to rig up a set-up for grinding the teeth.
My rationale was that the more comfortable
I was while sharpening, the less tiring it would be, and
I would end up doing a more consistent job.
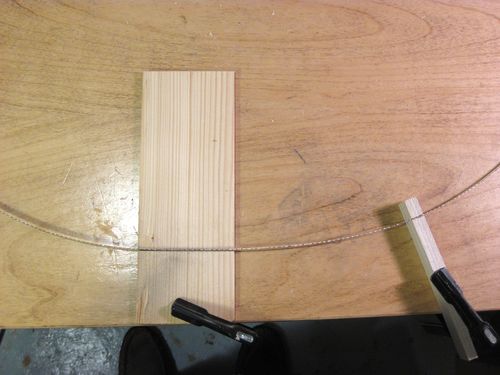
The wide piece of wood towards the center has a slot cut in it that the blade sits in. The
smaller piece on the right also has a slot in it to guide the blade. With this set-up,
I can slide the blade along to get at more teeth. The piece of wood at an angle
on the right is another guide that helps to line up the blade as I pull it to the left.
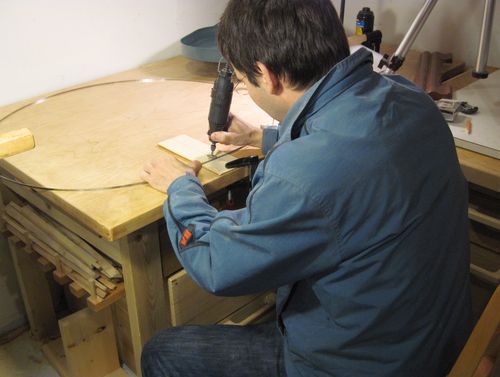 I pulled up a chair to the workbench to do the sharpening. My 6 tooth per inch blade
has over 550 teeth on it, so that's a lot of teeth to sharpen. But it was manageable.
I pulled up a chair to the workbench to do the sharpening. My 6 tooth per inch blade
has over 550 teeth on it, so that's a lot of teeth to sharpen. But it was manageable.
For resaw blades with fewer teeth, resharpening makes much more sense. For really
fine 10 tpi blades, hand resharpening may not be a worth while.
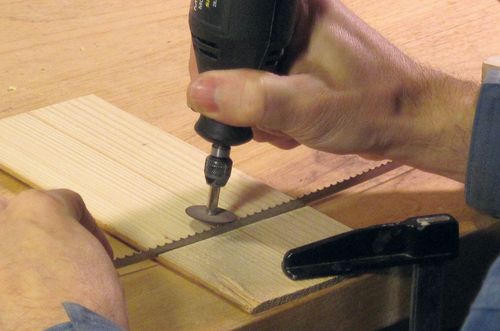 To sharpen the teeth, I just briefly touched the cut-off disk of the Dremel tooth to the top
of the tooth. The Dremel tool is held at a slight angle so that the top of the
cut has a slight bevel with respect to the direction of the blade's travel.
Having previously flattened the tops of the teeth with a stone,
all I need to do now is add a slight bevel to the top.
To sharpen the teeth, I just briefly touched the cut-off disk of the Dremel tooth to the top
of the tooth. The Dremel tool is held at a slight angle so that the top of the
cut has a slight bevel with respect to the direction of the blade's travel.
Having previously flattened the tops of the teeth with a stone,
all I need to do now is add a slight bevel to the top.
Once I got a routine going, I was able to sharpen more than one tooth per second, so that
sharpening all the teeth on my blade took less than 10 minutes. With that sort of time to sharpen
a blade, it takes more time to go to the store and buy a new one. So the
"life is too short to sharpen your own bandsaw blades" statement becomes difficult to rationalize.
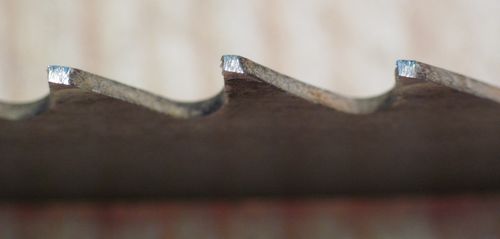
Here's what the sharpened teeth look like. I made no attempts at grinding the valleys
between the teeth.
I figure this procedure is good for about five sharpenings before the blade needs replacing.
With each sharpening, the teeth get a tiny bit shorter. To do more sharpenings
would require deepening the valleys between the teeth and adjusting the set. Not worth
the trouble to me.
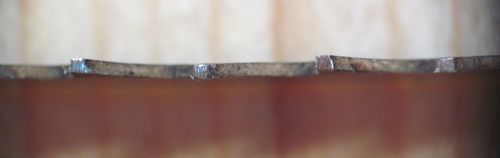 Alternate teeth have a light left or right bend to them
so that the cut that the blade makes is a bit wider than the blade itself. You can just see
the left and right bend from looking straight on at the blade in the close-up photo at left.
Alternate teeth have a light left or right bend to them
so that the cut that the blade makes is a bit wider than the blade itself. You can just see
the left and right bend from looking straight on at the blade in the close-up photo at left.
With the wider kerf, the blade has more room so it can run without binding.
The slack also helps when cutting curves.
My previous video (from 2010) on sharpening bandsaw blades
Stoning bandsaw blades for a cleaner cut Sharpening drill bits
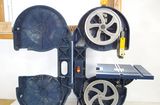 Tuning up a cheap bandsaw
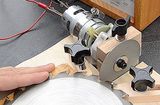 Table saw sharpening jig
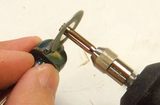 Sharpening router bits