Flush cutting a dowel
Some of my free plans, such as my workbench plan or my simple table plans call for dowels to be flush cut with the surface, and I suggested using a chisel. A reader emailed me saying he had difficulty with that, so I figured this might be a topic that's worth further discussion.
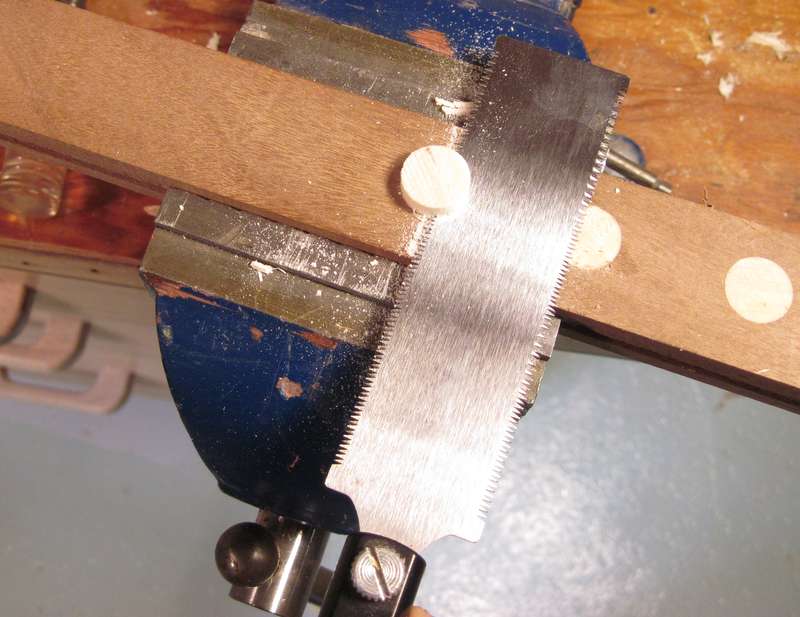 A good way to get a dowel flush with the surface is to use a flush cut saw.
A flush cut saw will do a good job of cutting the dowel flat, although, depending
on your saw, you may end up scraping the surface around the dowel just a bit.
The resulting cut will also not be as smooth as it could possibly be.
A good way to get a dowel flush with the surface is to use a flush cut saw.
A flush cut saw will do a good job of cutting the dowel flat, although, depending
on your saw, you may end up scraping the surface around the dowel just a bit.
The resulting cut will also not be as smooth as it could possibly be.
But this article is not so much about having all the right tools, so I'll show how to do it without a flush cut saw. Fact is, I have been woodworking for so long without one that I never remember to use it when I actually need to flush cut something. Usually, I just put the work piece on my bandsaw or table saw to cut things nearly flush, then use a chisel or belt sander to finish it off.
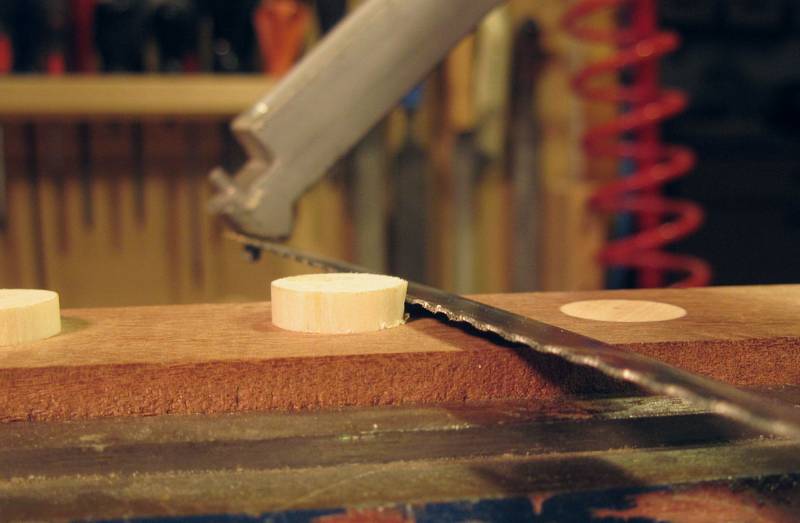 So to demonstrate my techniques, I'm going to start by cutting the dowel off
with a hacksaw. A hacksaw blade
will definitely damage the surface if you try to cut flush to the surface, so I'm
cutting the dowel about a millimeter above the surface. I start my cut by angling
the hacksaw blade upwards a little bit to get the right distance from
the surface. The angle is a bit exaggerated in this
picture to better illustrate. After starting the cut, I orient the blade horizontally
to finish the cut.
So to demonstrate my techniques, I'm going to start by cutting the dowel off
with a hacksaw. A hacksaw blade
will definitely damage the surface if you try to cut flush to the surface, so I'm
cutting the dowel about a millimeter above the surface. I start my cut by angling
the hacksaw blade upwards a little bit to get the right distance from
the surface. The angle is a bit exaggerated in this
picture to better illustrate. After starting the cut, I orient the blade horizontally
to finish the cut.
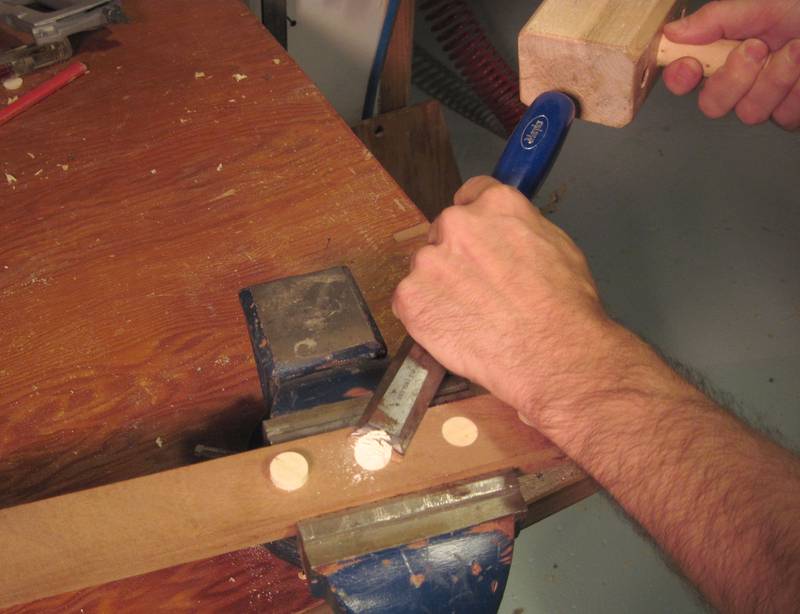 The most obvious way to chisel the dowel flush is to just drive a chisel straight
across the top of the dowel with a mallet.
The most obvious way to chisel the dowel flush is to just drive a chisel straight
across the top of the dowel with a mallet.
This works if the chisel is sharp and the dowels dowels are of a sufficiently hard wood such as oak. But for softer woods, such as birch, it leaves a messy surface.
 The resulting cut often doesn't end up very smooth. Also, with the heavy forces
involved, you may end up driving the chisel into the surrounding wood.
The resulting cut often doesn't end up very smooth. Also, with the heavy forces
involved, you may end up driving the chisel into the surrounding wood.
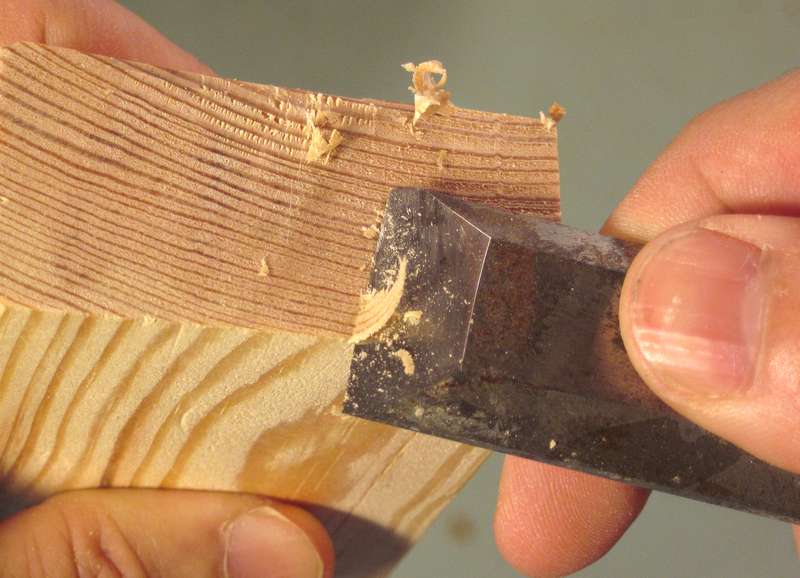
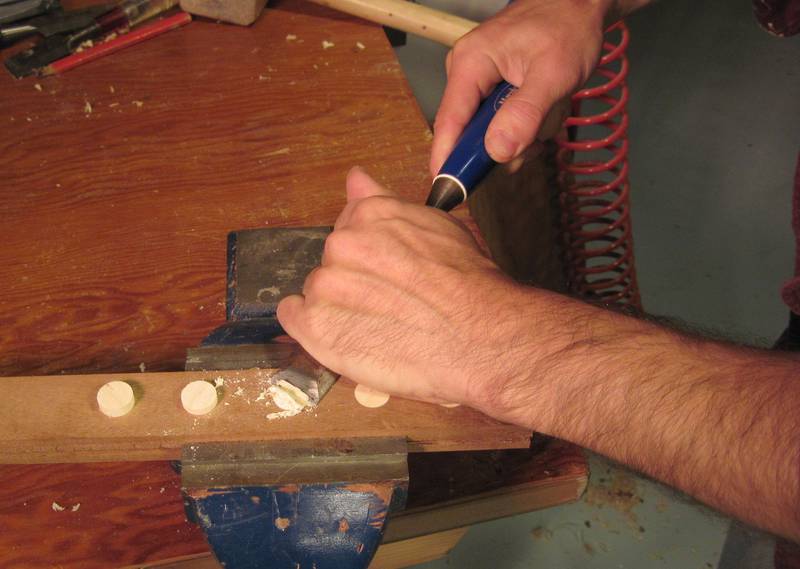 The key to getting a smooth cut is to move the cutting edge move side to side relative
to the direction of cut, Similar to how you would push and pull on a knife when cutting
through a loaf of bread.
The key to getting a smooth cut is to move the cutting edge move side to side relative
to the direction of cut, Similar to how you would push and pull on a knife when cutting
through a loaf of bread.
I'm holding the chisel in place with my left hand, while my right hand turns the chisel side to side (more of a yaw motion in airplane terminology), causing the tip of the chisel to move side to side as it moves forward.
As long as I'm taking a very thin slice off the wood and my chisel is sharp, I don't need a lot of force to drive the chisel through the wood. Merely pushing it forward with my right hand is enough.
With the much lighter forces involved, the chisel is also much less likely to dig into the surrounding wood.
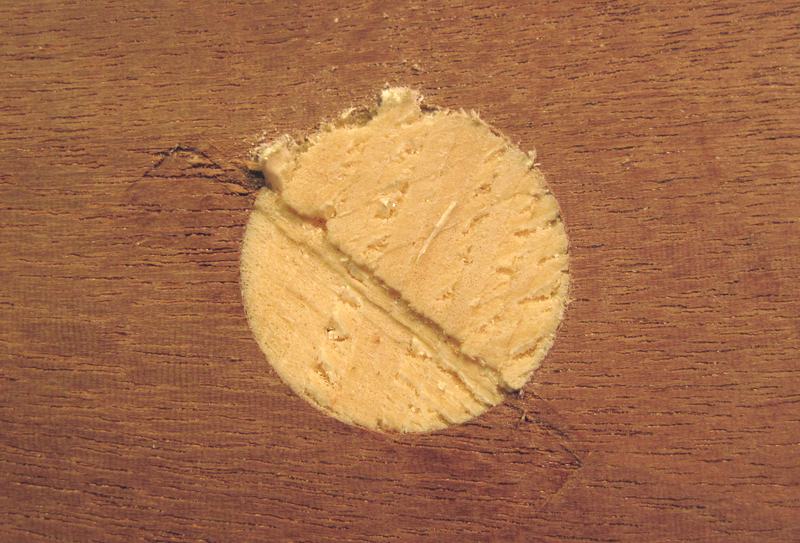
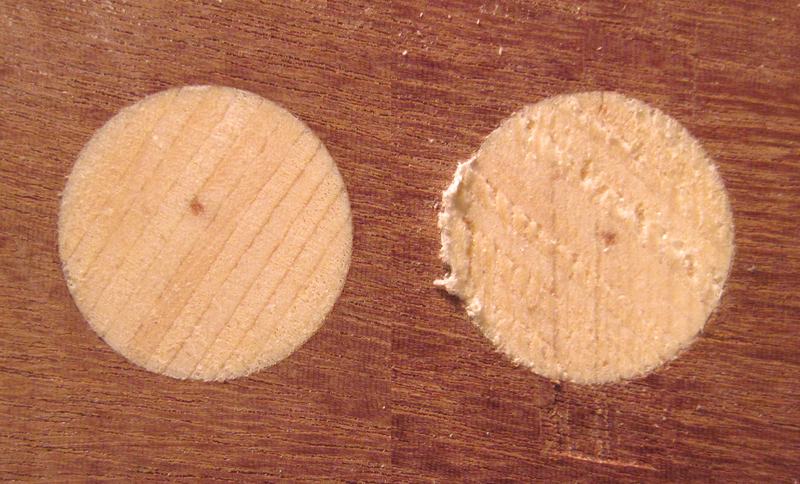 And here's the resulting cut. The one on the left was made by stroking the chisel side
to side as I pushed it across in several passes. The one on the right was just
hammered straight across.
And here's the resulting cut. The one on the left was made by stroking the chisel side
to side as I pushed it across in several passes. The one on the right was just
hammered straight across.
A sharp chisel is essential, but a sharp chisel alone is not enough to guarantee a clean cut. Both cuts were made with the same chisel.
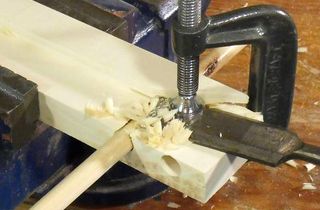
You might be wondering about the grain on the dowels. These dowels are made of laminated
layers of veneer. Seems kind of odd, but they were the best dowels I could find in that size.
All the dowels at The Home Depot, last time I checked, were too inaccurate to be even usable,
and they felt so light that I'd guess they were made out of poplar. Surely, dowel joints
can be just about as good as
mortise and tenon joints, but only if you can
find suitable dowels.
How I sharpen my chisels
Much has been written about sharpening, and the topic almost seems to be a religious one, but I'll add my two cent's worth anyway.I see myself as more of a sharpening barbarian. I don't own one of those fancy expensive Tormek sharpeners, nor do I own any oil stones or any of that fancy stuff. But I thought I'd include a few notes about how I sharpen my tools.
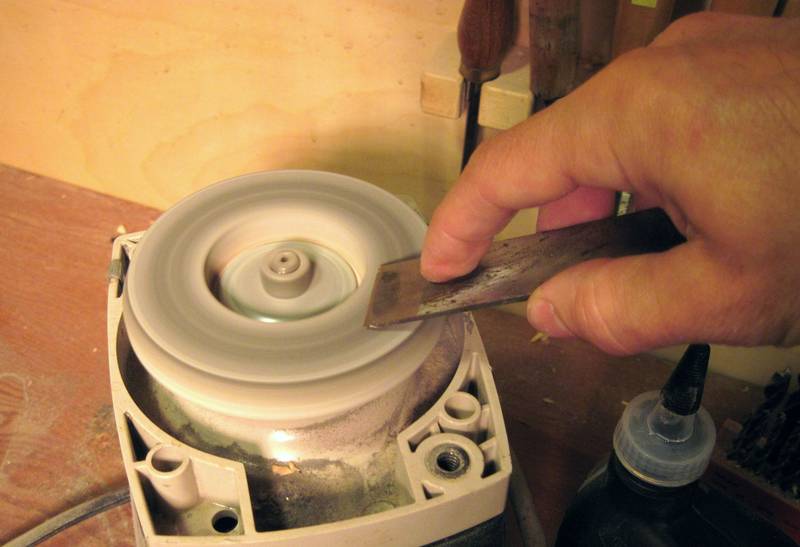 I have this grinder with a white wheel on it. It's supposed to be a wet grinder,
but the water pumping thing stopped working long ago, so at some point I just removed it
along with all the plastic around the wheel.
I usually wet the wheel a little bit before using it, but not too much, because it will
just throw any excess water all around if I do.
I have this grinder with a white wheel on it. It's supposed to be a wet grinder,
but the water pumping thing stopped working long ago, so at some point I just removed it
along with all the plastic around the wheel.
I usually wet the wheel a little bit before using it, but not too much, because it will
just throw any excess water all around if I do.
The wheel runs at about 3500 RPM, fast enough to make sparks. So I have to be careful not to let the tool overheat. But this wheel produces a very smooth surface, smooth enough to sharpen jointer knives.
I grind the bevel, and usually also briefly put the chisel flat on the surface to grind the flat part as well.
 I then go from the grinder straight to a leather strop with honing compound.
I pull the chisel across while pushing down firmly, pulling it across maybe 10 times
on the bevel and 10 times on the flat side.
I then go from the grinder straight to a leather strop with honing compound.
I pull the chisel across while pushing down firmly, pulling it across maybe 10 times
on the bevel and 10 times on the flat side.
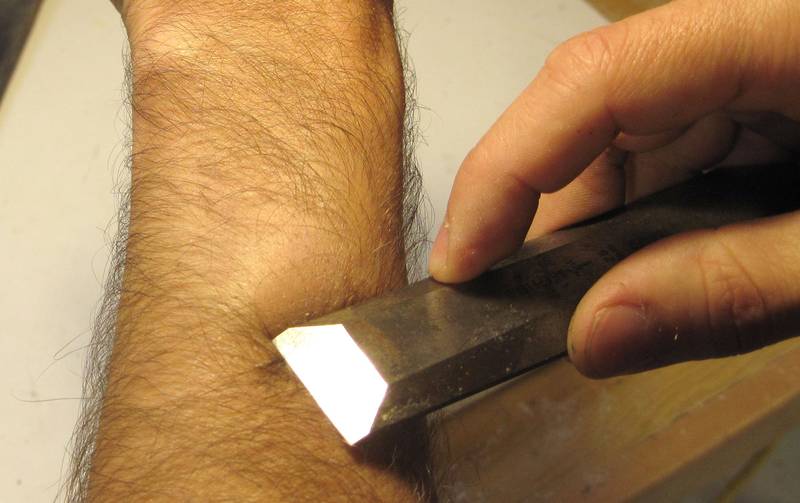 The resulting edge is one that is sharp enough to take the hair off my arm if I push
the chisel across it.
The resulting edge is one that is sharp enough to take the hair off my arm if I push
the chisel across it.
 I don't usually test my chisel that way. Shaving bare spots on my arm is
not something I do for fun. A better way to test the sharpness of an
edge is to take a piece of softwood, and push the chisel or blade straight across
(no skew) to cut some chips off the end grain.
If you can see a bit of a gloss in the cut you made, it's definitely sharp.
I don't usually test my chisel that way. Shaving bare spots on my arm is
not something I do for fun. A better way to test the sharpness of an
edge is to take a piece of softwood, and push the chisel or blade straight across
(no skew) to cut some chips off the end grain.
If you can see a bit of a gloss in the cut you made, it's definitely sharp.
I have also at times used a buffing wheel instead of the strop, but I keep the strop in a drawer in my workbench, so it's always close at hand.
An even more barbaric method I have used is to go straight from the fine wheel on my bench grinder to the buffing wheel. I only use that technique for knives and other edges that don't need to be super precise, but it's surprising how good an edge you can get moving from the bench grinder straight to the buffing wheel!
See also:
 Making dowels
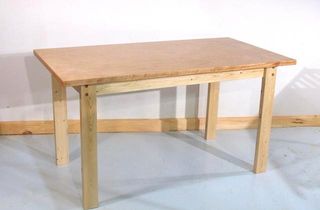 Building a simple table
 Building a workbench
 My favourite handplanes
 More about using dowels
 Flush cut with a router instead of
a flush-trim saw
Flush cut with a router instead of
a flush-trim sawMore Woodworking techniques on my Woodworking website