I came up with the design for a desk like this for the purpose of doing work from
out of the office. I had a girlfriend in another city in 2004, and
to spend more time with her, I decided to do some “work from home” from her
home with a laptop computer and external monitor.
When working at the computer, it's important to have a desk and chair that go
well together so that I can sit comfortably and focus on my work.
I didn’t want to get a fancy office chair like they had at work.
Instead, I figured a variety of seats could be very comfortable
if the desk was at just the right height to go with them. For example, a
couch, with pillows behind the back is quite "configurable" and comfortable
for long stretches, but not when used with a normal desk of regular height.
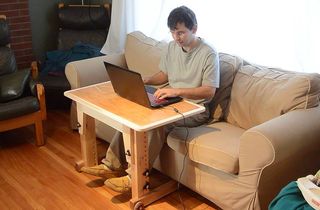
So built a height adjustable small computer ‘desk’ so that I could take it there
and adjust it to whatever was optimal to go with the available seating options –
whether it be a couch, a chair, or whatever.
I also wanted to be able to put the desk out of the way in the evening, so
I put wheels on it and sized it so it could still be rolled down a hallway
and through a bedroom door.
After I built the original desk, it was still a couple of weeks until my
next trip, so I tried it out at my house. I quite liked it.
I'd sit on my day bed
with a pile of pillows behind me, and then pull the computer
desk up to me. Once I moved the desk to her place, I built a second one to
use at home.
The first one was built from nice white ash wood, but I used up all the white
ash I had lying around. The second one I built mostly of spruce construction lumber.
You can get pretty decent spruce if you are careful about selecting it. It
also helps to buy wider material – such as 2x8’s, because those come from larger trees
and aren't as full of knots.
I didn’t draw any plans for this one, though I did make plans
for my next version.
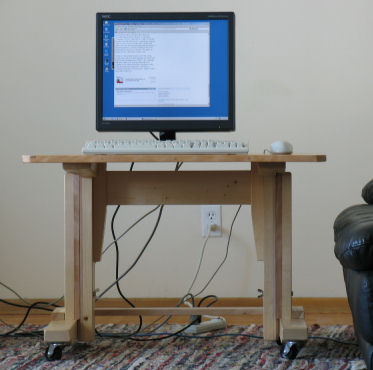
The pictures above may also be useful for you to figure out what the overall dimensions are.
I took them from far away and straight on, so there is relatively little perspective
distortion. You should be able to just print the pictures, and work out the scale.
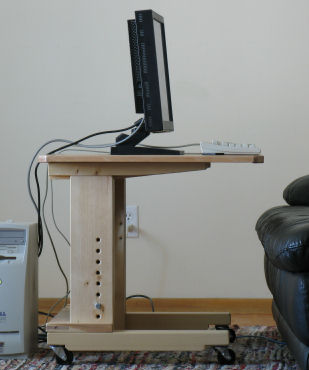
For reference, the desk is set to 57.5 cm high. The top is 85 cm wide and 62 cm deep.
The monitor on the desk is an 18” LCD monitor, which is 24 cm wide on the outside.
The row of holes for adjusting the height is spaced at 3 cm intervals. The holes
on the inside parts of the legs are spaced at 4.5 cm, which allows for height
adjustment steps of 1.5 cm by using different combinations of holes.
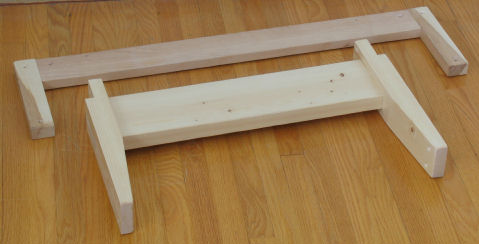
Legs reversed for storage
The desk can relatively quickly be put out of the way by removing the legs and sliding
them on in reverse (upside down and left-right reversed). In this configuration, the
desk can be put into the trunk of a hatchback car relatively easily, or stuck in
a closet on its side.
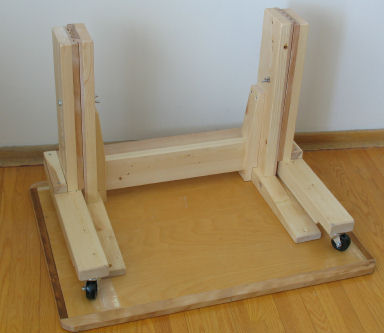
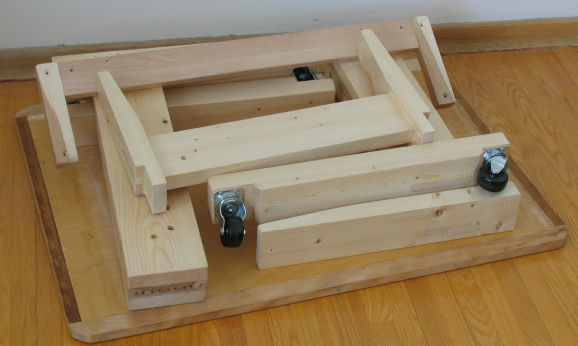
Fully disassembled
The first desk had the parts of the frame mortised together so it couldn't be made
much more compact than to remove the legs. The second desk has a frame that's
partly put together with screws so that, removing 18 wood screws leaves this.
The bracket that ties the legs together on the bottom rear is made of maple. It's the top
of the two brackets in the above photo. Making it out of spruce would have meant making it
a fair bit thicker. The other bracket goes between the two top leg segments. It's responsible
for side-to-side stability of the desk. The cross beam is mortised into the vertical parts
of that bracket, although I'm sure doweling would work good enough too.
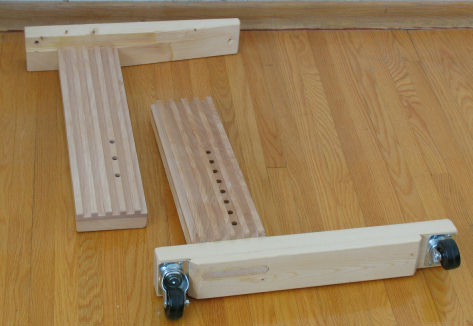
This picture shows the two leg segments. the top part screws to the plywood top. The two pieces
shown are the bottom right segment, and the top left segment - these two don't actually
mesh together in the normal position, but picture the top part being a mirror image of itself,
mirrored against the plane that is the floor, and you can see how it meshes with the bottom part.
Also note that I mortised the T-joints. Strength is critical for these, especially
if somebody sits on the desk. Four 3/4" dowels instead of a mortise and tenon joint should
do too. The upright part of the legs with the slots is made of maple for strength.
It's 12 cm wide, and with five slots across. That makes the slots and ridges each 1.2 cm wide.
In my next version I made it four slots instead of five.
This would makes the ridges between the slots stronger, and also a bit less work.
An important detail is that the bottom part of the legs has the slots sticking out with respect
to the bottom cross piece with the wheels on it. That way, the grooved part from the top can
slide down beyond the slots on the bottom part, so that it can extend down far enough to almost
touch the floor.
This picture gives a better idea of how the parts of the frame fit together.
It helps to oil the castors. They come with a little bit of grease on
the ball bearings, but both the swivel and the wheel turn easier and quieter with a drop of oil.
I always pull the desk up to myself after I sit down, so this helps a lot.
I have been using this style of desk now since 2004, and I'm not at all tempted to
go back to using a conventional desk. I used to have it in front of a
daybed that I built,
where I could pile an assortment of pillows
behind me, giving me all kinds of comfortable, ergonomic, as well as reclining configurations.
It's also a great setup when using a computer together with somebody. A couch or
daybed allows two to sit comfortably.
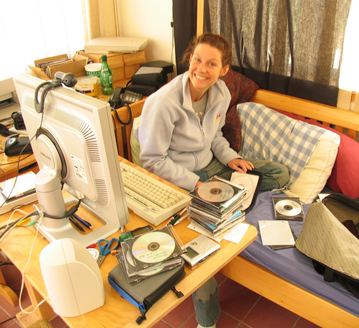
A candid shot of the desk in typical use in 2006.
Sitting cross legged on the daybed seems to be a popular choice as well.
It also makes a great laptop computer desk, or just a general work table for jobs where you need to
have your elbows above the table. It's been suggested it would make a good table for sewing or
quilting.
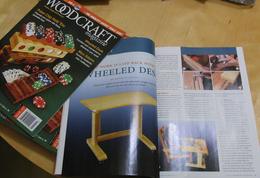
Got published in a magazine
Some time in 2006, woodcraft magazine approached me about writing an article about how to
build one of these. The article was published in the March 2007 issue of
Woodcraft Magazine.
To get enough detail photos of the construction I had to build another one.
I simplified the design a little.
The article ended up covering 7 pages, including 40 illustrations. That was a
different experience. It was before I created this website. Since then, I find
writing for the web to be more fun and rewarding, I don't need the prestige of print
publications.
 I came up with the design for a desk like this for the purpose of doing work from
out of the office. I had a girlfriend in another city in 2004, and
to spend more time with her, I decided to do some “work from home” from her
home with a laptop computer and external monitor.
I came up with the design for a desk like this for the purpose of doing work from
out of the office. I had a girlfriend in another city in 2004, and
to spend more time with her, I decided to do some “work from home” from her
home with a laptop computer and external monitor.
 The first one was built from nice white ash wood, but I used up all the white
ash I had lying around. The second one I built mostly of spruce construction lumber.
You can get pretty decent spruce if you are careful about selecting it. It
also helps to buy wider material – such as 2x8’s, because those come from larger trees
and aren't as full of knots.
The first one was built from nice white ash wood, but I used up all the white
ash I had lying around. The second one I built mostly of spruce construction lumber.
You can get pretty decent spruce if you are careful about selecting it. It
also helps to buy wider material – such as 2x8’s, because those come from larger trees
and aren't as full of knots.
 Legs reversed for storage
 Fully disassembled
 The bracket that ties the legs together on the bottom rear is made of maple. It's the top
of the two brackets in the above photo. Making it out of spruce would have meant making it
a fair bit thicker. The other bracket goes between the two top leg segments. It's responsible
for side-to-side stability of the desk. The cross beam is mortised into the vertical parts
of that bracket, although I'm sure doweling would work good enough too.
The bracket that ties the legs together on the bottom rear is made of maple. It's the top
of the two brackets in the above photo. Making it out of spruce would have meant making it
a fair bit thicker. The other bracket goes between the two top leg segments. It's responsible
for side-to-side stability of the desk. The cross beam is mortised into the vertical parts
of that bracket, although I'm sure doweling would work good enough too.
 This picture shows the two leg segments. the top part screws to the plywood top. The two pieces
shown are the bottom right segment, and the top left segment - these two don't actually
mesh together in the normal position, but picture the top part being a mirror image of itself,
mirrored against the plane that is the floor, and you can see how it meshes with the bottom part.
Also note that I mortised the T-joints. Strength is critical for these, especially
if somebody sits on the desk. Four 3/4" dowels instead of a mortise and tenon joint should
do too. The upright part of the legs with the slots is made of maple for strength.
It's 12 cm wide, and with five slots across. That makes the slots and ridges each 1.2 cm wide.
In my
This picture shows the two leg segments. the top part screws to the plywood top. The two pieces
shown are the bottom right segment, and the top left segment - these two don't actually
mesh together in the normal position, but picture the top part being a mirror image of itself,
mirrored against the plane that is the floor, and you can see how it meshes with the bottom part.
Also note that I mortised the T-joints. Strength is critical for these, especially
if somebody sits on the desk. Four 3/4" dowels instead of a mortise and tenon joint should
do too. The upright part of the legs with the slots is made of maple for strength.
It's 12 cm wide, and with five slots across. That makes the slots and ridges each 1.2 cm wide.
In my 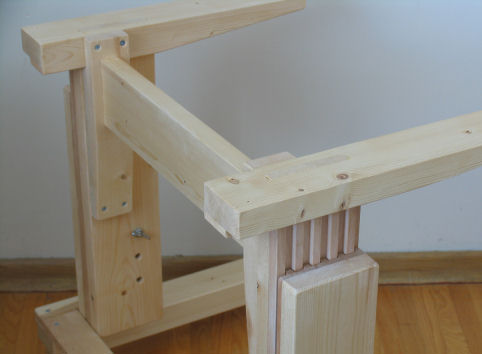 This picture gives a better idea of how the parts of the frame fit together.
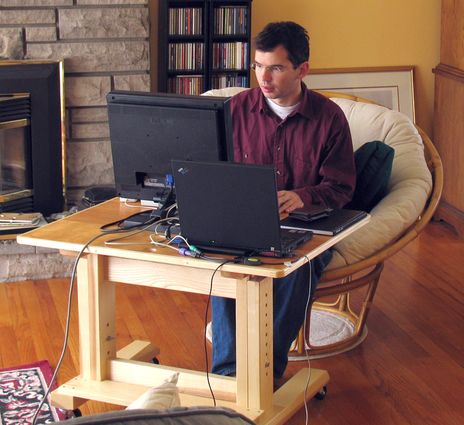
 A candid shot of the desk in typical use in 2006.
Sitting cross legged on the daybed seems to be a popular choice as well.
It also makes a great laptop computer desk, or just a general work table for jobs where you need to
have your elbows above the table. It's been suggested it would make a good table for sewing or
quilting.
A candid shot of the desk in typical use in 2006.
Sitting cross legged on the daybed seems to be a popular choice as well.
It also makes a great laptop computer desk, or just a general work table for jobs where you need to
have your elbows above the table. It's been suggested it would make a good table for sewing or
quilting.
 Got published in a magazine
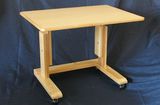 Laptop table (version 2)
 Stand-up laptop table
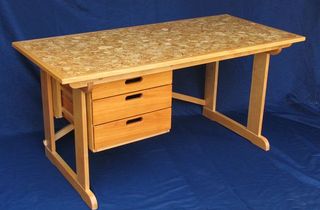 Knock down student desk
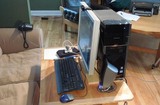 Computer/monitor stand
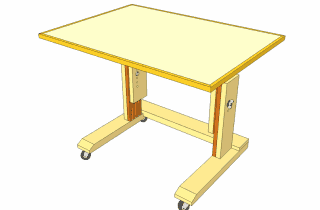
 Knock down laptop