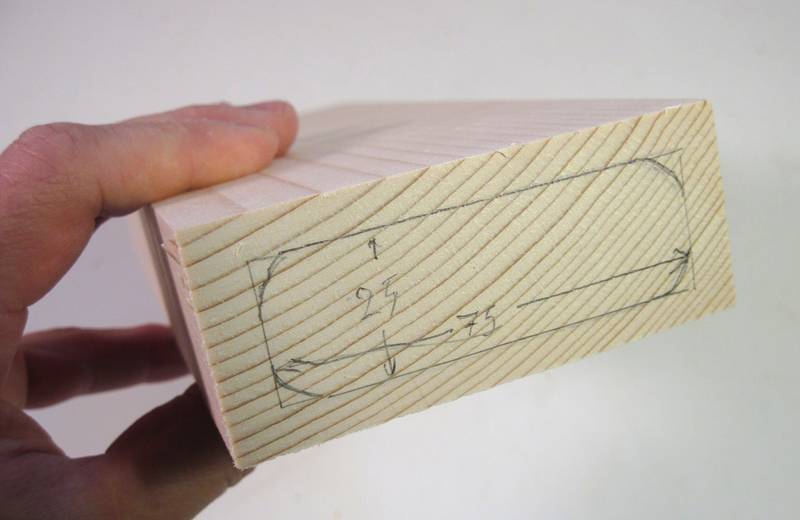
 I decided to make a 25 x 75 mm (1" x 3") mortise and tenon. That would be a good sized
joint if one was using 2 x 4 lumber to build a traditional workbench.
I decided to make a 25 x 75 mm (1" x 3") mortise and tenon. That would be a good sized
joint if one was using 2 x 4 lumber to build a traditional workbench.
I wanted to explore making some really big mortise and tenon joints with the pantorouter. I didn't actually have a project that needed such joint, so I made some test joints just to demonstrate.
I decided to make a 25 x 75 mm (1" x 3") mortise and tenon. That would be a good sized
joint if one was using 2 x 4 lumber to build a traditional workbench.
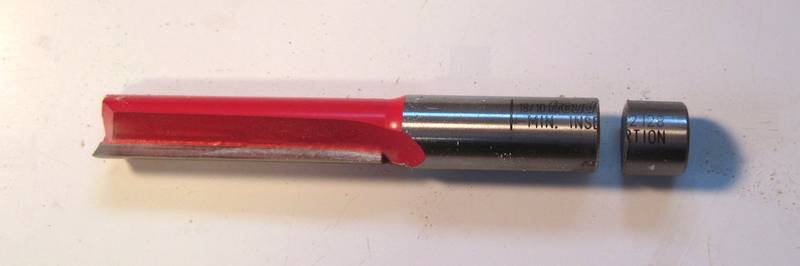 I bought a 1/2" (12.7 mm) router bit with a cutting length of 2" (51 mm) for the job. This was actually
not the longest router bit available, but I figured it should do. Fully inserted, the bit still stuck
out of the collet quite a ways. So I cut off about 1.5 cm from the back of it. It was relatively easy
to cut with a hacksaw.
I bought a 1/2" (12.7 mm) router bit with a cutting length of 2" (51 mm) for the job. This was actually
not the longest router bit available, but I figured it should do. Fully inserted, the bit still stuck
out of the collet quite a ways. So I cut off about 1.5 cm from the back of it. It was relatively easy
to cut with a hacksaw.
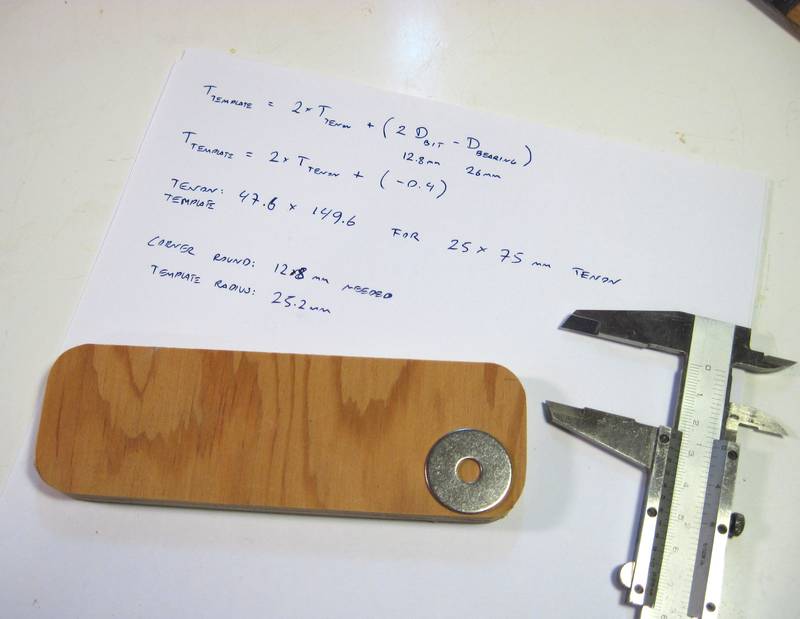 I used a 26 mm guide bearing (couldn't find a 1" bearing). I measured the router bit's actual
cutting diameter at 12.8 mm - slightly larger than specified.
Plugging my tenon, bearing and bit size into the formula:
I used a 26 mm guide bearing (couldn't find a 1" bearing). I measured the router bit's actual
cutting diameter at 12.8 mm - slightly larger than specified.
Plugging my tenon, bearing and bit size into the formula:
Ttemplate = 2 * Ttenon + ( 2 * Dcutter - Dbearing)
Plugging in my numbers:
Ttemplate = 2 * 25 mm + ( 2 * 12.8 - 26)
= 50 - 0.4
The term in brackets in the right worked out to -0.4 mm. So basically, my template needs to be 0.4 mm smaller than twice the size of my tenon. Easy enough. I cut the tenon template on the table saw. I used a 1" washer to trace an arc on the corners. The actual radius I needed for the corners was twice the 12.8 of the bit, minus the 0.4 mm adjustment, or 25.2mm. I figured the 1" (25.4 mm) of the washer was close enough.
If you don't like equations click here for another explanation.
 I glued the template onto a thin piece of plywood for mounting. I also glued a few strips of wood
to another piece of wood for the mortise template. The mortise template is much wider than the
guide bearing so I can move all around the inside perimeter of it to cut a rounded rectangle
shaped mortise.
I glued the template onto a thin piece of plywood for mounting. I also glued a few strips of wood
to another piece of wood for the mortise template. The mortise template is much wider than the
guide bearing so I can move all around the inside perimeter of it to cut a rounded rectangle
shaped mortise.
The mortise template is twice the size of my desired mortise plus the 0.4 millimeters I worked out earlier. For inside templates, the adjustment factor goes the other way around.
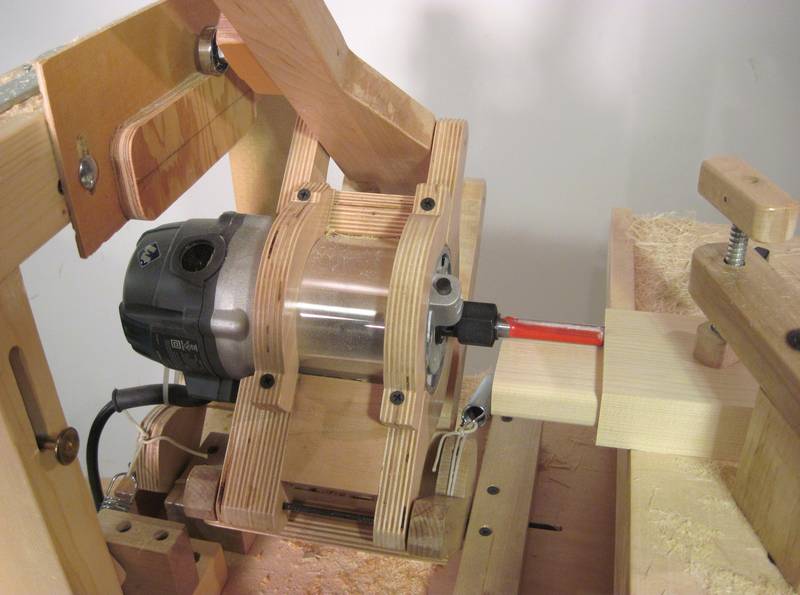
 Aligning the template for a cut
I added a "setup bar" to reference from. This bar represents the level of the table on the template side of the pantograph. I worked out the position of that by placing a 1/4" shaft in my router and a 1/2" guide bearing on the pantograph. With the shaft in the router on the table, the bottom edge of the bearing corresponds to that exact position on the template side. I made some pencil marks on the template frame for where the bar goes so next time I only need to line up the bar with the pencil marks. The setup bar can get in the way of the router, so I take it off after finishing the setup.
My stock for the tenon is 36 mm wide, and I want the tenon to be centered. So the center line of the tenon needs to be 18 mm from the edge. On the pantograph side, that dimension doubles, so the template's center line needs to be 36 mm above the setup bar.
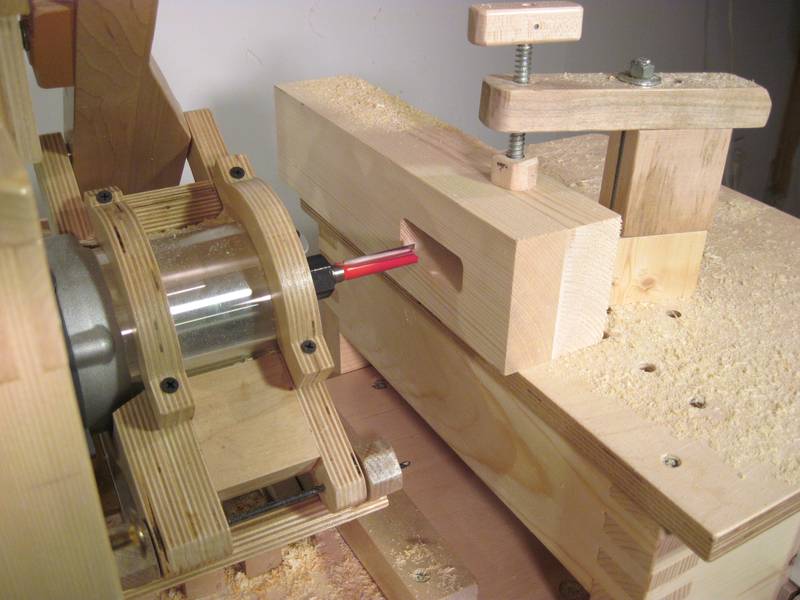
 Here's my cut tenon. The tenon is 6 cm long (2 3/8"), which is longer than the cutter length of the
router bit. I started the cut with the plunge carriage pulled back, cut all the way around,
and then plunged all the way in to
finish the cut. That way I can cut tenons longer than the actual cutter length of the bit.
If I hadn't shortened my bit, I could have made a tenon about a centimeter longer.
And if I had bought the longest bit available, I could have made a tenon 8 cm long!
Here's my cut tenon. The tenon is 6 cm long (2 3/8"), which is longer than the cutter length of the
router bit. I started the cut with the plunge carriage pulled back, cut all the way around,
and then plunged all the way in to
finish the cut. That way I can cut tenons longer than the actual cutter length of the bit.
If I hadn't shortened my bit, I could have made a tenon about a centimeter longer.
And if I had bought the longest bit available, I could have made a tenon 8 cm long!
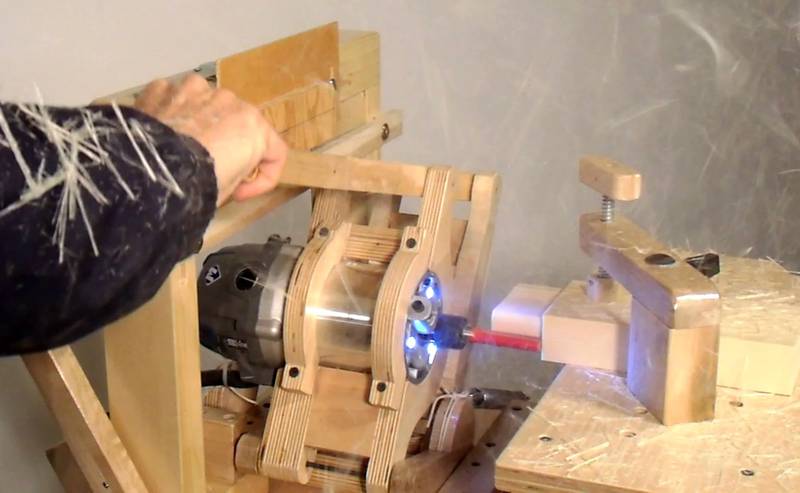 The chips sure go flying while making the cut - there's quite a bit of material to be removed.
The router motor blows air out the front, which really spreads the chips around. On the plus side, at least this gets the chips out of the way.
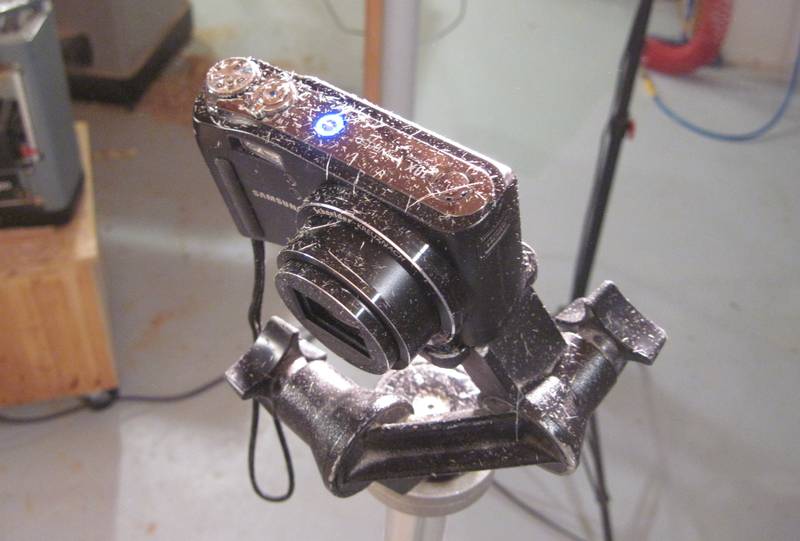 That previous shot is a still frame from the video I shot. I set up my
camera a meter away, but it still got a fair bit of dust on it.
It's of the reasons I try to use cheap cameras in the workshop. I haven't
had a camera die of dust exposure yet. But what can happen is that dust
gets in between the lens groups inside the zoom lens. That dust is impossible to get out.
That previous shot is a still frame from the video I shot. I set up my
camera a meter away, but it still got a fair bit of dust on it.
It's of the reasons I try to use cheap cameras in the workshop. I haven't
had a camera die of dust exposure yet. But what can happen is that dust
gets in between the lens groups inside the zoom lens. That dust is impossible to get out.
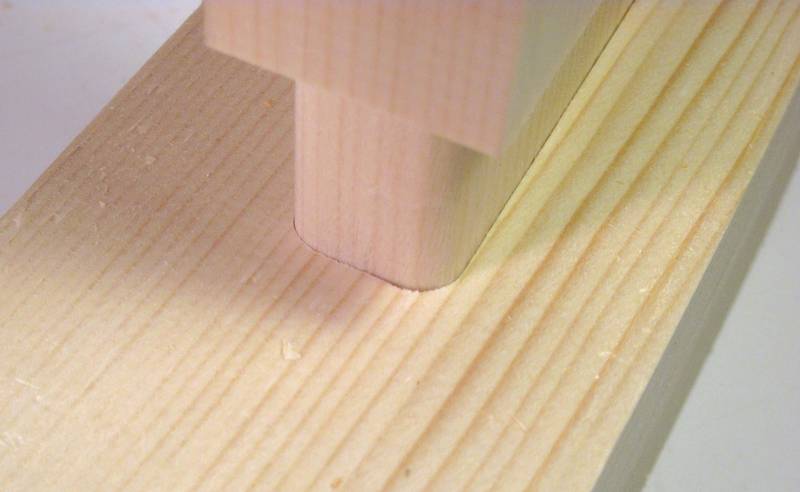
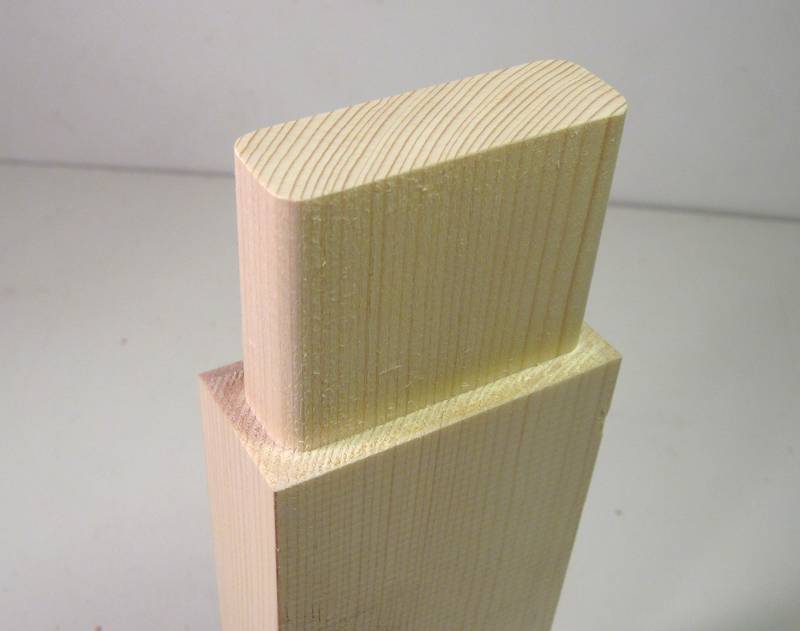 The finished tenon. I always make all the cuts around the edge with a "climb cut", basically with the cutter
moving into, not out of the wood. This eliminates any sort of tearout.
The finished tenon. I always make all the cuts around the edge with a "climb cut", basically with the cutter
moving into, not out of the wood. This eliminates any sort of tearout.
 I made some through mortises on much thinner stock to test the fit with. My initial fit was too
tight, so I sanded the edge of the tenon template down just a bit. I also found my mortise a little
too wide, so I put a strip of 0.25 mm thick UHMW tape to one of the inside edges of the template.
I made some through mortises on much thinner stock to test the fit with. My initial fit was too
tight, so I sanded the edge of the tenon template down just a bit. I also found my mortise a little
too wide, so I put a strip of 0.25 mm thick UHMW tape to one of the inside edges of the template.
This photo shows the fit after adjustments.
 Now cutting the big mortise. Clearing out chips for a cut this deep is a challenge. But fortunately, with
a mortise this wide there's plenty of room. For a mortise that's just the width of the bit, it would be
more of a problem. If I was making a lot of deep and narrow mortises, I'd probably invest in a spiral
bit.
Now cutting the big mortise. Clearing out chips for a cut this deep is a challenge. But fortunately, with
a mortise this wide there's plenty of room. For a mortise that's just the width of the bit, it would be
more of a problem. If I was making a lot of deep and narrow mortises, I'd probably invest in a spiral
bit.
 The finished mortise
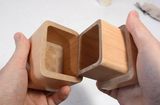
 The tenon fits quite nicely, with just a bit of friction going in. When I pull the tenon out
rapidly, it actually makes a loud "plop" from the partial vacuum in the mortise because air couldn't
get past the tenon fast enough as I pulled it out (see end of video).
The tenon fits quite nicely, with just a bit of friction going in. When I pull the tenon out
rapidly, it actually makes a loud "plop" from the partial vacuum in the mortise because air couldn't
get past the tenon fast enough as I pulled it out (see end of video).
You know your mortise and tenon joint makes a good fit if it goes "plop" when you pull it out!
 Making tenon templateswithout equations (2013)
 Making a box on the pantorouter
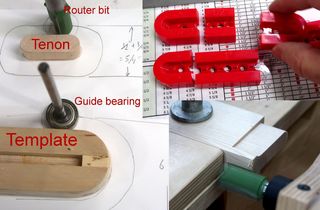 Making and setting up tenon templates
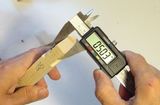 Mortise and tenon joint accuracy