Hiking pole bipod / tripod
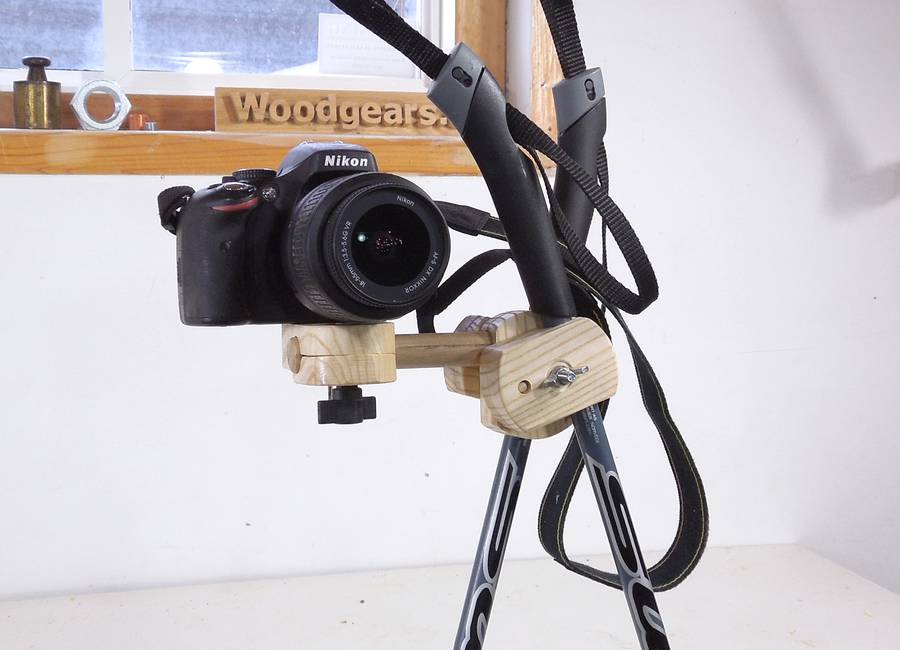 I sometimes go cross country skiing at night. Sometimes it's tempting to take
some night photos, but I don't want to lug along a tripod. So this little
contraption allows me to use my ski poles as a bipod, or a tripod if I borrow
a third pole.
I sometimes go cross country skiing at night. Sometimes it's tempting to take
some night photos, but I don't want to lug along a tripod. So this little
contraption allows me to use my ski poles as a bipod, or a tripod if I borrow
a third pole.
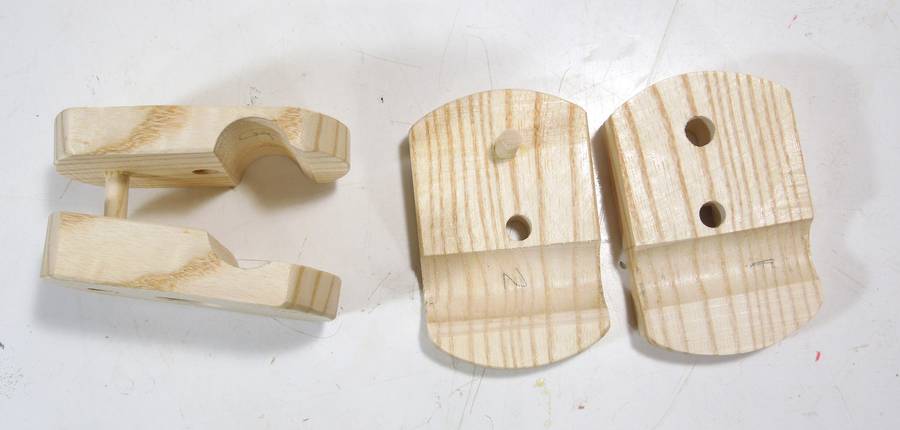
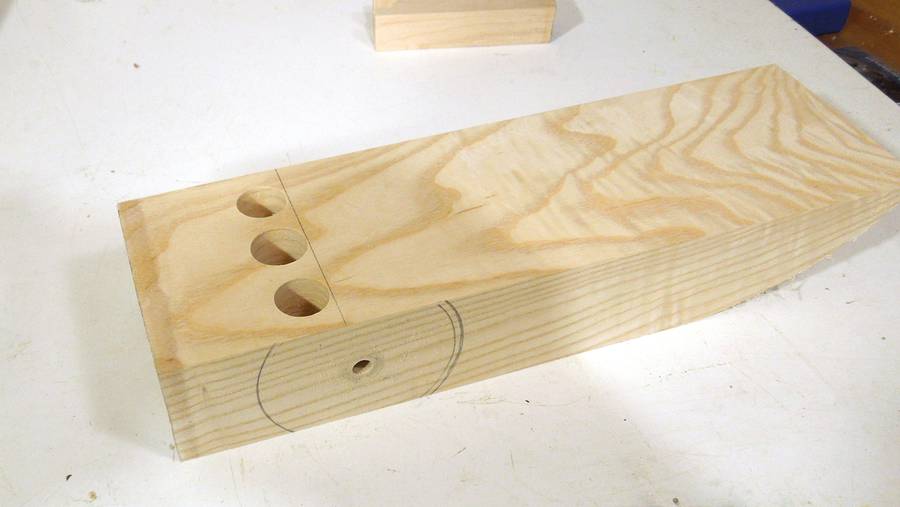 I started by drilling three holes in a wide block of wood. One 3/4" (19 mm) hole
in the middle for a dowel, and two smaller 5/8" (16 mm) holes on either side
for the ski poles.
I started by drilling three holes in a wide block of wood. One 3/4" (19 mm) hole
in the middle for a dowel, and two smaller 5/8" (16 mm) holes on either side
for the ski poles.
I also drilled a 1/4" (6mm) hole across the block, and marked a circle on it.
 I first cut out the round-ish profile, then sliced the block through each hole
and between the holes on the bandsaw.
I first cut out the round-ish profile, then sliced the block through each hole
and between the holes on the bandsaw.
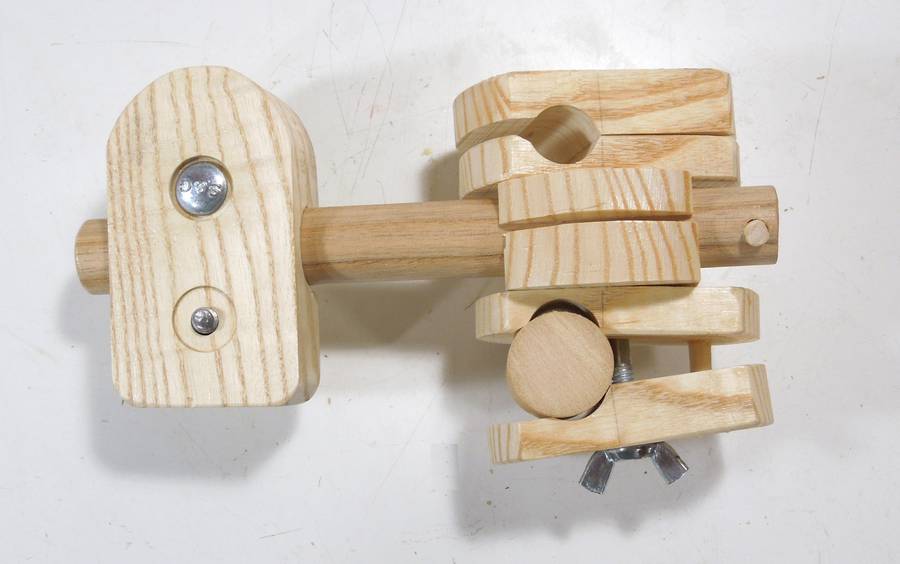
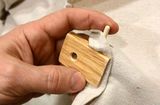
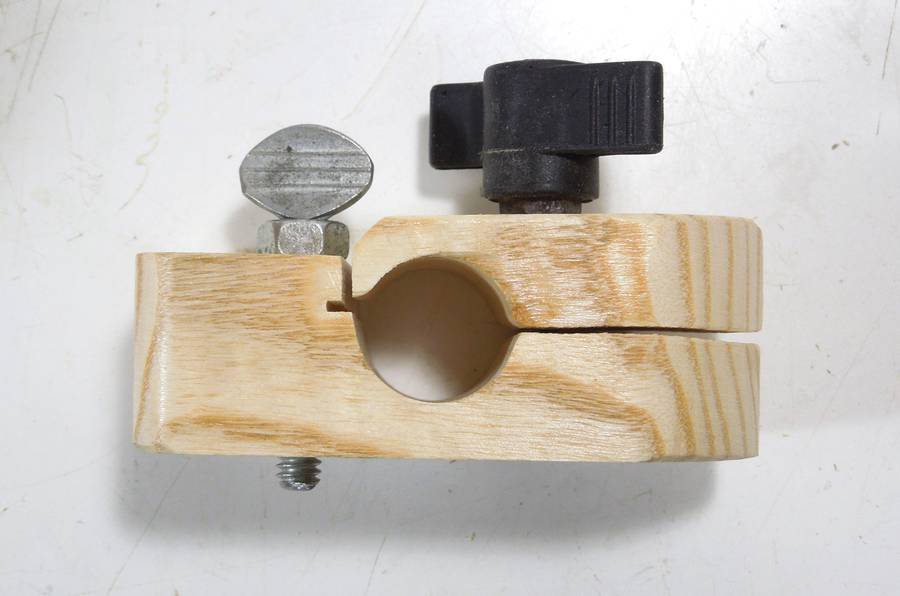 I made a bracket to mount a camera and clamp to a dowel. A plastic knob tightens
it around the dowel. A captive 1/4" screw (left) mounts the camera.
I made a bracket to mount a camera and clamp to a dowel. A plastic knob tightens
it around the dowel. A captive 1/4" screw (left) mounts the camera.
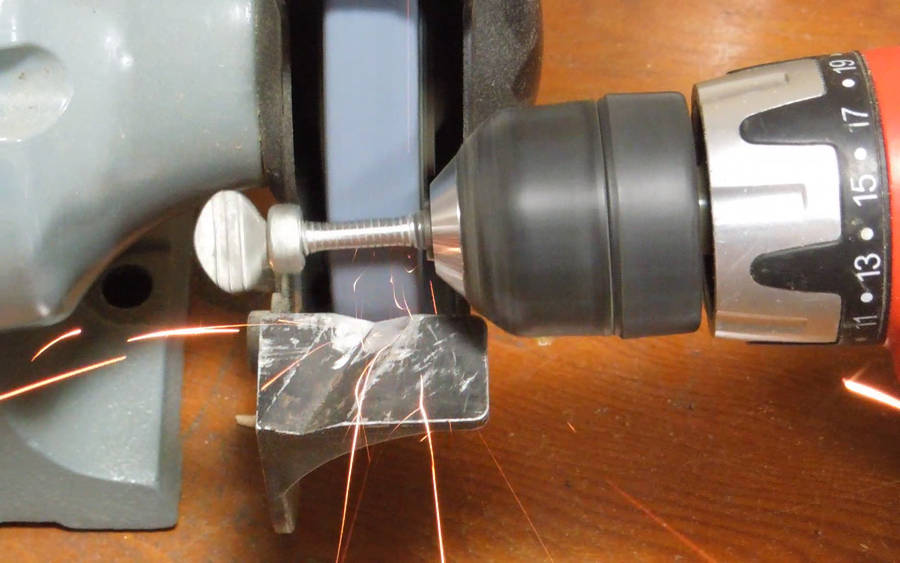 I made the captive by grinding away the threads for part of the length
of a screw on my bench grinder. I wrapped some electrical tape around the threads
before mounting it in a drill to void damaging the threads with the chuck.
I made the captive by grinding away the threads for part of the length
of a screw on my bench grinder. I wrapped some electrical tape around the threads
before mounting it in a drill to void damaging the threads with the chuck.
 The block that the screw goes in has threads in part of it. I turned the threading
tap with my drill - with wood, it doesn't take much force.
The block that the screw goes in has threads in part of it. I turned the threading
tap with my drill - with wood, it doesn't take much force.
The thread-less part of the screw goes where the bracket has threads so the screw is loose in the block. But to insert or remove the screw, the threaded end of the screw needs to be screwed through the threaded part of the block. (Thanks, Murray Lowe, for suggesting the idea)
 After using the bipod for a bit, I found that when I loosened the main screw to
mount it on ski poles, the dowel and camera bracket would often slip out.
After using the bipod for a bit, I found that when I loosened the main screw to
mount it on ski poles, the dowel and camera bracket would often slip out.
So I put a dowel across the end of it to keep that from happening.
 I also found it to be a bit fiddly getting both halves of the brackets that go
around the ski pole to align. "Fiddly" is not something you want at night in
the snow, so I added a pin between these pieces to keep them aligned.
I also found it to be a bit fiddly getting both halves of the brackets that go
around the ski pole to align. "Fiddly" is not something you want at night in
the snow, so I added a pin between these pieces to keep them aligned.
 I took my gadget to Ottawa Modlab to show it off, but they had just gotten
an "Ultimaker" 3D printer kit, so everybody was all excited about assembling that.
I thought it would be neat to take a time-lapse of some of that.
So I used the bracket to mount the camera to the handle of a broom, which
I put up on a chair.
I took my gadget to Ottawa Modlab to show it off, but they had just gotten
an "Ultimaker" 3D printer kit, so everybody was all excited about assembling that.
I thought it would be neat to take a time-lapse of some of that.
So I used the bracket to mount the camera to the handle of a broom, which
I put up on a chair.
 I hadn't anticipated mounting it on a broom stick. The broom stick is much thicker
than a ski pole. To make it easier to clamp on, I modified the shape of the cut-outs
for the poles. I also widened the slot a bit to make it easer to slide the ski poles
in and out.
I hadn't anticipated mounting it on a broom stick. The broom stick is much thicker
than a ski pole. To make it easier to clamp on, I modified the shape of the cut-outs
for the poles. I also widened the slot a bit to make it easer to slide the ski poles
in and out.
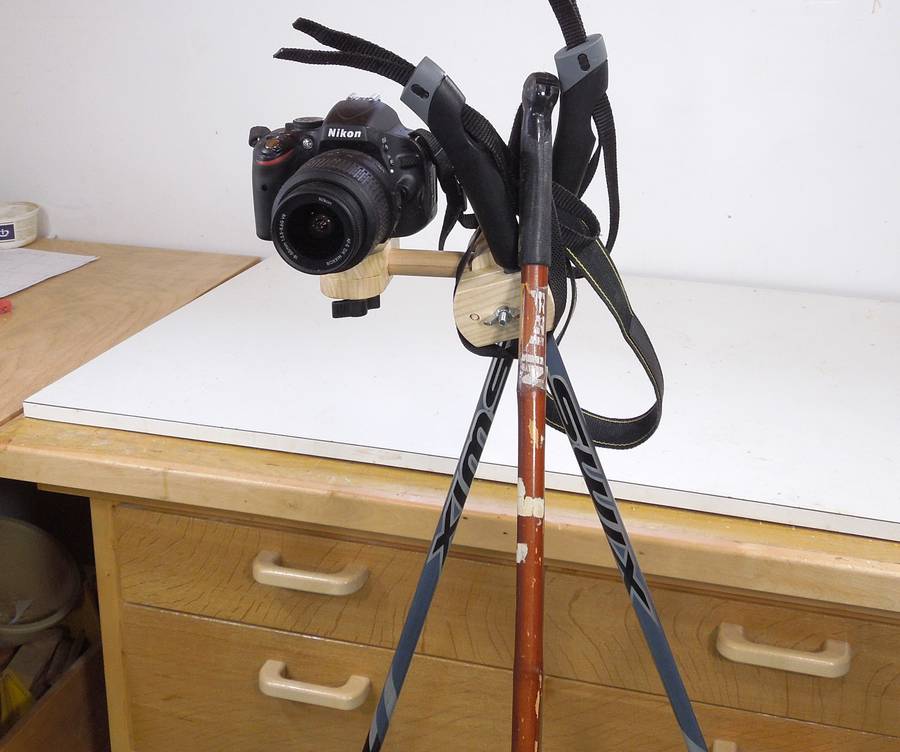 A bipod goes a long way towards steadying a camera, but for time exposures, a tripod
is really what you need. Ski poles and hiking poles always have loops on them,
so I can just hook the loop of a third hiking pole around the bracket
to make a tripod.
A bipod goes a long way towards steadying a camera, but for time exposures, a tripod
is really what you need. Ski poles and hiking poles always have loops on them,
so I can just hook the loop of a third hiking pole around the bracket
to make a tripod.
This arrangement isn't as stable as even this portable tripod that I fixed recently, or my wooden tripods, but it's a lot more portable!
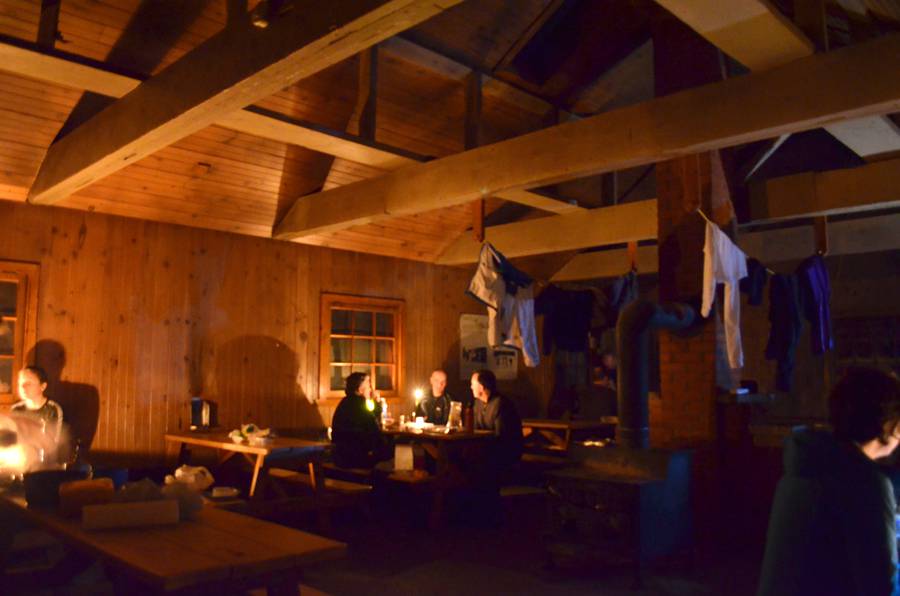
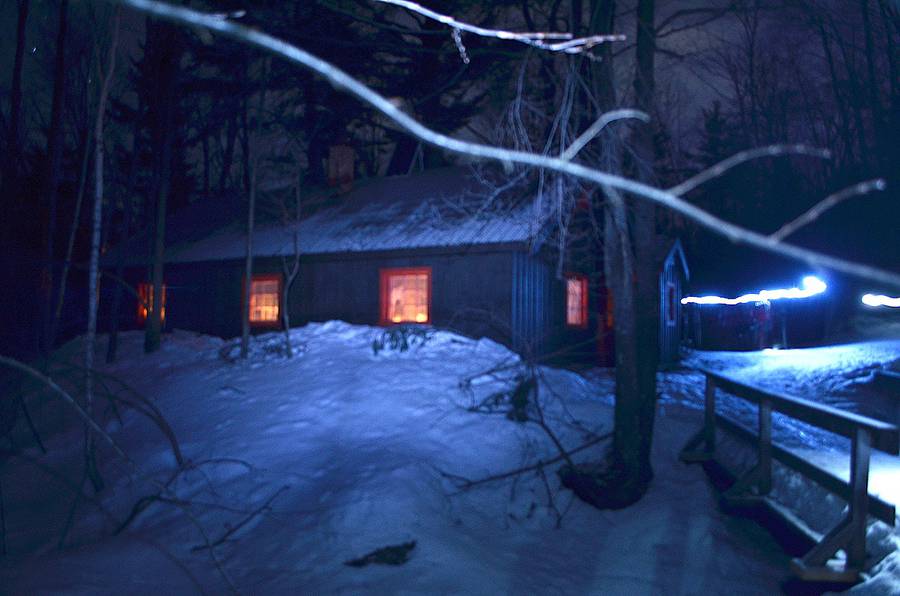
Here are some photos I took of Huron Hut in Gatineau park. I didn't have enough time to
really fuss with setting up and getting focus for the camera
(hard when there is so little light), and these are multi-second time exposures with just a bipod.
The inside shot is lit just by candles on the tables (no electricity in this hut), the second photo is lit with my tiny LED headlamp, and candlelight coming out of the windows. Also, some skiers wearing headlamps arrived during the exposure, making for some white streaks.
See also:
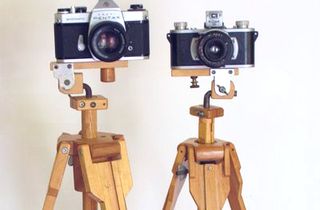 Wooden tripods
 Justin's tripod
 Repairing a tripod
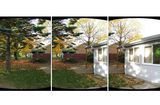 Panorama photography
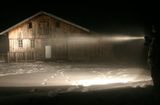
 Making wooden tarp clips
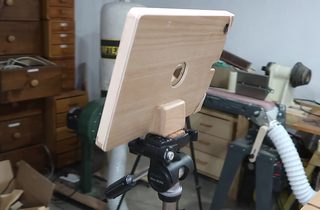 iPad tripod mount
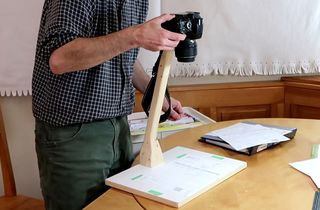 Document photographing stand (video only)
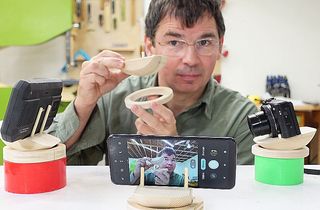 Simple camera or phone aiming platform, replaces tripod
Back to my woodworking website