 I had finished my homemade sawmill relatively late last year,
so I didn't have that many opportunities to run it on real logs before the winter.
I had finished my homemade sawmill relatively late last year,
so I didn't have that many opportunities to run it on real logs before the winter.
But my neighbour had a large Norway maple tree cut down recently, and I was there before they cut it all to firewood. I was able to convince the guys cutting it down to give me a large section of the trunk. I also had some very thick branches from an oak tree that was pruned from my next door neighbour. So it was time to get the sawmill out again.
 I had previously used an old 1 HP pool-pump motor
to power my sawmill. That motor was more than enough for regular band sawing and
resawing, but for sawmilling, I was always close to stalling the motor.
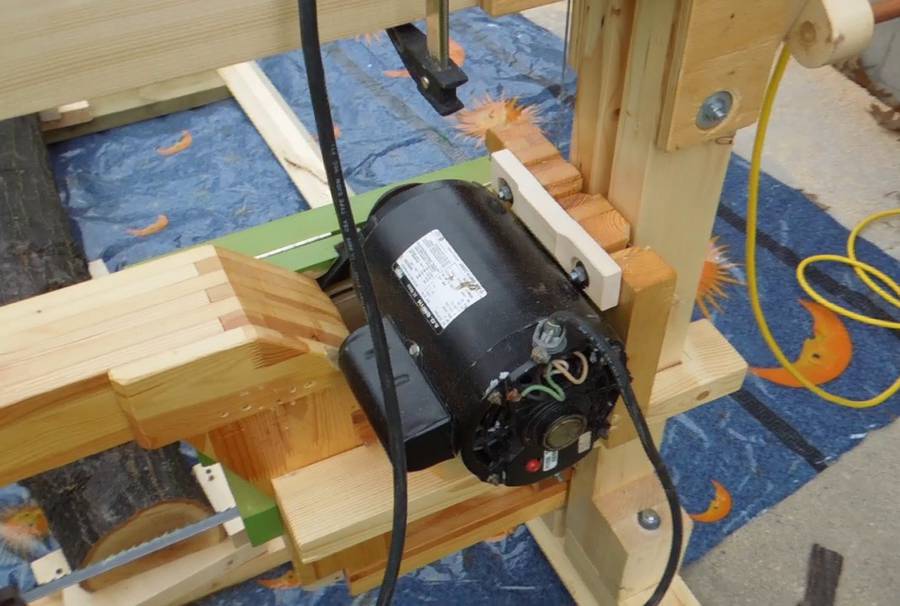
So this time, I used a 2 HP motor that a friend had given to me. It barely fit on the saw.
I had previously used an old 1 HP pool-pump motor
to power my sawmill. That motor was more than enough for regular band sawing and
resawing, but for sawmilling, I was always close to stalling the motor.
So this time, I used a 2 HP motor that a friend had given to me. It barely fit on the saw.
 The 2 HP motor needs either a 20 amp 120 volt circuit, or a 240 volt circuit to run. I opted
for 240 volts. The current needed at 240 volts is half as much, and the relative voltage drop
in a long power cord is also less of a problem at 240 volts.
I have some 240 volt sockets in my workshop, but I didn't want
to run a cable that long. I could also have used the clothes dryer socket -
I kept the cord from an old dryer.
A clothes dryer socket would be good for 30 amps at 240 volts - enough for a 6 HP motor!
The 2 HP motor needs either a 20 amp 120 volt circuit, or a 240 volt circuit to run. I opted
for 240 volts. The current needed at 240 volts is half as much, and the relative voltage drop
in a long power cord is also less of a problem at 240 volts.
I have some 240 volt sockets in my workshop, but I didn't want
to run a cable that long. I could also have used the clothes dryer socket -
I kept the cord from an old dryer.
A clothes dryer socket would be good for 30 amps at 240 volts - enough for a 6 HP motor!
But instead I opted to use a split kitchen socket. The "hot" side of kitchen sockets is almost always wired on opposite phases for each pair of sockets.
Update: It appears that in the US, kitchen sockets are not required to be split sockets like they are here in Canada, so this trick wouldn't work. Check your sockets with a voltmeter before trying this.
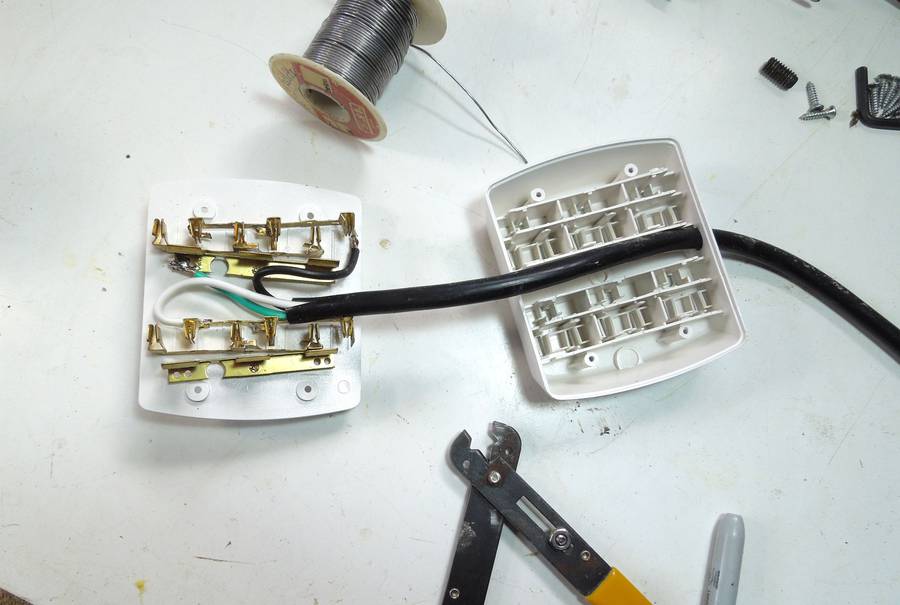
 So I modified one of those 6-way things that you can plug into both sockets at once.
That way, both sockets are plugged in at the same time. Another option would be to just make some
cord with two plugs in it. That way, even without a kitchen socket, you can just find circuits
on opposite phases in your house to get the 240 volts.
So I modified one of those 6-way things that you can plug into both sockets at once.
That way, both sockets are plugged in at the same time. Another option would be to just make some
cord with two plugs in it. That way, even without a kitchen socket, you can just find circuits
on opposite phases in your house to get the 240 volts.
If you build such a thing, make sure to keep it where only you have access to it. If only one plug is plugged in, and the saw is switched on, it won't run, but the prongs of the other plug will be "hot".
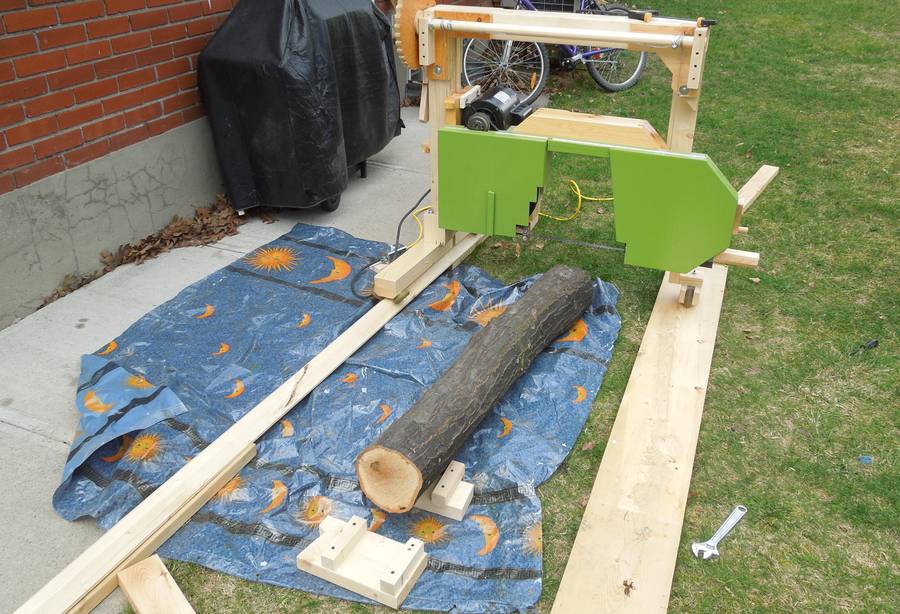 I still hadn't come up with a good "log support" system. Previously, I had rested the log
on the ground in some cradles I'd cut out of 2x4s. That can work OK as long as the log is
heavy enough.
I still hadn't come up with a good "log support" system. Previously, I had rested the log
on the ground in some cradles I'd cut out of 2x4s. That can work OK as long as the log is
heavy enough.
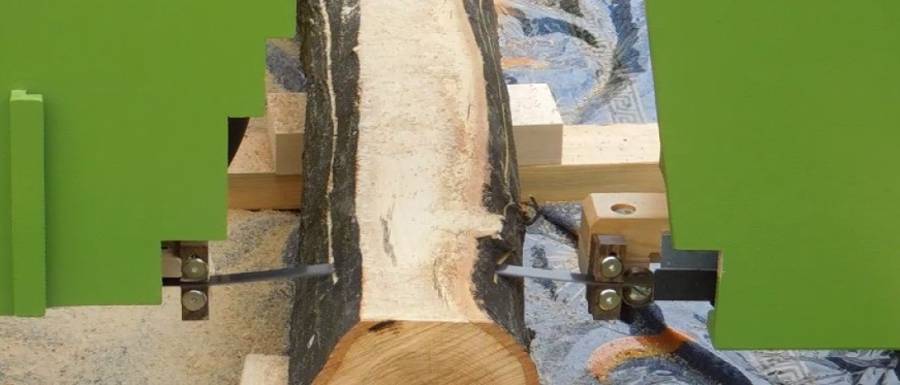
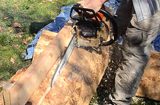
This time, I screwed some 2x2 pieces of wood to some scrap 2x4 and 2x6 pieces to act as cradles. But that proved inadequate for this thinner oak log. The log was too light, and the oak has a tendency to catch on the blade and I didn't have anything to hold it firmly.
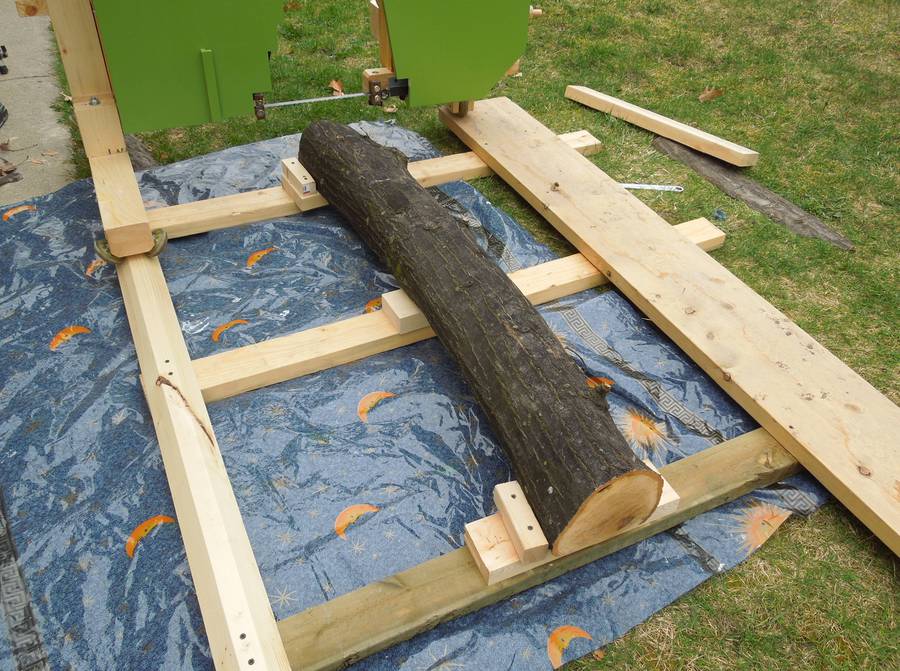 So I put some 2x4s under the rails and screwed the rails onto them.
I could then screw the log cradles to the rails to secure them.
That solved the sliding-around problem.
So I put some 2x4s under the rails and screwed the rails onto them.
I could then screw the log cradles to the rails to secure them.
That solved the sliding-around problem.
 With the more powerful 2 HP motor, I could cut through the oak log at a pretty good rate.
But the sawblade drifted badly, even with low feed pressure and lots of blade tension.
So I didn't think exceeding the blade's beam strength
was the cause of the problem. I resawed some of those pieces of oak on my 18" bandsaw, and that
saw also had a relatively hard time with it. So something about this particular oak was very
hard to cut.
With the more powerful 2 HP motor, I could cut through the oak log at a pretty good rate.
But the sawblade drifted badly, even with low feed pressure and lots of blade tension.
So I didn't think exceeding the blade's beam strength
was the cause of the problem. I resawed some of those pieces of oak on my 18" bandsaw, and that
saw also had a relatively hard time with it. So something about this particular oak was very
hard to cut.
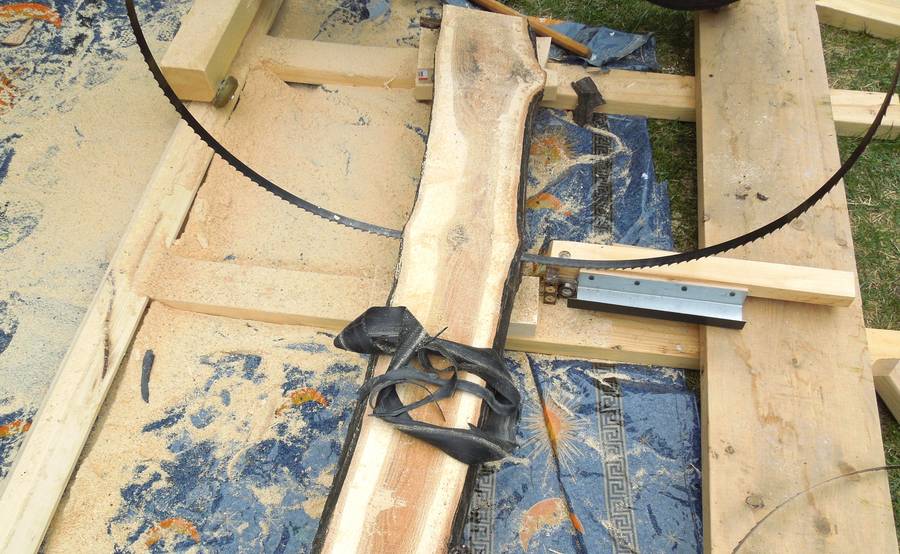 I kept at it, and even had the blade jump off the wheels a few times. Eventually, it jumped
off the wheels in a way that shredded the drive wheel's tire.
I kept at it, and even had the blade jump off the wheels a few times. Eventually, it jumped
off the wheels in a way that shredded the drive wheel's tire.
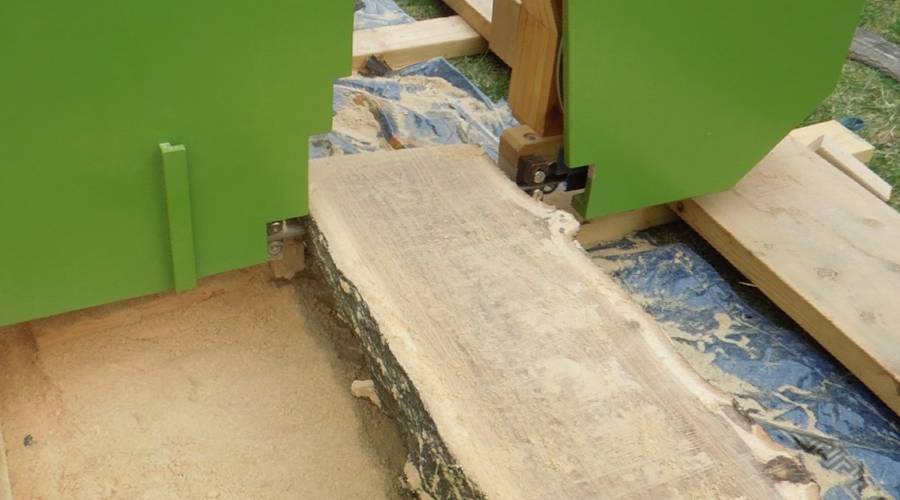
I was unable to back the blade out of the log that time, so ended up leaving it in the log as I backed up the saw! You can see the remains of my shredded tire lying on the log.
I found the saw kerf was so plugged with sawdust that I had to use a hacksaw blade to clean it out before I could pull the blade back through the kerf. So maybe the problem was too much sawdust left in the kerf, and maybe the sawdust was more to one side, pushing the blade to the side?
 But before I could experiment further, I had to fix the saw. There were some scratches on the
drive wheel from where the blade had come off. But the damage was light enough that it
didn't warrant fixing. It did occur to me that, for sawmilling, maybe wider wheels would be better.
Although as long as the blade doesn't come off the wheels, the narrow wheels are just fine.
But before I could experiment further, I had to fix the saw. There were some scratches on the
drive wheel from where the blade had come off. But the damage was light enough that it
didn't warrant fixing. It did occur to me that, for sawmilling, maybe wider wheels would be better.
Although as long as the blade doesn't come off the wheels, the narrow wheels are just fine.

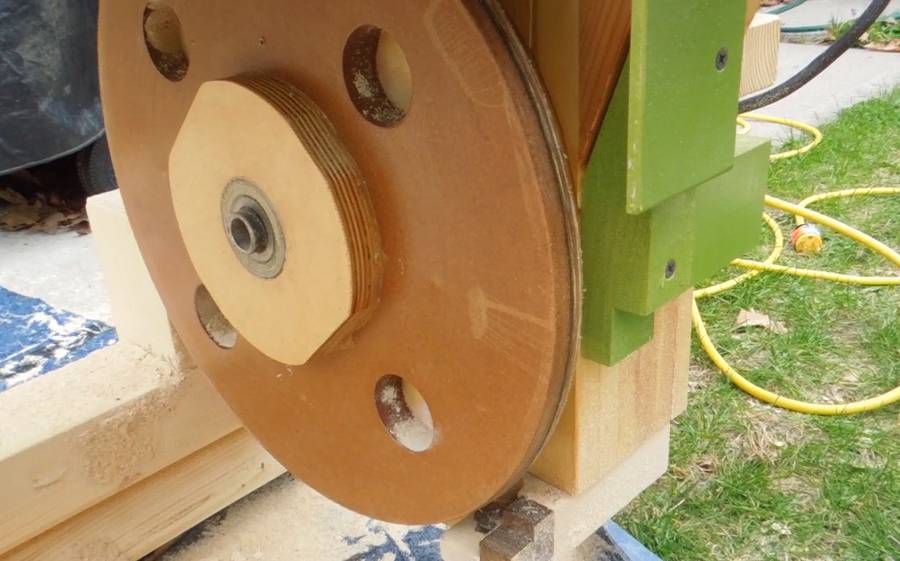
 So I had to make a trip to Canadian Tire to buy a kid's bicycle inner tube for $5. I bought two,
just in case I shred another one.
So I had to make a trip to Canadian Tire to buy a kid's bicycle inner tube for $5. I bought two,
just in case I shred another one.
I was able to get the new "tire" on without taking the wheel off the saw, so the repair was relatively quick. I always put a tire on by clamping it on one side, stretching it straight across the front and then clamping it on the other side. Then I pull from the middle to form another corner and then straighten out the rubber in between. That way, I start out with relatively even tension on the tube all around. Rubber gets thinner as it's stretched, so if you want the thickness to be even, the tension also needs to be even all around.
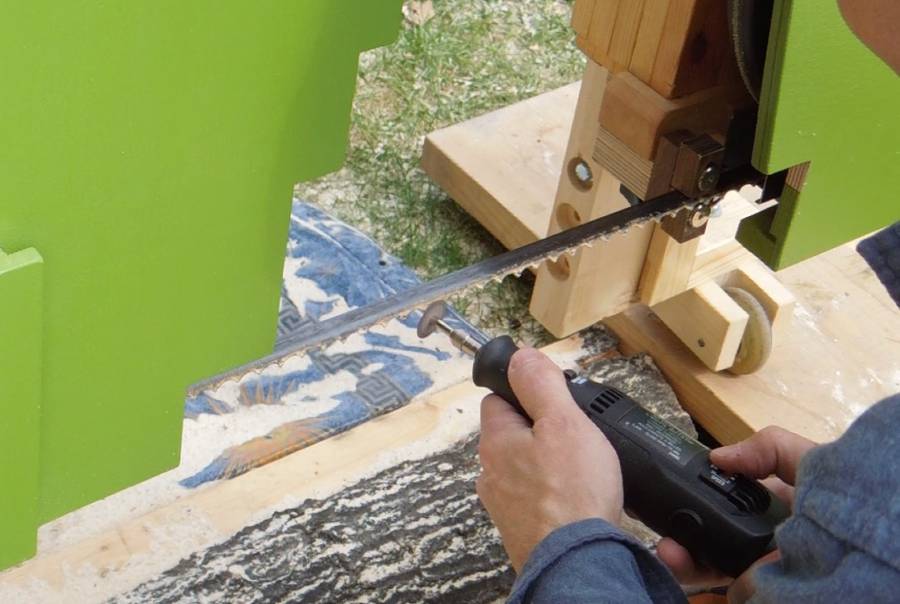
 Putting the blade back on.
 Smooth sailing... (or smooth milling)...
Having realized just how clogged with sawdust my kerf was, my new theory was that I had been feeding the saw through the wood too fast. The sawdust from this oak was relatively sticky, so it doesn't come out as easily. Once I fed the saw much slower, the drift problems went away. With the slightly larger than 3" pulley on my 3500 RPM motor, I was running the saw at about 3300 Feet per minute, or about 1000 meters per minute. Relatively fast for a bandsaw, but slow for a sawmill. Given that I wasn't limited in power, I could have used a larger pulley on the motor to run the blade faster.
 As an experiment, I cut much faster for the last 5 cm of this log, and sure enough, the blade
started drifting when I did that. Looking at the log afterwards, I could see there was more
sawdust left in the kerf for the part that I'd cut much faster.
As an experiment, I cut much faster for the last 5 cm of this log, and sure enough, the blade
started drifting when I did that. Looking at the log afterwards, I could see there was more
sawdust left in the kerf for the part that I'd cut much faster.
 Milling up the rest of those sections of oak went fairly well, although perhaps a bit slow,
feeding the saw at maybe 3 ft (1 meter) per minute. Occasionally, I backed up the saw,
watching to see how much sawdust the blade would scrape out of the kerf as I backed it up,
just to make sure I wasn't leaving excessive amounts of sawdust in there.
Milling up the rest of those sections of oak went fairly well, although perhaps a bit slow,
feeding the saw at maybe 3 ft (1 meter) per minute. Occasionally, I backed up the saw,
watching to see how much sawdust the blade would scrape out of the kerf as I backed it up,
just to make sure I wasn't leaving excessive amounts of sawdust in there.
 I also tackled the huge piece of Norway maple. My sawmill is designed to deal with an absolute
maximum of 40 cm (16") diameter of logs, and this log was about 55 cm (22") in diameter.
The piece I had was only about 80 cm (32") long, but it was plenty heavy at that!
I was barely able to lift one end to tip it up.
I also tackled the huge piece of Norway maple. My sawmill is designed to deal with an absolute
maximum of 40 cm (16") diameter of logs, and this log was about 55 cm (22") in diameter.
The piece I had was only about 80 cm (32") long, but it was plenty heavy at that!
I was barely able to lift one end to tip it up.
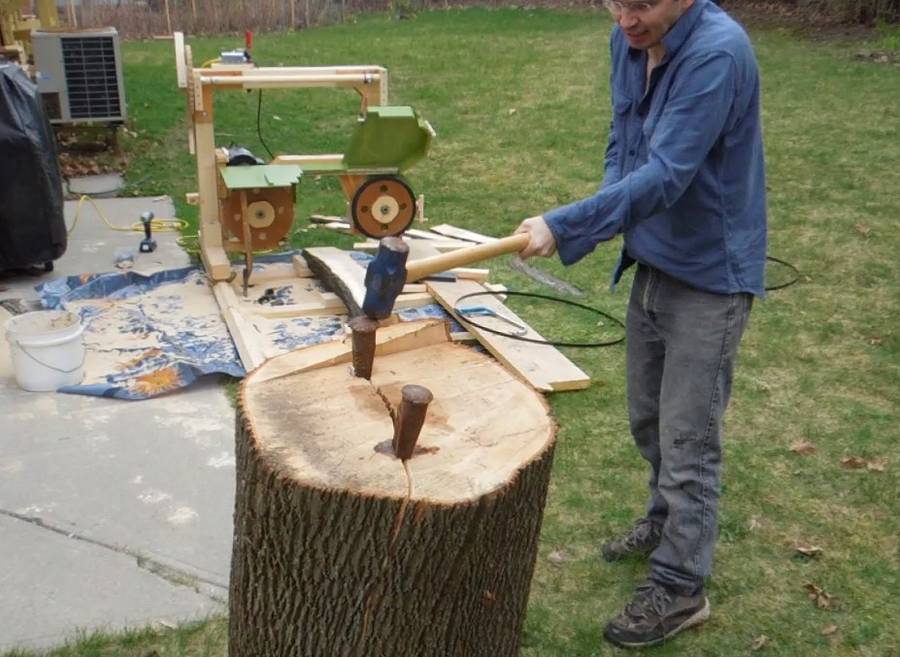
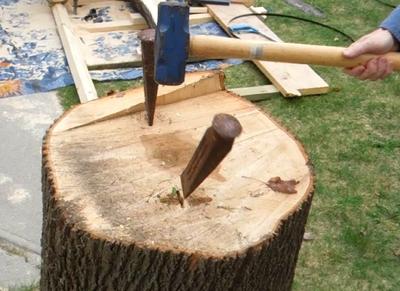 I decided to quarter the log by splitting it. Working with two wedges,
I have pretty good control over where the split line goes.
I decided to quarter the log by splitting it. Working with two wedges,
I have pretty good control over where the split line goes.
But splitting that log was very tiring. I had placed the nearer of the two wedges into a slightly rotten section of log, and the wood there was very slippery. That, in turn, caused the wedge to keep bouncing out of the log, and even after I got it to stick, it just kept recoiling back to the same spot after each blow. I didn't realize this at the time I was pounding on it, but watching the video, I could see that pounding the one wedge made no progress for the most part.
But I did get the log apart eventually!
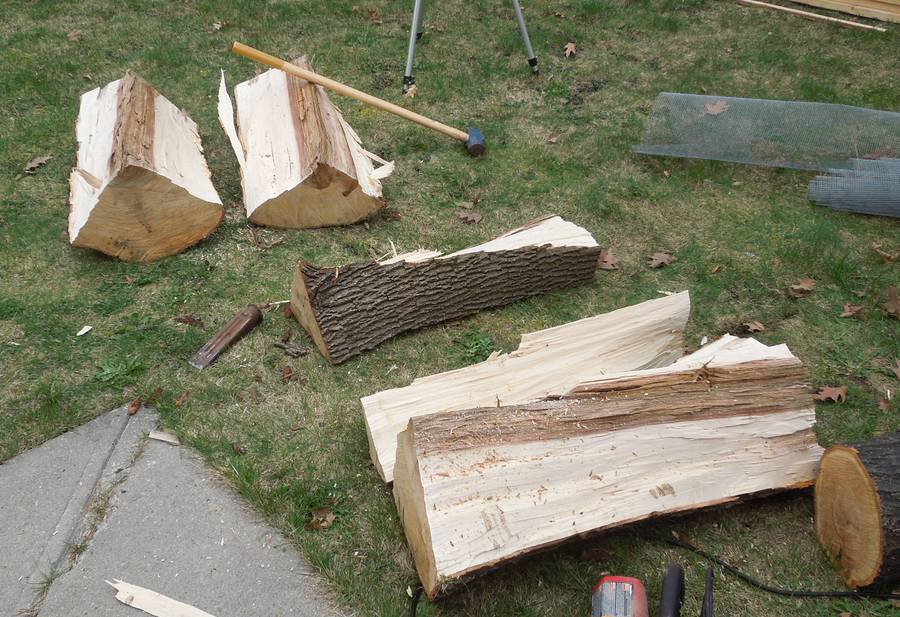 The way that log split apart, it was apparent that the grain had some twist to it.
But with it quartered like that, I could just orient the sections to mostly follow the twist.
The way that log split apart, it was apparent that the grain had some twist to it.
But with it quartered like that, I could just orient the sections to mostly follow the twist.
 Having split the log into quarters, I figured I might as well cut the pieces in such a way
that the biggest pieces would have the grain oriented like it was quarter sawn.
Having split the log into quarters, I figured I might as well cut the pieces in such a way
that the biggest pieces would have the grain oriented like it was quarter sawn.
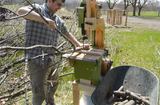
But this required supporting the piece in a rather precarious way on the mill. I was concerned that I might have a minor accident and damage the mill. But then again, having built it, there's nothing on that saw that I can't fix. As for myself - I kept out of harm's way.
 Eventually, the blade needed sharpening. I find that backing the mill off the log,
raising it up all the way, and then sitting on the log made for a comfortable
working position.
And with fewer teeth on the coarser blades, sharpening in place doesn't take
as long as changing blades.
Eventually, the blade needed sharpening. I find that backing the mill off the log,
raising it up all the way, and then sitting on the log made for a comfortable
working position.
And with fewer teeth on the coarser blades, sharpening in place doesn't take
as long as changing blades.
But I found that a sharper blade had more of a tendency to really catch in the wood, so I was running into more problems with oscillations with the saw.
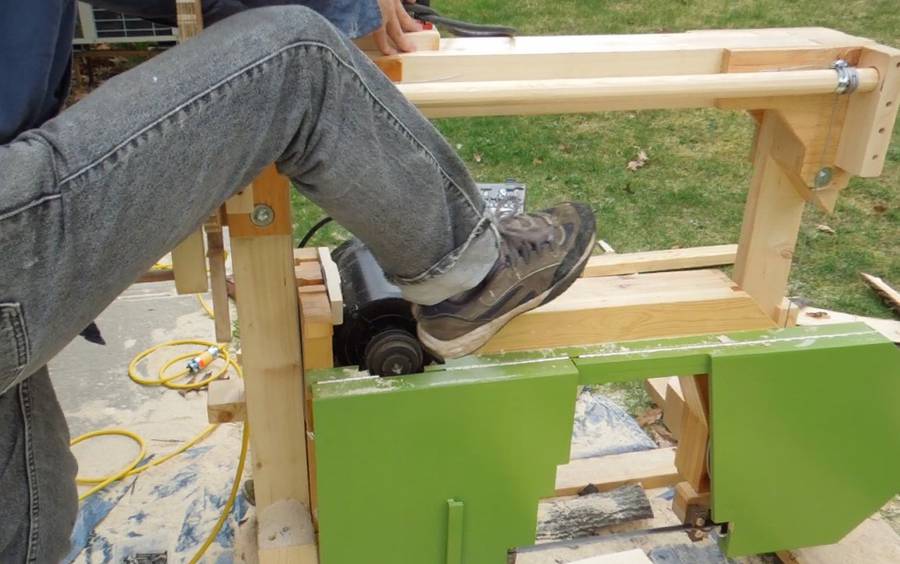 The next problem was that the centrifugal starter switch on the motor
stopped working. Without the starter engaging,
a single phase induction motor lacks that initial
rotational kick that tells it which way to go, so it won't start on its own.
The motor can still be started if you spin it up a little before turning it on.
So I tried starting it by kicking the pulley as I turned it on,
but I couldn't get it to turn fast enough to start.
so I resorted to an even more unsafe method. I opened the top cover and spun the
wheel up by hand before turning it on. My only "safety" precaution was that I used a
stick instead of putting my fingers directly in one of the holes on the wheel.
The next problem was that the centrifugal starter switch on the motor
stopped working. Without the starter engaging,
a single phase induction motor lacks that initial
rotational kick that tells it which way to go, so it won't start on its own.
The motor can still be started if you spin it up a little before turning it on.
So I tried starting it by kicking the pulley as I turned it on,
but I couldn't get it to turn fast enough to start.
so I resorted to an even more unsafe method. I opened the top cover and spun the
wheel up by hand before turning it on. My only "safety" precaution was that I used a
stick instead of putting my fingers directly in one of the holes on the wheel.
Part of the problem is that the motor is an "open" style motor that pulls air through it for cooling, and that it pulls air in near the pulley. This means it also pulls airborne dust through the motor. With the previous motor, I added a shield, but I didn't intend to leave this motor on the saw, so I didn't bother with this one. I think some of the sawdust got between the internal starter switch contacts.
 I was nearly done milling at this point,
so I just left it running between cuts as I finished up.
I was nearly done milling at this point,
so I just left it running between cuts as I finished up.
I took this picture after cutting the last piece. The two pieces of 2x4, with the block screwed on the left side worked quite well for holding the log in place. I realized later that these could be extended to push up against the main guide rail at left, and hook over each side of the 2x4, which would make screwing them down unnecessary.
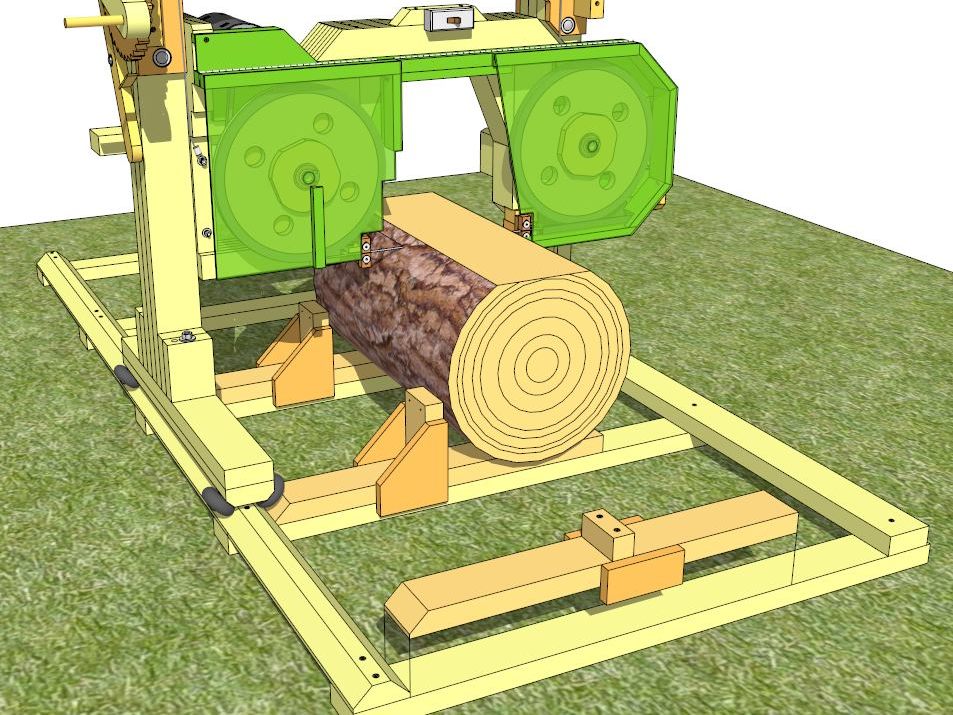 People sometimes ask whether I have a design for a system to hold he logs.
Previously I just rested the log on the ground, and once the block was squared up,
let it push up against the lower blade guide.
People sometimes ask whether I have a design for a system to hold he logs.
Previously I just rested the log on the ground, and once the block was squared up,
let it push up against the lower blade guide.
But the log holders screwed onto the rails worked well. I later had the idea that I could make log holders that hook over the cross pieces and push up against the beveled rail, so I wouldn't need to screw them down every time. Here's a picture of the design I came up with, now part of the plans. The picture shows two log holders holding the log, and a low profile holder at the front, two of which are meant to be used on a log that has been squared as it's been cut to boards.
I tested these, and they hold the slog securely, though vibration can still be a problem.
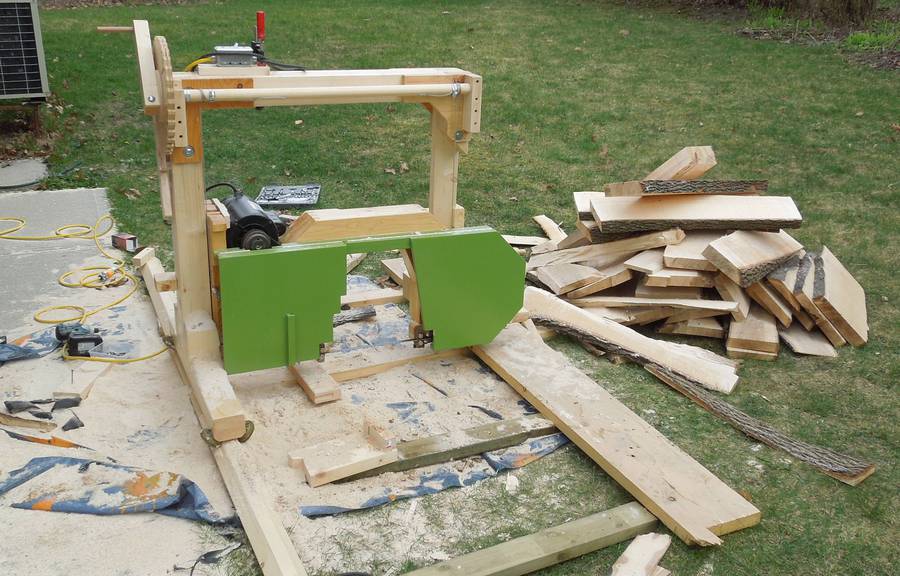 Here's the pile of lumber I cut with the saw.
 Starting to take it down. The 2 HP motor on the saw head is a fair bit heavier than the
1 HP motor I had used last time.
Starting to take it down. The 2 HP motor on the saw head is a fair bit heavier than the
1 HP motor I had used last time.
 I have some ideas for how to build a better, more heavy duty sawmill.
This one is really quite light duty, but the advantage is that it dismantles
to almost nothing. And I can't think of a
way to improve the saw without sacrificing this aspect.
I really don't need that much of a sawmill, so
I think I'll live with the weaknesses of this one.
I have some ideas for how to build a better, more heavy duty sawmill.
This one is really quite light duty, but the advantage is that it dismantles
to almost nothing. And I can't think of a
way to improve the saw without sacrificing this aspect.
I really don't need that much of a sawmill, so
I think I'll live with the weaknesses of this one.
The bandsaw / mill head part works just fine, but I should build a much heavier and stiffer frame for passing it over the log.
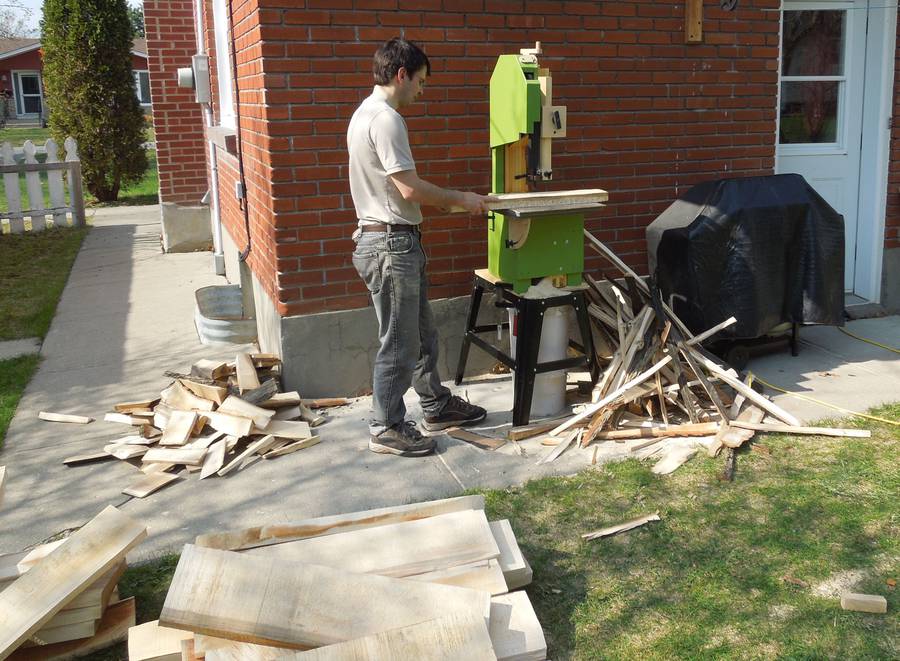 Since I already had the bandsaw in my backyard, I set it up
as a conventional bandsaw and used it to cut the scraps into firewood and
square up the tree edges on my pieces of wood.
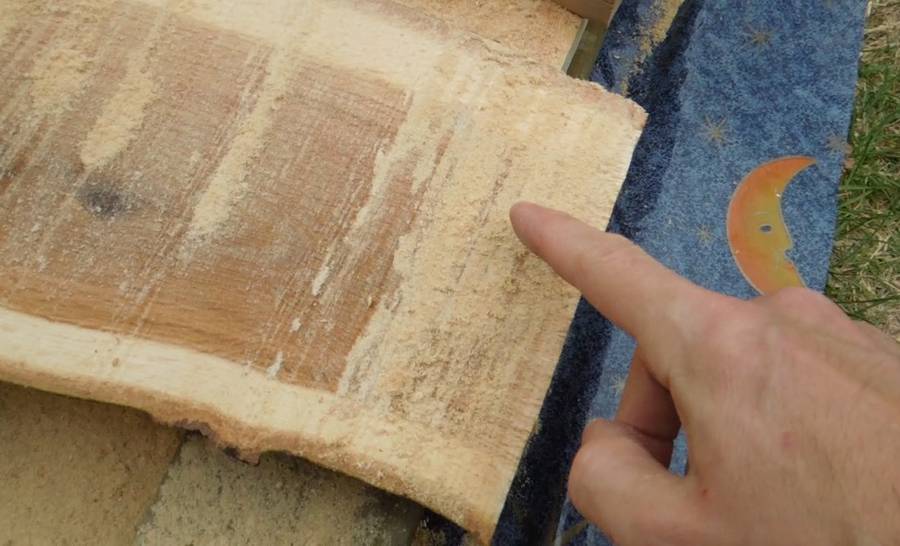
Wood worms lay their eggs in bark, so it's important to remove all the bark to
prevent worms.
Since I already had the bandsaw in my backyard, I set it up
as a conventional bandsaw and used it to cut the scraps into firewood and
square up the tree edges on my pieces of wood.
Wood worms lay their eggs in bark, so it's important to remove all the bark to
prevent worms.
Some years later, I also used this bandsaw to
make some firewood
 All in all, a good quantity of lumber came out of those logs.
I cut it all into slabs about 4 cm (1.5") or thicker. I can often scavenge hardwood boards
up to 19 mm (3/4") thick here and there, so it makes sense to mill thicker sizes that are harder
to get. And I could always resaw these to boards if I need to.
All in all, a good quantity of lumber came out of those logs.
I cut it all into slabs about 4 cm (1.5") or thicker. I can often scavenge hardwood boards
up to 19 mm (3/4") thick here and there, so it makes sense to mill thicker sizes that are harder
to get. And I could always resaw these to boards if I need to.
 Making firewood with the bandsaw (video)
 More sawmilling
 Chainsaw milling experiment
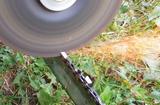 Chainsaw sharpening
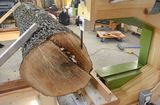 Bandsaw-on-a-dolly sawmill
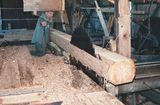 My dad's old sawmill
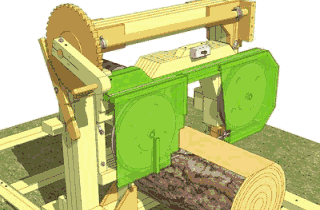 Bandsaw / sawmill plans