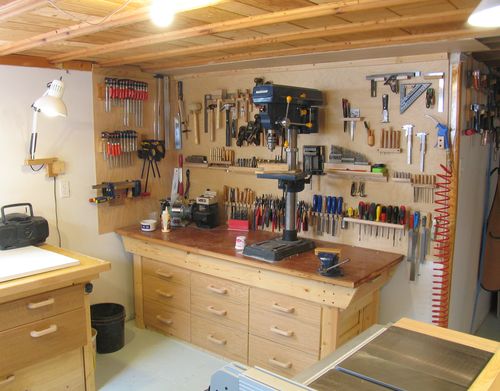
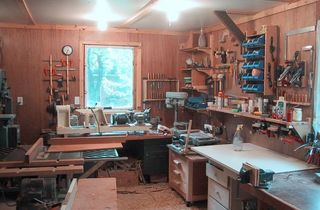
 This is the workbench where I keep a lot of my hand tools on some wall
tool holders that I made. That way, I don't
have to open drawers to reach the tools I use most frequently.
This is the workbench where I keep a lot of my hand tools on some wall
tool holders that I made. That way, I don't
have to open drawers to reach the tools I use most frequently.
In 2007, I moved to a different city. So, I needed to set up a new workshop at my new place. My old workshop was in a garage, but this time, I put the workshop in the basement. Initially, I figured this would be an interim measure until I could build a building for the workshop. But with the harsher Ottawa climate, I realized that having a basement workshop does have the advantage that I don't have to heat it up before going in there. This means that it's worth going in there for just 20 minutes of tinkering here and there, even in the winter.
I was initially worried about getting dust all over the house, but with the workshop at the opposite end of the basement as the stairs, I find that airborne dust doesn't really make it up into the rest of the house. A bigger problem was tracking sawdust and shavings on my shoes into the house. A piece of old carpeting at the base of the stairs solved that problem for the most part, as it tends to rub the dust off my shoes.
This is the workbench where I keep a lot of my hand tools on some wall
tool holders that I made. That way, I don't
have to open drawers to reach the tools I use most frequently.
The drill press is a tool I use an awful lot, and the most frequently used drills are nearest to the drill press. Other, less frequently used tools are in the workbench drawers right under the workbench.
You can see the spiral compressor hose to the right of the tools. I keep my compressor in the laundry room, and pass the hose over the walls. I don't have any air tools in my workshop, and primarily use the compressor to blow dust off of things. It's also very handy to blow the dust off my pants and jacket before leaving the shop.
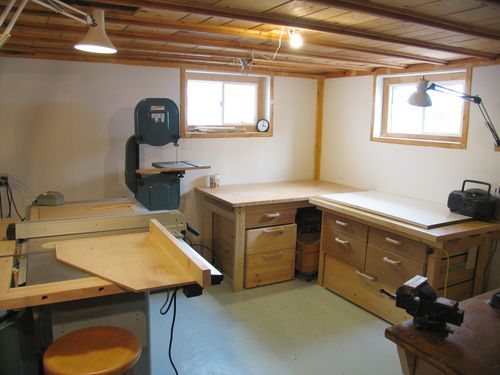
 Right across from the workbench seen above are two more workbenches.
The one on the left is based on my simple table design,
and the one on the right is another design.
These are used to put together projects, as well as to generally hold tools
that I haven't put away. They both end up getting quite cluttered during any project
Right across from the workbench seen above are two more workbenches.
The one on the left is based on my simple table design,
and the one on the right is another design.
These are used to put together projects, as well as to generally hold tools
that I haven't put away. They both end up getting quite cluttered during any project
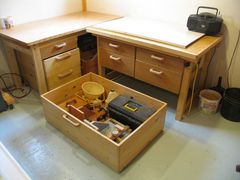
The bottommost drawers under both of these workbenches are actually drawers rolling on rollerblade wheels, very similar my under bed drawers. The large one at right is especially handy for holding bulky items. It's sturdy enough for me to stand in the middle of it.
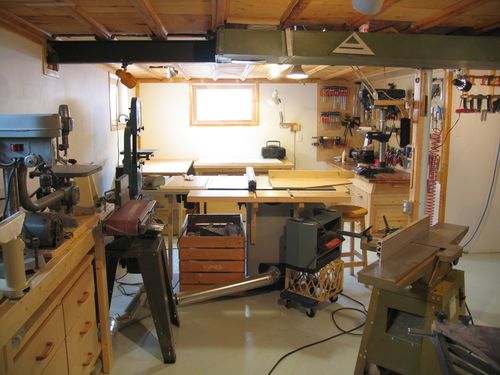
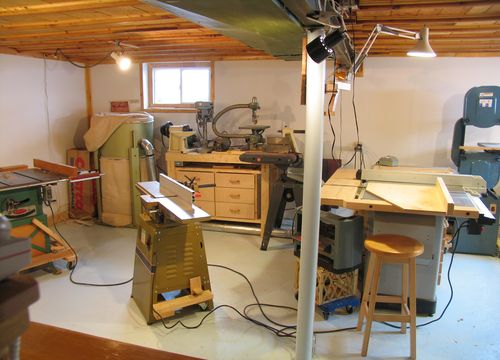
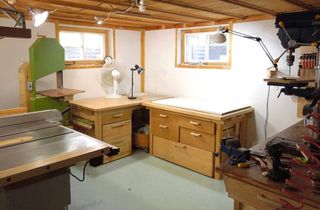
This is the area where I spend most of my time in the workshop. The bandsaw is also near there, as I use it quite frequently too. It's up against the wall, and for those times that I need to cut long pieces on it, I just pull it towards the middle of the room. It's on a mobile base, so this is easy to do.
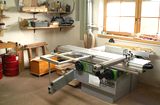
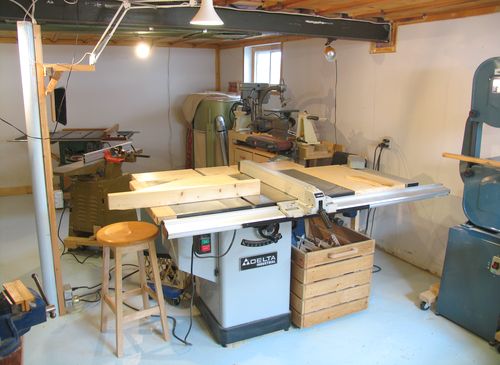 Facing the workbenches is my Delta hybrid table saw
Under the right side of the saw is a bin for scrap wood. It has some rollers on the bottom, so I can pull it out by the handle. I picked that box out of the trash, and it needed only minor modifications for this application. It's handy to have a scrap wood container near the table saw and band saw, because that's where I make the most scrap wood.
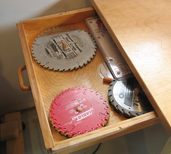
The side of the workbench nearest the table saw has a shallow drawer on the left end of it, pulling out towards the band saw. That drawer is dedicated to circular saw blades. It's a recycled wooden desk drawer, with some pieces of 5/8" dowel attached to the bottom of it, to keep the sawblades in place.
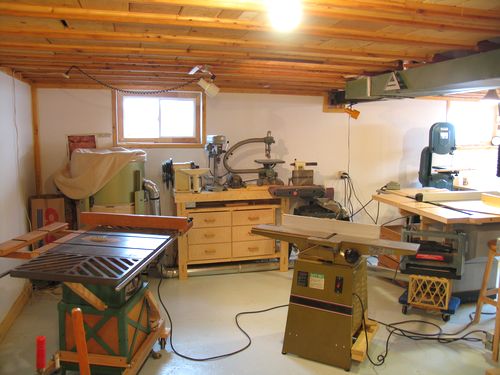
 This view is from the back of the shop, towards the area where my workbenches are.
You can't see much of the table saw. In front of it is my cheap thickness planer on a milk crate on a dolly. I should build a better mobile base for it, but this planer is hardly worth the effort.
Behind the planer, you can see a stool partially pushed under the saw table. Sometimes, when I need to work on something really fiddly, or just get stuck and need to think for a while, it's handy to sit on. It's also handy for propping things up some times. Most other times though, the stool is partly under the table saw.
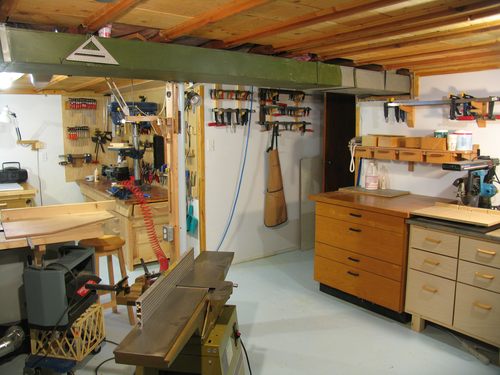
 This view is towards the entrance of the workshop. I have a whole lot of bar clamps
on racks right near the entrance. Running down between the clamps is the blue air hose,
which connects to the red spiral air hose. With the hose coming in from
over the ceiling like that, and the spiral hose, I can reach most of the workshop
with the air hose nozzle.
This view is towards the entrance of the workshop. I have a whole lot of bar clamps
on racks right near the entrance. Running down between the clamps is the blue air hose,
which connects to the red spiral air hose. With the hose coming in from
over the ceiling like that, and the spiral hose, I can reach most of the workshop
with the air hose nozzle.
You can also very prominently see the heating air duct on the ceiling. It's nearly 6' under the air duct, so there's no danger of me hitting my head against it.
I don't have any openings from the duct into my workshop, but I find that the heat radiated off the duct gives off quite a bit of warmth already - enough to keep the workshop at a comfortable temperature even when it's -20°C outside.
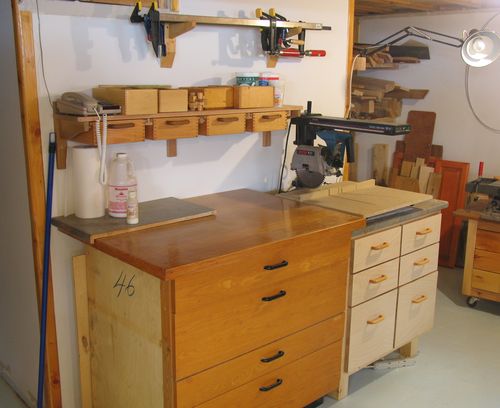 This is the area just next to the entrance. The big piece of furniture
on the left was a piece of lab furniture I bought at a surplus sale. The top
came from some strange desk that I picked up off the curb. It's a bit deeper than
the drawer unit, so there is room behind it for small sheet goods.
This is the area just next to the entrance. The big piece of furniture
on the left was a piece of lab furniture I bought at a surplus sale. The top
came from some strange desk that I picked up off the curb. It's a bit deeper than
the drawer unit, so there is room behind it for small sheet goods.
To the right of this is a dresser that I built to use as a radial arm saw stand. The drawers are all recycled 1970's desk drawers that I refaced. Above it is a Shelf with drawers, which holds miscellaneous machine screws and unsorted wood screws.
I hardly ever use the radial arm saw - it's just not accurate enough for any serious woodworking. Miter saws are better, but still not rigid enough for me to use them for finishing cuts. I tend to rely on my table saw sled for accurate crosscuts.
 This view is from the entrance, towards the back of the workshop. Towards the
middle you can see a steel post, which holds up an I-beam that supports my house.
That post can really get in the way when trying to cut large pieces of plywood on
my table saw. But I also mounted several electrical outlets, tool hooks, and a
swing arm lamp on it, so the post does have its uses.
This view is from the entrance, towards the back of the workshop. Towards the
middle you can see a steel post, which holds up an I-beam that supports my house.
That post can really get in the way when trying to cut large pieces of plywood on
my table saw. But I also mounted several electrical outlets, tool hooks, and a
swing arm lamp on it, so the post does have its uses.
To the left of it, you can see my jointer on a mobile base. The jointer moves around a little from time to time, though it's always in that general vicinity. The mobile base is primarily handy to roll it out of the way when sweeping up, or to make room when assembling something large in the area in the back of the shop.
 This view is taken from just left of the previous photograph.
You can see my old table saw on the left.
It's on a mobile base. I mostly use
my old saw if I need to make a quick cut and have something else set up on my
main table saw. Though sometimes, if I need to be able to walk around what I'm
putting together, I put a piece of plywood on it, and use that saw as an
assembly table.
This view is taken from just left of the previous photograph.
You can see my old table saw on the left.
It's on a mobile base. I mostly use
my old saw if I need to make a quick cut and have something else set up on my
main table saw. Though sometimes, if I need to be able to walk around what I'm
putting together, I put a piece of plywood on it, and use that saw as an
assembly table.
Way in the back corner you can see my dust extractor. It's a relatively large unit with the blower actually inside the main housing. I think it's a very good design, as it doesn't take up too much floor space for the size of its bags. I use ordinary duct work to connect it to the table saw and belt sander. These tight elbows are not ideal for the job, but they are cheap and work well enough, even though the dust extractor only has a 3/4 horse power motor on it. I only use the dust extractor to suck up dust from the table saw and belt sanders. I find that planers and band saw don't make much fine airborne dust, so I just sweep it up from time to time. With primarily table saw sawdust going into the dust extractor, it's good for about a year before it needs emptying.
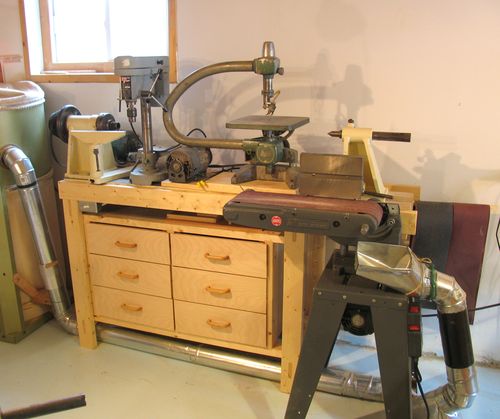 This photo shows my lathe stand. I rarely
use the lathe. But with a flat bed on the lathe, it's a handy place to keep rarely
used machines. Under the lathe I have a
set of drawers. Really, the whole lathe
is more storage than anything else.
This photo shows my lathe stand. I rarely
use the lathe. But with a flat bed on the lathe, it's a handy place to keep rarely
used machines. Under the lathe I have a
set of drawers. Really, the whole lathe
is more storage than anything else.
In front of the lathe is my belt sander. It's a slightly odd shaped piece of equipment, and is actually a ShopSmith accessory on its own base. I find it's nearly impossible to set the tracking on it to keep the belt from wandering into one side or the other. But overall, it's a handy tool to have.
I have a duct ending by the belt sander to suck up some of the dust. There's no blast gate on this duct, and I just use a 1 liter Yoghurt container that fits perfectly into the end of the 4" duct to close it off when I'm not using the sander.
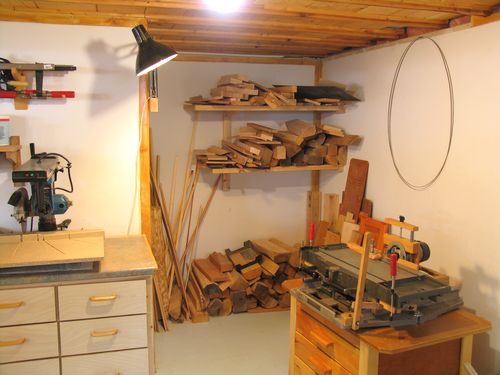 This is another corner of my workshop. Immediately behind the radial arm saw is
a sort of "walk in closet", which was already there when I bought the house. I
use it to store jigs and such. In the corner, I have pieces of
planed firewood stacked on the floor, and more firewood on some shelves
on the wall.
This is another corner of my workshop. Immediately behind the radial arm saw is
a sort of "walk in closet", which was already there when I bought the house. I
use it to store jigs and such. In the corner, I have pieces of
planed firewood stacked on the floor, and more firewood on some shelves
on the wall.
 To the right of this you can see my home made
mortising machine. I mostly use mortise
and tenon joints for the stuff I build.
To the right of this you can see my home made
mortising machine. I mostly use mortise
and tenon joints for the stuff I build.
The photos were taken in early 2009. As of May 2010, I have
demolished that closet
to make a bit more room. I turned the mortising machine into a
horizontal boring machine after I built
a separate slot mortising machine
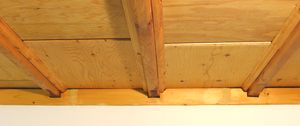
I should also point out the novel design of the ceiling in my workshop. My house is a bungalow from the 1950s, with a relatively low basement ceiling. The way the ceiling is done is that somebody planed and routed the bottom edges of the joists, and then attached molding to either side, and put plywood panels in between. It must have been very labour intensive, but the result is that most of the ceiling is about 2 cm higher up than the bottom edge of the joists, so a little bit of height is gained back in the basement. The panels are in loose, so I can still get in there if I need to do some rewiring.
Finally, most of these photos were taken with my workshop very much cleaned up.
I figured this makes for perhaps a bit of an unrealistic impression, so included
some messy photos of my workshop in mid project
Video tour of my workshop (2010) (video shot one year after above article)
See also:
 My old garage workshop
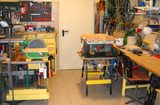 Richard's workshop
 2012 workshop tour
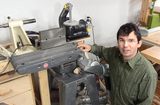 How much the tools cost
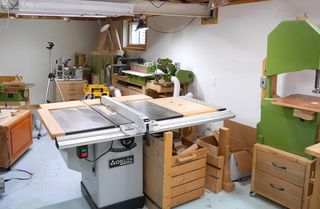 Last tour of my base-
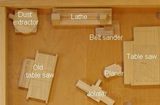
 My dad's workshop
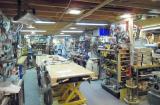
 Alois Schmid's workshop
 Using the workshop
 A real mess in the workshop
 CTV TV shoot